
DIY Budget Bathroom Remodel
I can’t tell you how ready I am to finally share this with you. We finished our bathroom. WE FINALLY FINISHED OUR BATHROOM! I had all intentions of making this statement in May, at the end of Calling it Home’s One Room Challenge, but we had a couple of hiccups (that actually ended up saving us quite a bit of money, thank goodness) that stretched the remodel out for four more months. Let’s not wait any longer, here is our new bathroom!
Should I show you what it looked like before?

If you’re interested in all the nitty gritty details of the space to begin with and the steps in the remodel, you can check out all of the remodeling process here. To keep it short and simple, almost the whole space was gutted – shower, tiles, vanity, bottom half of the wall, and toilet. We replaced everything on a tight budget.
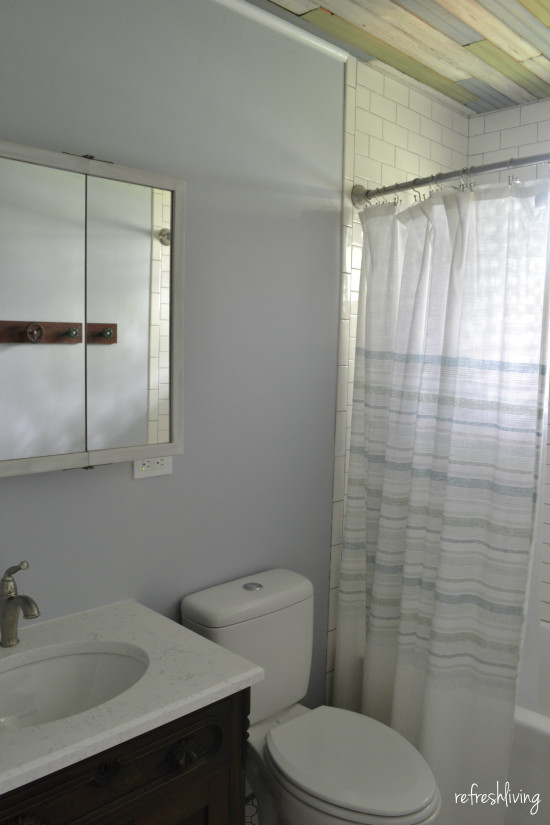
We moved around the plumbing and then installed the bathtub and tile. I chose white ceramic subway tile primarily because it is cheap, but I also liked the clean look it gave the room, especially with my ideas for such a colorful ceiling.
I stood firm on the light gray grout for the wall and floor tile, even though my dad thought I was crazy. I must say, I started to regret my decision after it was installed. My dad and husband said it resembled an insane asylum, and I found myself agreeing with them. Thankfully, once the ceiling was installed, it changed the whole look of the space.
The only thing I knew I wanted in this space was an antique bead board ceiling. This wood came from an old milk barn in Wisconsin. I love it. It might be my favorite thing in the whole house. If you want to put some old wood on your ceiling, too, read this post on how I installed the beadboard on the ceiling.
Now, it wasn’t the plumbing, tile install, or ceiling that held up this bathroom remodel. Everything in the space was completed by the end of spring, except for that vanity.
My dad found this antique washstand in an empty apartment that had been used as a sink, and as soon as I laid eyes on it, I told him that was going to be our vanity at our cottage. The sink that was in it was rectangular and the faucet was on the side, because washstands are fairly narrow in depth. We had ideas of how we could retrofit it to fit a countertop and add some space to the back of it so a standard sink would fit.
I found a slab of quartz countertop (but it looks just like marble) at my local ReStore for $20 and an under-mount sink for $10. It was just big enough to fit the washstand; we didn’t have an extra inch. It was unfinished and chipped on one side, so we made a template and brought it to a local countertop shop, who quoted us at $175 to finish the stone and attach the sink. $205 for a complete vanity sounded perfect!
Long story short, that piece of stone sat at the countertop shop for five months. To give them credit, we did tell them not to rush on it, since it was a small side job. After a lost template, a lost phone number, a few questions about our “vanity”, we finally got our finished slab. Because it took them so long, they wouldn’t accept our payment. We were shocked, because although it had taken so long, we understood, and we weren’t upset about it. I told you we have been remodeling on a tight budget, so our patience with this vanity top saved us a lot of money, which I am very grateful for.
We stripped down the finish and stained the washstand in an ebony color. My dad cut out the drawer so the sink would fit, added a panel to the back because the washstand needed to stand about 6 inches out from the wall, and added cleats to the wall for the back of the countertop to sit on top of. (Although I was completely willing to take this on myself, my dad was pretty excited about this project, so I let him work his magic.)
I added my vintage faucet towel rack to help us corral all those extra towels when guests stay with us.
I saved more money by painting our old medicine cabinet. I really don’t love the look of it, and when I find an antique medicine cabinet with a mirror, I’ll probably replace it, but for now, I have a virtually free (and still sturdy) medicine cabinet.
I told you our budget was tight. Would you believe me if I told you we renovated everything for under $1,000?!? Here’s the breakdown:
- Bathtub (acrylic) – $150
- Toilet – $90
- Countertop & sink – $30
- Faucet (on clearance!) – $55
- Bathtub faucet fixtures – $95
- Subway ceramic tile – $135 (900 tiles @ $0.15 per tile)
- Mosaic floor tile – $65 (25 sq. feet @ $2.57 per sq. foot)
- Grout & mortar – $50
- Cement board, plywood, drywall, misc. – $75
- Antique bead board – $80
- Paint & stain (wall paint, milk paint for ceiling, vanity stain) – $30
- Ceiling light and vent fan – $95
- Towel rack – $10
- Electrical outlets and wiring – $15
The grand total? $975. Our original budget was $1,500. If you added in the countertop cost that wasn’t charged to us, we would still have come in under budget at $1,150.
A full bathroom remodel for under $1,000? I’ll take it, and I’ll give myself and my dad two big pats on the backs.
We’re changing everything in our little lake house cottage. Feel free to take a tour:
Post by Jenny Leads
Jenny is the voice behind Refresh Living. She has a passion for helping people to create a home they love without spending a lot of money.
I am completely loving on that ceiling! Great idea and everything looks amazing 🙂
Thank you so much, LZ!
Such a beautiful bathroom! The ceiling definitely makes the room! Look forward to the post on that. 🙂
Thanks, Audra! I will say that the ceiling is my favorite part of the room, and it wasn’t even all that difficult.
Wow! What a transformation! Thanks so much for sharing your beautiful bathroom remodel at the Vintage Inspiration Party!
Thanks so much for the opportunity to share fun vintage/reclaimed pieces at your party every week! Thanks for stopping by and our kind words.
Jenny, your bathroom looks fantastic! That sink is my favorite along with the bead board ceiling. Great gob girl:).
Thanks, Tara – I love the sink as well, especially considering that whole set up only cost me $30!
Great Job Jenny! Thant ceiling is stunning! I love the your color choices too! Thank you for sharing!!
Cat
Thanks so much, Cat! I’m so, so glad to have it done!
Wow! I love love love that vanity — worth the wait and you earned the discount! 🙂
Thanks, buddy! I definitely wasn’t expecting full price discount, but you’re right, the discount was earned.
Love the before and after, that ceiling is great! Great project!
Lovin that ceiling!! Thanks for linking up to Merry Monday! Sharing on my G+ ! Have a great week!
Kim
Thanks for sharing, Kim!
Love the bathroom re-do! And I love how you were able to do it thoughtfully and inexpensively 🙂 Just my kind of remodel 🙂 Lovely, lovely job. Hugs, Lisa
Thanks so much, Lisa. Renovating on a budget is my idea of a good time!
LOVE, LOVE, LOVE it! That is so awesome that the company you worked with comped you the countertop; they probably did because you were so understanding about it. If we re-do my mom’s bathroom I am definitely going to be getting a lot of inspiration from this post 🙂
Thanks, Sydney! You’re right, I think sometimes being understanding is the best way to go. I’m glad you like the space and might take some inspiration from it!
Great work on the bathroom! What a transformation! Still loving the towel “hooks”- such a great idea!
Thanks, Erin! I love the towel hooks too, mainly because we now have so much more room for all those towels (although I think I need to add a couple more on the back of the door, still)!
Hello cute Friend! What a wonderful project. You have been Pinned, Tweeted and Posted to Facebook!
Hooray! Thanks, I’m heading over to check it out, and to share my newest project!
AH. That floor! The ceiling! It looks so great!
Thanks, Heather. 🙂
I would NEVER guess you only paid $1000 to redo your bathroom. I really need to gut my bathroom and the tub is going to be a large part of my budget. Where did you find a tub for $150?
I actually got it from our big box home improvement store (Menards). It is acrylic, which kept the cost down, and I waited for it to go on sale. I don’t know if you have a ReStore in your area, but I’ve also seen new, nice bathtubs there, but it is totally hit or miss.
Love the ceiling. Does it need to be sealed due to moisture. My husband takes hot showers.
Good question, and one we were debating, too. We ended up not sealing ours because we have a pretty powerful bathroom fan and a window in the shower that is often open. Because of this, we really don’t get much condensation in this bathroom at all. If this wasn’t the case, I would definitely seal it with a clear polyacrylic or something to keep out the moisture!
Did you install the bathtub and tile yourself? I’m planning a bathroom remodel and I found the biggest expense is just labor.
Yes, you are so right about the labor being a major cost! My dad installed the tub, because I’d never trust myself to do that, but I installed the tile. It definitely helps us keep our project budgets low that my dad knows how to do so much.
The after looks great! I can’t believe you came out that much under budget.
Quartz looks a lot more expensive than it is. We just installed in our kitchen. I’m loving it!
Thanks so much! Yes, I agree; I’m a huge fan of quartz.