Update to a Nursery Dresser and Changing Table
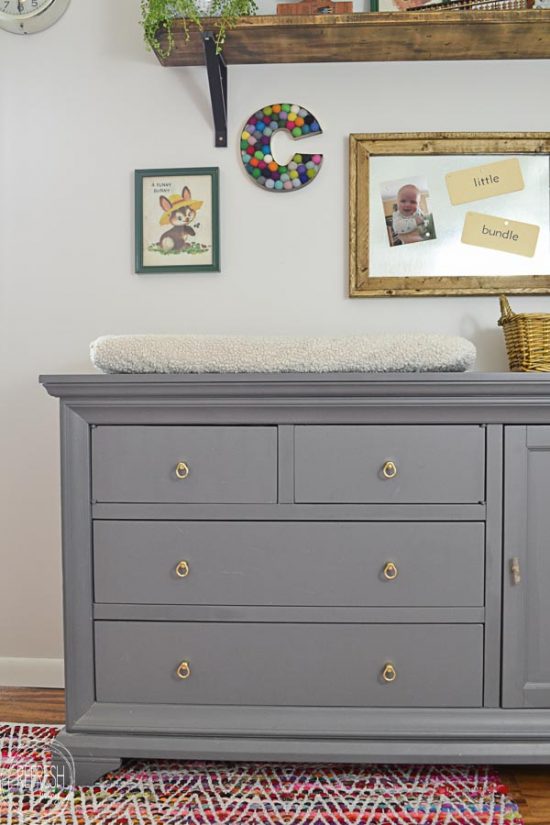
A dresser can easily be made into a changing table by adding a changing mat to the top and securing it with heavy duty velcro so the pad stays in place. This dark, cherry colored dresser was given a makeover and it now a gray changing table dresser perfect for a neutral nursery.

When we had our first child five years ago, we bought a floor model dresser from a department store to save some money. Although it’s very sturdy, I quickly grew sick of it and knew I wanted to paint it, but waited years and years before making my move. When I finally decorated the nursery for my third little girl as a vintage schoolroom, I knew the dresser needed a face lift as well.
So, approximately four days before giving birth, I finally painted that dresser (gotta love that nesting energy)!


The surface of the dresser was a shiny, cherry colored finish. To make sure that the paint adhered well to the surface, I lightly sanded it with 220 grit sandpaper to scuff up the finish. I wrote an entire post about how to prepare furniture before painting. In it, I include information about primers and how to clean your piece, as well as the age old question of whether or not to sand before painting.

I used General Finishes Milk Paint in Driftwood to paint this piece. If you’re wondering about the differences between all of the types of paint marketed for painting furniture, you should definitely read this post. In in, I compare four of the main types of furniture paint with the pros and cons of each one.

I always attack dressers one side at a time. I start with painting in the nooks and corners with a paint brush. Then, before that paint begins to dry, I roll on the paint to the flat surfaces with a high density foam roller. After using a roller, it’s important to run a brush along the other side of the corners to catch any drips on the other side.

After it was all painted, I dressed it up with these brass knobs from D. Lawless Hardware.

I chose not to add a top coat to this dresser, because I’ve found that General Finishes paint actually dries to a pretty durable finish. And, to be honest, I was a bit lazy this time around. Giving it a topcoat will add extra durability and help it to be easily wiped down if something spills on it. If I decided to get ambitious and give this one a topcoat, I would choose this one; it’s my go-to clear acrylic flat finish.

I love how it turned out and am kicking myself for not doing it sooner. Before I started painting furniture, I always looked at it and worried paint would never stick to it because it was such a shiny, glossy finish. Now that I know how to properly prep a piece and the best type of paint to use to paint furniture, this project was easy!

Wondering about how the rest of the nursery turned out? You can see the full vintage classroom room reveal here.

Post by Jenny Leads
Jenny is the voice behind Refresh Living. She has a passion for helping people to create a home they love without spending a lot of money.
Wow, what a transformation! Love how the dresser turned out.
I scoured Pinterest looking for a gray paint to use on our old china cabinet and came across your nursery dresser post. I also read an earlier post related to painting furniture with milk paint. Can you tell me more about the bonding additive you use which will prevent chipping? Is it also a General Finishes product? Thanks so much!
Hi Janice. I’m glad you stumbled upon my blog – I LOVE talking painted furniture! The additive I’ve used with Milk Paint is a Miss Mustard Seed product. Here’s the weird thing though. General Finishes makes “Milk Paint” which is what I used on this dresser, but it’s not actually true milk paint, it’s actually acrylic. (Confusing, right?) Now, maybe you already knew this, but basically you won’t need to add anything to General FInishes Milk Paint for it to adhere. I usually just scuff up the surface with 150 or 220 sandpaper and then paint it. GF Milk Paint sticks to furniture surfaces really well. True milk paint (Miss Mustard Seed and Old Fashioned Milk Paint Company are two brands I use and like), comes in a powdered form that you mix with water. This paint will chip if you don’t add the additive. I don’t know if you happened to see my post on comparing types of furniture paint, but I think it might be helpful for you. I tried to spill everything I know about types of furniture paint there!
Can you please share the colour! Thank you
Yes, it’s Driftwood by General Finishes. Although it’s a specialty paint, it’s definitely my favorite (and well worth it) for painting furniture!
Could you share what you use to apply the flat finish? Also a high density foam roller?
Hi! Yes, I usually use a foam roller and a paintbrush. I’ve found acrylic flat finishes level really well, so brush marks won’t be seen once it dries.