
Pantry Labels on Glass Jars (free pantry label printables)
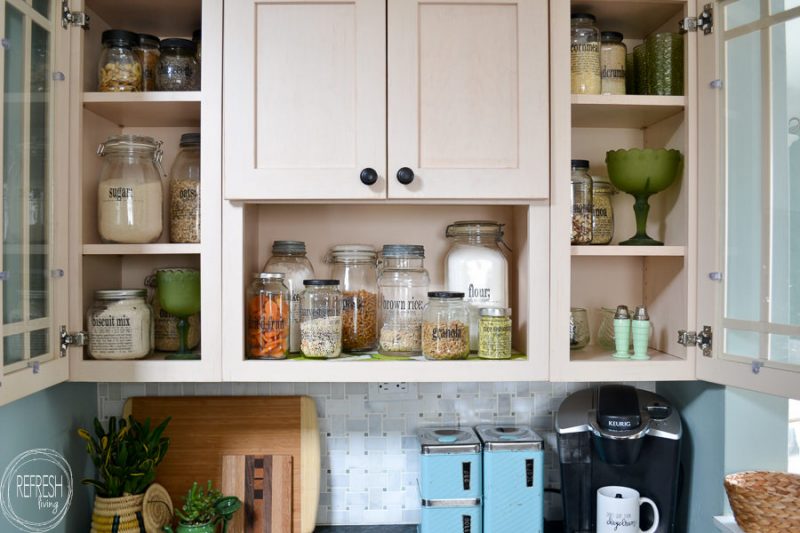
Organize a small pantry with reused glass jars
Use these free pantry labels and attach them to glass jars by making your own DIY glass jar stickers. This is an easy DIY project that will help to create an organized, pretty, and functional pantry, all in one! This pantry organization project is virtually free and allows you to store a ton of dried food and homemade mixes.
In This post You’ll find:
Pantry labels are a great way to stay organized and make your pantry functional AND pretty! Using glass jars as pantry storage is a beautiful way to organize your pantry. Instead of buying premade labels, I made my own clear sticker labels for glass jars out of packing tape. These labels have held up for 5 years – even through occasionally hand washing.
I have this thing for glass jars and struggle with throwing them in the recycling bin. Vintage glass jars, canning jars, old food jars – I’m not picky. I have a large stash of jars in my basement and always end up finding a use for them. This pantry organization project is a great way to reuse a lot of old glass jars, but I’ve also reused them as DIY bathroom storage from glass jars and for making Christmas decor from glass jars as well.
Let me be honest with you. My pantry was a disaster. I stuffed all of my dried goods on the top shelf, and stuff was falling onto my head (or the kids’ heads) every time the door was opened. (Take a look at my video later in the post to see what I’m talking about.) I’ve been saving up large glass food jars from applesauce, pasta sauce, and pickles, as well as snagging up large glass jars when I stumbled on them at thrift stores and flea markets.

First, you’ll need to clean your glass jars, and remove any labels. Here’s the process I use on how to easily remove labels from glass jars.
After all the glass jars are cleaned, I chose to spray paint some of the lids so the images and printing weren’t visible. I ended up combining old glass jars (black lids) with some vintage canning jars and a few new pantry jars from IKEA as well.
If you’re looking to organize your pantry and keep track of what you have and what you need to buy, these food inventory printables would be great!
I’ve seen quite a few versions of free pantry label printables out there, and while they are pretty, I couldn’t find any that also included directions on how to make the dried food. You see, I have an awful memory, especially when it comes to numbers. After dumping the product into the jar, I’d throw away the packaging, with the directions. Every time I’d go to make the item, or replenish the mix, I’d have to look up the recipe. Again, and again and again. Now, I have labels with directions for how to make four types of oats, quinoa, rice, beans, and many more dried good staples!
I also love making homemade mixes – like pancake mix, bisquick mix, and rice seasoning. The free pantry labels I made include the instructions for how to make it or use it in recipes AND the ingredients needed to make the mix. Now that I have these labels on all of my jars, I feel as if I just shaved hours off the rest of my life trying to relook up these recipes and directions.
Download the Printable Pantry Labels
Become an email subscriber and instantly download over 30 pantry labels. Plus, gain access to the free graphics library, exclusively for subscribers, where I add any new designs I create.
If you’d like your own copy of these labels, please just sign up for my mailing list. I’ll send you an email about once every other week and share my latest upcycled or DIY projects, refinished pieces of furniture, or budget decorating tips. As an email subscriber, you’ll gain access to my free graphics library and hear about giveaways that I only offer to my email followers.
How to Make Clear Pantry Labels for Glass Jars
This post contains affiliate links. You can read my full disclosures here.
Supplies to Make Clear Labels
- 2 inch heavy duty packing tape
- 3 inch heavy duty packing tape
- labels printed with laser printer
- credit card
- rubbing alcohol
- dishwasher safe Mod Podge (optional)
How to Print the Pantry Labels
Once you have your labels downloaded or created, you’ll need to print them with a laser printer. That part is definitely important. An inkjet printer won’t work for this label-making method, only laser printing will cut it. I personally don’t have a laser printer, so I found someone that does and had them print them for me. Or, most copy and office supply stores (Staples, Kinkos, Office Depot) print with laser printers for about a dime per page.
Transfer the Image to the Tape
I would recommend using heavy duty packing tape for this project. It seems to have the best sticking power after the image has been transferred. Most standard packing tape is 2 inches wide (here’s the brand I used with great success), but some of the labels require wider tape in order to fit all the directions onto the label. Thankfully, 3 inch packing tape is also available and worked perfectly for all of the labels I designed.
Basically, you’ll just place the tape over the image and use a credit card to rub on top of the surface, transferring the letters to the tape.
Remove the Paper from the Tape
Then, you’ll put the piece of tape (attached to the paper), into a bowl of water water and let it sit for about 3 minutes. It will curl up right away (that’s okay), and the paper will start to become soft. After at least 3 minutes, gently rub the paper off the back of the tape.
At first, it will feel as if there is no “stick” left to the tape and any amount you rub will take away any of the stickiness. Trust me on this one, you can rub quite a bit, and once it dries, it will still be plenty sticky! Be sure to rub a little extra on the places where there is ink, because this is where I find little bits of paper tend to get stuck.
Attach the Clear Labels to the Jar
After all the paper pieces have been rubbed away, let the pieces of tape air dry, sticky side up. While waiting for the labels to dry, you’ll want to give your glass jars one final cleaning with rubbing alcohol.
Once the labels are dry, just stick them onto your glass jar and fill them up!
If you want your jars to be washable and dishwasher safe, I would recommend applying 2-3 coats of Modge Podge Dishwasher Safe Sealer on top of the labels. Otherwise, these packing tape labels will stay adhered to the jar well, but can be removed if you want to change out the contents of the jar, or even f you decide to use the jar for another purpose. I have a small fear of commitment when it comes to decorating my home, so I chose not to use the ModPodge.
Update: I have been using these jars and labels for 4 years, and the labels have stayed on perfectly. I hand wash the jars every once in awhile if needed, and the labels stay on perfectly! Just be sure not to put the jars in the dishwasher, unless you cover them with the Modge Podge Dishwasher Safe Sealer!
Not only do I love having all my dried foods neatly organized with all the information I need to know right on the label, but I love how the food is now part of the decor. (I painted my kitchen green! Here’s the full space and post on my green kitchen.)
Please feel free to share these FREE pantry printables!
I REALLY love to reuse glass jars – can you tell?
Post by Jenny Leads
Jenny is the voice behind Refresh Living. She has a passion for helping people to create a home they love without spending a lot of money.
This is a great idea! I love jars too! When my family needs a jar for a project or gift and asks me for one I say, yeah you can have one of my jars…but it kind of hurts a little. Lol Thanks for the free printable. Visiting from Our Mini Family Linky Party.
Haha! Too funny – I can understand that twinge of pain. 🙂
Hi! Visiting from the Remodelaholic Link Party 🙂 These labels are so cute! I love the old fashioned look they have. Definitely pinning! 🙂
Thanks so much, Ashley!