
Pop Up Camper Roof Repair and Rebuild
This was a full blown pop up camper roof repair and rebuild. We removed all of the water damaged wood, rebuilt the roof structure and then sealed the seams to prevent future water damage. This post will give you all the details on each of these steps so you can use them to fix your pop-up camper roof as well.
When we purchased our 1993 pop-up camper, I knew there was water damage to the roof. What I didn’t know, however, was how extensive the damage actually was. We were able to rebuild the roof and now have a like-new camper, but the amount of time it took to complete made it quite the project.
After figuring out how bad the damage was on our camper, I searched the internet for videos and posts on how to fix water damaged roofs, and although I found some helpful videos, I struggled finding detailed posts that walked through the process on how to completely rebuild parts of the roof. Hopefully this post will be helpful for others that find themselves overwhelmed by the process of fixing a rotting roof on a camper like I did!
1. Remove the Pop Up Camper Roof
In order to assess the water and structural damage, you’ll want to remove the trim and skin of the roof to access the structure underneath.
Remove the Exterior Trim
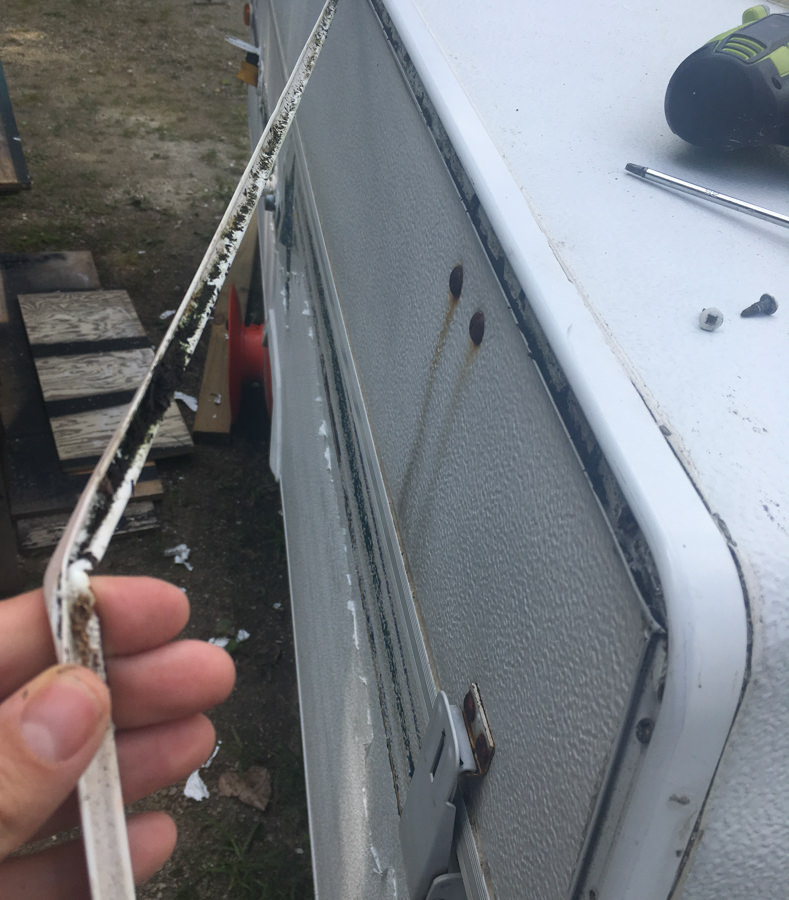
In order to unscrew the trim, the first step is to take out the vinyl trim insert that covers the screws. If your camper looks anything like mine, the vinyl trim is probably cracked, broken, moldy, or all of the above. This trim should just pop out as you pull on it.

Then, it’s time to remove the screws. As I was taking out the screws, this gave me a good idea of where the water damage was on the camper. Some of the screws came out rusted, and in some cases, completely rotted away, which signaled that area of wood was probably rotting away as well.
For the screws that were completed rotted, the screwdriver obviously didn’t have anything to grab on to, so I ended up using a combination of a pry bar, pliers, and some swearing to get the screw pieces out. Update: Although the above method does work, I’ve since found a better way to remove rusted, worn screws. Use a rotary tool or small handheld saw with a metal cutting blade attached. Cut a line through the center of the head of the screw. Then, use a large, flat head screwdriver to turn the screw (with pressure) to remove the screw.
After all of the screws were removed, I used a metal putty knife/scraper to remove all the old, gunky, sticky butyl tape. This process was tedious, to say the least. After most of the putty tape was removed, I used mineral spirits and a fine mesh steel wool to remove the excess gunk.
Assess the Water Damage
At this point, you can easily lift up the skin to see the condition of the wood of the roof. As I unscrewed the trim screws, some of our camper roof just started falling apart because the perimeter boards, and some of the top frame, was rotting away.
You can get a better view of the amount of water damage in this video. You can also find all my camper roof videos on my You Tube channel.
2. Detach the Canvas to Remove the Roof
If you find, like we did, that you’ll need to replace a good amount of the wood on your pop up roof, it’s time to detach the canvas and then remove the roof in order to rebuild it. If your water damage is minimal and the wood is still structurally sound, you might be able to skip ahead to the section on Sealing the Camper Roof to Prevent Future Water
First, we unscrewed the canvas from the inside of the camper. Basically, the canvas is attached to metal strips that are then screwed into the sides of the roof. I made sure to take pictures of the brackets around the entire inside perimeter of the roof so when it was time to put everything back together, I had a visual model to help me.
After the canvas was detached, I unscrewed the four lifting brackets from the sides of the roof frame. Ours were attached with bolts and nuts on the inside of the camper, so they were easy to remove. We used 2 x 4s to hold the roof in place while we detached the other lifting brackets.
After everything was disconnected from the main body of the camper, we took off the roof and put it on top of two sawhorses right next to the camper.
For a better look at our deconstructed roof, watch the video below.
3. Remove Rotted and Water-Damaged Wood
In the video above, you probably saw just how rotted away some of the wood on our camper was. This thing had clearly been taking a lot of water for a long time. We opted to completely remove all four sides of our roof, as well as replace the outside edge of 1 x 2″ framing.
At this point, if the water damage is extensive enough, you have the option of completely removing the skin, the foam, and all of the framing lumber and rebuilding it from scratch. (If you need to go this route to rebuild your roof, I’d recommend checking out The Pop Up Princess, and they just rebuilt a pop up camper roof and decided to replace everything.)
The interior frame of our camper roof was built as shown in image below. The original frame was made of 1×2 boards. (Note that our pop up did not have a rooftop air conditioning unit. It yours does, the ceiling frame will most certainly be reinforced with more or thicker wood, especially across the center.
We decided that instead of completely taking apart the entire roof and replacing all the foam and framing, we would just replace the pieces of wood that had taken water and were no longer structurally sound. In the video, I mentioned that we thought we were going to keep some of the 1 x 2″ frame, but instead we decided to just replace all the 1 x 2s along the edge. Thankfully, we didn’t need to replace the interior 1 x 2″ frame, and therefore we could keep the skin and foam attached.
To remove the 1 x 2 pieces that were still attached, I used a small, 4-1/2″ compact circular saw to cut from the bottom right along the edge of the 1 x 2. The only thing that was holding those pieces in place was that the interior ceiling was still attached to them. It’s important to make sure you don’t saw deep enough to go right through the aluminum skin! This will add a lot more work to repair the skin in order to keep out those water leaks.
4. Rebuild the Roof
Supplies Needed to Rebuild Pop Up Roof
- 1″ x 2″ boards (we needed about 30′, but this number will vary)
- 1″ x 8″ x 12′ pine board (cut in half and used for front and back roof sides)
- 1″ x 12″ x 10′ pine boards (2 – one for each side of roof)
- white aluminum sheeting
- contact cement (or other permanent adhesive)
Build (or Repair) the Ceiling Frame
To rebuild the ceiling frame and make it structurally sound, I attached new 1×2 boards (green) to the existing interior ceiling frame (yellow). I used wood glue and screws to attach it all together. I rebuilt this frame when the roof was detached from the camper, sitting on the sawhorses.
Rebuild Pop Up Roof Side Panels
To create an exact size match of the side panels, you can use the old sides as a template. If your old sides are so water damaged that they fall apart into small pieces (like mine did), then use the old aluminum skin that was attached to the old wood as your template.
Our original pop up roof sides were constructed of 1/2″ plywood, which you could definitely use to make your new sides as well. Instead, we decided to use 1″ boards (which are actually 3/4″ thick). Then, to compensate for the difference in thickness, we just used a router to notch away 1/4″ from the ends where the boards would meet. (You could also just cut the front and back panels 1/2″ shorter than the original panels to make up for the slightly thicker sides.)
I wrapped new white aluminum sheeting and attached it to each side board with permanent contact cement prior to attaching it to the camper. (I forgot to take a picture of this step before putting it back on the camper.)
Use the old skin as your template for where to predrill the camper lift holes. Then, attach the sides boards to the lift arms.
I used wood glue and thin trim screws to attach the front and rear roof sides to the two side panels.
Reattach Roof to the Camper
After the back and front of the roof structure was built, it was time to attach the ceiling (with the top aluminum skin still attached) to the camper.
To do this, we placed the roof on top of the camper and held it in place while using trim screws to screw through the side boards and into the ceiling frame 1x2s. I dipped each screw in Dicor Lap Sealant as a way to protect against water creeping in the in the future. You can see where we screwed the roof to the sides in the video below.
I used contact cement to attach the aluminum roof skin to the back and front wood boards.
Because I used 3/4″ thick pine board as opposed to the original 1/2″ plywood, the skin didn’t overhang and fold over quite as much as before. However, with the way I decided to keep everything watertight (which you’ll see in the next step), the slight difference in overhang didn’t matter at all.
5. Seal Camper Roof Seams to Prevent Future Leaks
Clean Roof Surface Well
After the skin is glued back down to the front and back sides, it’s time to finish up the top and make sure the camper doesn’t take any more water in the future. It’s important to make sure that any old butyl tape or caulk is fully removed before applying tape to the seams. I’m working on a full post on how to remove silicone caulk from an RV and how to remove old butyl tape residue. I’ll link that here as soon as it’s finished.
Apply Eternabond Tape to Seams
The product I decided to use to make sure none of those seams took any more water was Eternabond Tape. I read a ton of reviews, and went to my local RV store to talk to someone there about the efficacy of this tape. Basically, it’s a rubberized tape that flexes with changes in temperature and conditions. It’s uber sticky, and creates a waterproof seal.
Update: I’ve been using Eternabond tape for seven years on different campers and it is my go-to product for exterior RV repairs. I have a full post on this post in the works!
I started with the side seams of my camper and applied one long run of the tape across each seam. By making small slits halfway through the tape, I was able to create a smooth pass along the curved edges as well.
There are a few tricks to applying this tape, and you have to be careful about overlapping pieces, because sometimes water can still sneak in. You can see more details on using this tape in the video below.
6. Reattach the Pop Up Canvas
After the roof is attached back to the lifting brackets, you can attach the canvas back to the roof. Because some of the old screws were rusted due to water damage, I decided to use new, self-drilling screws stainless steel screws to attach the canvas bracket to the wood frame.
Because we decided to only replace the 1 x 2″ exterior frame of the roof and reuse the foam and interior paneling, I definitely needed to come up with a solution to cover up the part of the roof that had peeled away because of the water damage. Here you’ll find the complete tutorial on how to use glue up ceiling tiles in an RV to give the interior a completely new look.
I completed this pop up camper roof repair five years ago, and the roof has held up beautifully. We haven’t had any leaks or water entering the camper yet! We keep it stored outside (and are located in northern Illinois where it rains, snows, and hails), but to be safe we covered it with a piece of 4 mil plastic, and then placed a tarp on top of that for the winter. It’s leak free and structurally sound, which is way better than it was when I bought it!
Love your directions for fixing a pop up . Thank you for sharing!
Hi there! What did you do for weather stripping the bottom of the new roof sides?
Hi! I used a rubber gasket that I glued on with gasket adhesive
How on God’s Good Earth did you get the aluminum skin off. I have met my match on this one. I rebuilt the whole front of this 2000 Viking and yet…. Any ideas or tips appreciated.
Oh no – is yours not budging? Mine literally fell off, but I’m sure it’s because the water damage was so bad the adhesive was destroyed. Have you tried using a heat gun or even a hair dryer on high heat to heat it up and loosen the adhesive?
do you have a cost breakdown?
Because it was over 5 years ago, I’m sure cost will be quite different than what I paid. But for the lumber and aluminum wrap for just the sides (we reused the top), it was about $125. I would guess it will be close to double that now.