
Pop-Up Camper Remodel
You can completely change the look of the interior of a pop up camper with just a few easy DIY projects. I renovated the interior and exterior of our old camper with painted cabinets, new flooring, a new ceiling, wood countertops, new cushion covers, and lots of little finishing touches.
I purchased an pop up camper and quickly discovered the roof was completely rotted away. After dealing with that issue by rebuilding the roof, I was able to tackle giving the interior a complete makeover.
I hope this pop up camper remodel inspires you to take the old and ugly and transform it into a space you and your family can comfortably enjoy!
Pop Up Camper Before the Remodel
I purchased this 1994 Starcraft pop up camper in July of 2017 from someone who was selling it for his grandfather. Unfortunately, he wasn’t completely honest with the condition, and I just didn’t know how to inspect a camper properly at the time.
Thankfully, I only paid a couple hundred dollars for it and therefore was able to spend the money to completely rebuild the roof and give it a facelift. You can see a full before tour of the pop up camper here, but here are a few issues I encountered after buying it:
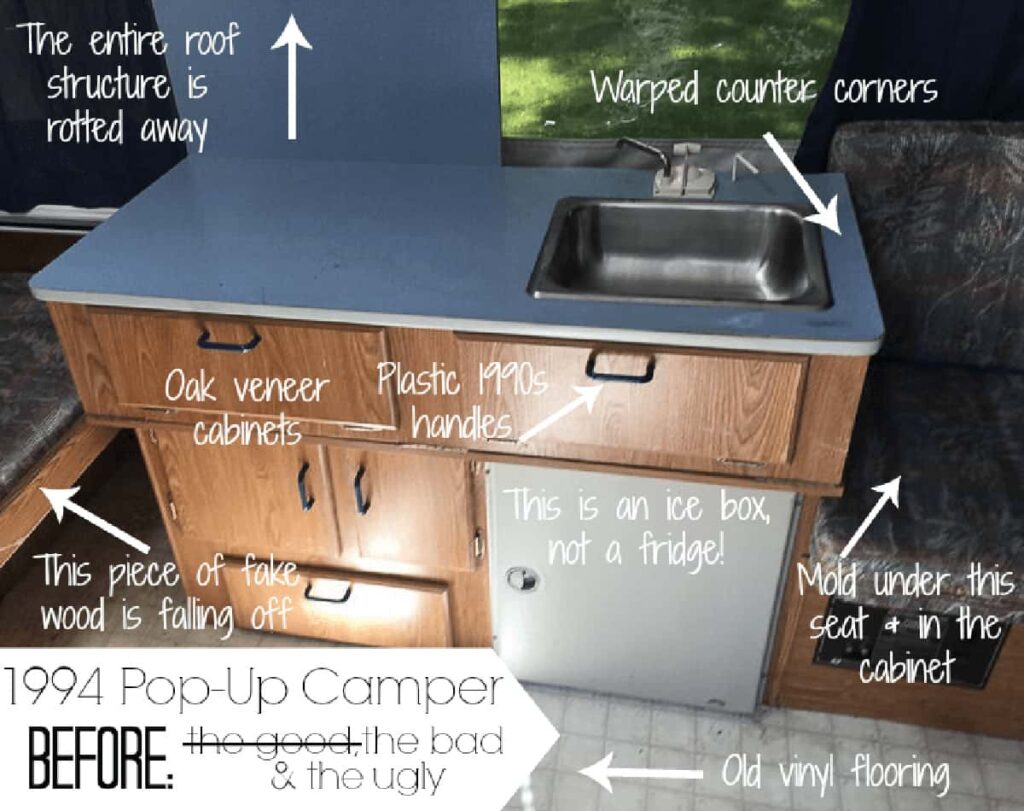
Before I could update the interior with a makeover, I first has to address the issue with the rotted roof. You can read the full tutorial here: how to rebuild a pop up camper roof.
Pop Up Camper Remodel Ideas
Update the Flooring

I used peel and stick vinyl plank flooring that I found on clearance for $7. I’m not completely in love with the color, but I couldn’t pass up updating the floor for less than $10!
Update: I was slightly concerned with the durability of peel and stick tiles that would be in a camper that is exposed to extreme temperature fluctuations. We live in northern Illinois, so we do experience cold winters and hot(ish) summers. Four years after applying the peel and stick flooring in our camper, there were a couple of places where the flooring was separating slightly. None of the tiles were becoming unstuck, but I think there was some contraction and expansion across the seasons that created a few gaps. It didn’t happen between every board though, only in a few places.
I’ve since installed two other types of flooring in other campers and have some opinions on the best flooring for RVs. I’ll be sure to link that post here once it’s complete.
Update the Ceiling
It was a necessity to update the ceiling in my pop up camper because the old ceiling had water damage which caused the wallpaper sticker material on the ceiling to fall off in some areas.
I decided to use Fascade vinyl glue on ceiling panels to cover the old ceiling and give it a new look. I have a full tutorial on how to update an RV ceiling where I give tricks on how to make the ceiling panels stick and stay stuck!
Plus, I now have a full post on 14 other amazing ideas on how to update an RV or pop-up camper ceiling!
Paint Pop Up Camper Cabinets
The cabinets in our pop up were fake oak laminate, so I knew right away that painting them was the best option. I am working on a full post on everything you need know about painting rv cabinets which I will be sure to link here when I’m finished. For now, you can head over to my other site, Refresh Living, to read all about how to paint cabinets (both in your RV and your home!)
The gold pulls from D.Lawless hardware look perfect on the white cabinetry, and about 1,000 times better than the original blue plastic pulls! I also removed the old ice box cooler and replaced it with a mini-fridge I found at an estate sale.
Update the Countertop and Table
The camper didn’t come with a table, so we installed a camper table leg base and used the table leg from my old childhood camper. (My dad basically keeps everything, so this leg has been stored in the garage for over 20 years. Thanks, Dad!) I used edge-glued pine panels for the table and the new counters. I just used a router to round off the edges. You can read the full tutorial on how to create the look of butcherblock in an RV in a cheaper and more lightweight way.
As you can see, I removed the sink inside the camper. However, I reused the old sink to create a DIY camping sink that folds up and fits perfectly in a pop-up even when it’s folded down.
Add New Pop Up Camper Bedding
The bedding is a collection of vintage throws paired with DIY shibori-style sheets. Of course, traditional shibori is made with indigo dyes, but I opted for my favorite color, and one that I think is perfect for camping: dark green. I’ll share my process for making these easy sheets soon, as I’m going to do the same thing for the bunk in our new (to us) hybrid camper!
Updated Pop-Up Camper Backsplash
I love making an RV look like a kitchen, but I definitely didn’t want to add the weight of tile on the backsplash. For this project, I had to cut a new piece of wood that I screwed onto the back of the counter. I made sure it was exactly the same height as the original backsplash so it folded down correctly for storage/traveling.
I framed the backsplash in 1×2″ wood boards and added Fascade vinyl glue on ceiling panels. I painted the raised edges in black to bring out the details of the panels.
Vintage enamelware just makes me happy. Period.
Add the Finishing Touches
I finally taught myself how to make pillow covers with zippers! This saved me a ton of money because I was able to use scrap vintage fabric I’ve bought at estate sales over the years. If I didn’t make my own, I would hit up IKEA because they have the best prices on pillow forms and covers – plus so many to choose from!
I updated the interior of the pop up door with a hand painted logo and a set of camping icons. If you’d like to paint your own camping icons on your camper door, you can print a copy of the icons here. Then, use this pencil transfer method to transfer the image onto your door to paint. A vintage map of our hometown area of Chicago finishes out the bottom of the door.
Paint the Exterior
Although the inside of the camper looked like new, the outside was still screaming 1990s. I found a way to deal with the super stuck on decals and then painted the pop up camper in a two-toned green and white color with little trees stenciled near the back. You can see the full process on how to paint a pop up camper exterior here.
Although my pop up camper makeover took about two months, you could definitely complete yours much faster if you devoted consistent work time into it. Because it’s such a small space, it really doesn’t take much time to give it a fresh, new look.
Thanks for taking a look around our pop up camper remodel! I am almost finished with our hybrid camper remodel and I can’t wait to share that one with you. If you have any specific questions about any of the projects, please reach out and let me know.
Oh my goodness! I love it!! I am pinning it to my camper inspiration board right now!!
Thanks so much, Jessica!
Where did you get your awesome top door decals???
Hi Kathleen! I designed and painted them on, although I think using vinyl cutouts would have been much faster! 😉
This is truly AWESOME! Kudos!!!!
Thanks Libbie!
What an amazing makeover! I love everything but especially that backsplash!
Thanks Jeanie! I love the backsplash too, and it was SO easy, which makes it even better!
Wow! Looks fantastic! Makes me want to buy a pop-up!
It’s amazing how paint and fabric can totally bring them back to life!
Jenny, this looks amazing! You guys are going to make such fun memories in there!
Thanks Karen – that’s definitely why I’m most excited. Yes, the project of working on it was a blast, but I just can’t wait to plan some trips. We might actually be road tripping out to Disney World with it this Spring…!
LOVE how cute your camper turned out!! The bedding is so lovely!
Thanks Emy! I am so excited about my green sheets, too!
Where did you get your dining room bench seat covers? I love them!
I wish I could say I bought them because it would have been much faster, but I couldn’t find what I was looking for so I ended up sewing new covers for them.
Such a darling camper! What an amazing transformation. This has been such an inspiring round of the ORC. I really appreciated the extra week.
May you and your family have a wonderful Thanksgiving!
That extra week was HUGE! Thanks so much – I can’t wait to see your space!
Thanks for sharing! Found a 1995 Starcraft in pretty good shape….someone loved her before we adopted! Need sew in curtain glides, but not rounded top. It is kind of pointy and delicate. Any help is appreciated!
Those sound different than the ones I had in mine, as mine were rectangular with a rounded top, like you described. I have a local camper supply store near me, so I was able to bring one of my old ones in and compare with the 3 different styles they had. There are some online sites that are exclusively for campers and RVs, I think those might be your best bet. Sorry I’m not of much help!
Hi Jenny,
Your camper transformation is amazing! You just made camping a whole lot more chic!!!
Right – we’re totally going glamping now!
OMG! That is amazing! I would be afraid to take it camping, it’s so pretty!
Right? I’ve thought of this too with three young, messy kids. Thankfully, all the cushion covers and pillow covers are removable and washable!
I am obsessed with your transformation! It really makes me want to go out and get a camper. Ah, I love everything about it!
Haha, you should! Make sure the roof isn’t rotted away though, that was a nightmare! 😉
Oh my stars! Great great job! This is just the cutest thing! LOVE! ~~ Susie from The Chelsea Project
Hehe, thanks Susie! It was so much fun!
Great use for a small space! Wow
Thanks Denise!
Woot woot! You are all ready for an adventure! Good call on saving on the flooring, especially in a space that will receive a lot of traffic from muddy boots, ash, water, and who knows what else. Love how bright and cheerful the camper feels, and love the enamelware collection!
Thanks Kat! Yes, my motto the entire time was, “it’s just a camper”. I reminded myself of this constantly to help save money and give myself some grace when I made mistakes!
“
What a fun project! Incredible job – love how it turned out- should make for fun camping!
Thanks Joy. I just can’t wait for our first camping trip in it – camping in luxury!
Im so inpress with your skills. Looks just incredible ! You are amazing!
Thanks Maria!!
Wow!!! Your camper looks great!! So much personality now and I love all that color. Great job!!
Thanks Susanne! I am such a huge fan of all the colors now, too!
Jenny this turned out amazing!! So inspiring! My parents have an old pop up and my Mom and I have talked about redoing! Now I think we have to!
Yes, you totally should. It was so much fun!
Wow! I’m sad I didn’t see this until the reveal… would have loved to have been following along. Really hoping there is a tutorial for the cushion covers!! My pop up is in need of a remodel, I’m so glad i found yours, so much great inspiration! GREAT JOB!
Thanks, Jen! I was actually pretty awful at posting updates this time around – but I do plan to post a ton of tutorials on the DIY projects, including the cushion covers!
Jenny,
Its amazing what you did…. You always do incredible work! I love my cabinets and my kids bathroom,.
Thanks, Gia! I still have your paint sample can and I haven’t forgot about making that one panel whiter. 🙂
Jenny! I love how bright it is! You amaze me!
Aw, thanks Aunt Su!!
Just wow! Amazing transformation. You are very talented. I have an awesome ’98 Viking pop-up sitting in my yard. It probably doesn’t need quite as much work as yours did, but I would have no idea how to do this, so there it sits lol. Happy camping!
Thanks Debra! I hope yours isn’t in as bad of shape as mine was – it was awful. I can’t wait to take it camping now!
You did such a great job and will LOVE camping in it! I’ve upgraded to a 16 ft. travel trailer (getting older to use a pop-up) and have been doing all kinds of remods on it. Since it’s just hubby and me, I removed the bathroom door (we use the campground facilities) and hung a curtain with a tie-back. I used the remaining curtain and valance to cover all of the fabric window coverings so my next project is to use a pretty blue sheet to cover the cushions. It is such a great feeling to go into it now and see “bright” instead of brown. Happy Thanksgiving.
Hi Vickie! It’s amazing how fabric can totally change the feel of a space, especially if it’s a pattern/color you love. I am so excited to start camping now – I have a lot to learn from seasoned campers like you!
Hi, we just bought a pop-up……The crank system is broken and only lifts one side; 2 of the aluminum support beams are broken too. Any advise on how to repair?
Hi Jada – sorry to respond back so late to your comment. I have no experience with repairing the crank system, but I know it can be done. Best of luck, it’s always the not so fun projects that you need to start with before being able to have fun updating the inside, right?
Hi Jada – sorry to respond back so late to your comment. I have no experience with repairing the crank system, but I know it can be done. Best of luck, it’s always the not so fun projects that you need to start with before being able to have fun updating the inside, right?
Really a very beautiful pallet. What did you do with the sink? I can’t tell from the pictures if you took it out.
Thanks for sharing!
Thanks Karen. I did take the sink out (but I don’t think I mentioned it anywhere in the post, now that you mention it). I saved it, though, and am planning to make a collapsible outdoor sink that I hope will be more functional for us.
Have you been happy not having a sink inside? Thinking about taking ours out as well…
I’m very happy we did! We now have a whole extra cabinet for storage (now that the water holding tank is gone). I did build a collapsible outdoor sink so we still have easy access to water without the mess of having it inside (especially with 4 young kids who still think water is a toy!)
We are also looking at taking the sink and stove out of our pop up and using that space for kitchen storage items. May I ask how you made the back-splash piece? Does it fold down when you close the pop up? Thank you!
Hi Cheryl. The backsplash piece is attached to the back of the cabinet that the sink was in. Then, the whole top cabinet (along with the backsplash) fold down and the top of the backsplash piece is what rests on the floor of the camper to close it up. This is how it was set up originally as well, so I just used the template of the original backsplash to make the new one from plywood (the old one was an MDF material that was falling apart a bit). I hope that helps a bit. I realized as I starting typing that it’s a little difficult to explain!
That is awesome!!
I would love to know what you used for that gorgeous wood countertop?? I looove it and would love to put a butcher block type camper in my 96 PUP fixer upper. Amazing job everywhere else!
Hi Jen. Thanks so much! So the wood was just a 5/4″ edge-glued pine board (which is cheaper than butcher block, but I think looks so similar!) I believe most big home improvement stores sell it in varying widths, which will allow you to just buy one piece to fit your project. I found mine specifically at Menards. Have fun with your PUP!!
beautiful! how did you redo the cushions?
Thanks Brooke! I sewed new cushion covers from drop cloths and then a patterned fabric for the sides. Reusing the old zippers and bottom pieces of fabric helped to keep it low cost!
Hi, I know it’s a couple of years after your reno was complete, but I’m hoping you’re still monitoring this blog. You’re so talented! I love all of your updates, the camper looks gorgeous! Just a quick question, did you clean the canvas? It looks so much whiter than in the before pix. We just bought a pop up and the canvas has rust stains from the poles, that I can’t remove. Did you replace or clean it? Thanks for your post it’s beautiful.
Hi! I’m sorry for not getting back to you right away. I did clean it on the inside. I just used a watered down bleach solution. I sprayed it on, let it sit for a minute, and then used a sponge to clean it up. I only did this on the side of the canvas and not the outside, because I didn’t want to do any damage to the canvas given I was using bleach. I didn’t notice any issues from using it though, and it cleaned it up really well. Have fun with your camper!!
Hi! Love this transformation! Did you route the edges of the counters yourself? Did you use a wax or some sort of sealer on them as well?
I’m so sorry for the delayed reply. I did use a router to round the edges, but I think they could be left as corners and still be okay. And to seal it I just used clear Polyurethane.
Hi! I love what you did with your pop-up camper!! I am wondering where you found the graphics/symbols at the top of your door… with the swimming , reading, fishing, camping, fires, etc… I would like to do something similar on our door..
Thank you so much in advance!
Nice work!!
Hi Kirsten! So funny you should ask because I have been thinking recently how I REALLY need to get that post going. I made the graphic. I’ll email you a PDF of it right now in case you want to DIY it and paint it.
Thank you so much for sharing. I will be repeating the new ceiling method. Yours turned out so nice. Wish me luck!
Best of luck! It’s such an easy process as long as you get the right adhesive!!
It looks amazing! We just took ours apart this week because we purchased a new canvas. Now I want to remodel myself. A question: our cabinets have a little latch on them to prevent them from opening while in motion. Did you find a solution to that or are your latches on the inside? Thanks for the inspiration! I can’t wait to get to work.
Hi! Ours are on the inside so it wasn’t an issue. Are you looking to paint your cabinets but the latches aren’t removeable or something else?