
Replace Your RV Counter with Wood
Update old, ugly RV countertops and tabletops by adding wood counters to your camper that look like butcher block, but are much cheaper AND lighter.
Here’s everything you need to know to make your own DIY wood countertops for your RV or pop up camper.
Easily replace camper countertops with lightweight wood
A few years ago I admittedly make an impulsive purchase and brought home an old pop-up camper. I got it for a great deal, but along with that great deal came a water damaged roof that needed to be completely replaced. You can find all of my pop-up renovation projects here, or take a look at the full reveal of the remodeled pop-up camper here.
One of the questions I get asked often about my pop-up camper remodel is how I made the tables and countertops, and even more specifically, where to find the wood I used to make wood countertops and tabletops.
When dealing with an RV, weight is always a factor, and when dealing with a budget-conscious DIYer, cost is always a factor as well. Although they look just like butcher block, these counters and tabletop are made from edge-glued boards that cut down on cost and weight due to their thickness.
Where to Buy Wood for RV Tables and Countertops

My local Menards store stocks both 1″ thick and 5/4″ thick edge glued pine boards in various sizes. The edge glued pieces give the look of butcher on the top, but the pieces are much thinner than actual butcher block.
This is perfect, because I personally don’t want to be hauling the extra, unnecessary weight that a piece of butcher block would add to my camper.
I’ve used both the 1″ thick boards and the 5/4″ thick boards and both work well. The 5/4″ is obviously a little thicker which gives more of a butcher block look. However, those pieces are a bit more expensive and also weigh a bit more.
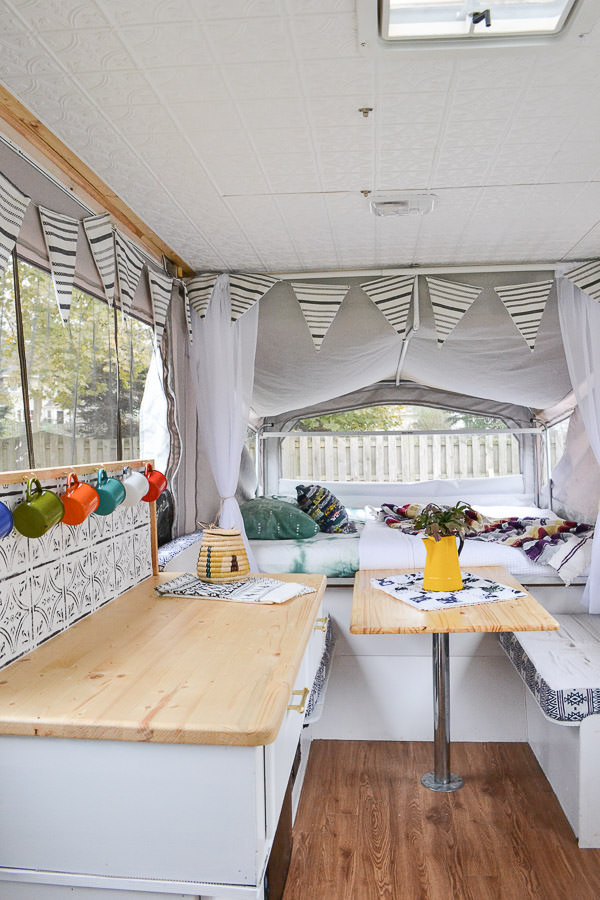
To give you an idea of how each thickness looks when used, the tabletop in my camper was 1″ thick and for the countertop I used a 5/4″ board.
How to Make Wood Tabletops for RV
To make the countertops, it’s as simple as cutting them down to the size you need. Using your old countertop as a template to trace is a great idea to get a perfect fit.
Whenever I’m cutting large pieces of wood or plywood, I grab my Kreg Jig Rip-Cut guide. This is one of my favorite tool accessories and it really works to make long, straight cuts that I would never be able to do freehand.
I also used a router to round off the edges and corners, but this step is optional.
How to Seal Raw Wood
To finish the boards, I used multiple coats of polyurethane in a satin finish for a budget friendly top coat. You could also choose to use an epoxy for a high gloss, highly durable finish.
When finishing raw wood boards, there are different options for clear coat finishes that can be used that will all give slightly different looks.
Polyurethane
Polyurethane is an oil-based finish that penetrates into the wood, slightly darkening the wood and accentuating the wood grain. I often choose this finish because I love how it accentuates the wood grain, but it’s important to be aware that it will definitely change the color to a darker finish. Plus, polyurethane will yellow slightly over time. I’ve never had a problem with this look on wood though as it’s very unnoticeable.
Here are a few common brands that you’ll find on the shelves of most home improvement stores.
*Although this post is about raw wood, I just wanted to note that I never use polyurethane over painted wood, because it does yellow over time and when used over paint, it is noticeable as time goes on.
Acrylic (recently labeled as “Water-Based Polyurethane”)
Using a water-based clear coat is another option for sealing and finishing raw wood. A lot of specialty furniture paint companies have been making water-based clear coats (that are usually a type of acrylic formula).
Now, Minwax and Varthane both have water-based finishes that you can find at any hardware store. The labels call them “polyurethane” but they are very different than a true polyurethane because they can be cleaned up with water and they will not yellow over time.
The other difference in the finish is that this type of finish does not penetrate into the wood as much, rather it sits on top of the surface. It still gives a durable finish in a range of sheens, but it will not darken the wood or accentuate the wood grain at all.
So, if you want the wood the stay the exact same wood color, choose an acrylic/”water-based polyurethane” as your clear coat finish.
Different Sheens of Clear Coat Finishes
After deciding if you want to use an oil-based or water-based finish, you’ll want to select the type of sheen (or shininess) of the finish.
Levels of sheen range from Matte -> Eggshell -> Satin -> Semi-Gloss -> Gloss. I’ve never found an oil-based polyurethane in a matte finish (and eggshell is really rare as well). Water-based polyurethane finishes come in all of the different sheens.
A matte sheen will reflect very little light and will not look shiny at all while a gloss will be very shiny. Besides the differences in look, the sheen also usually corresponds to how durable the finish will be.
Higher sheens will withstand wear and tear (and cleaning) better than lower sheens. Although, I must say the newest formulas of water-based clear coats in matte finishes are pretty impressive in their durability! And, of course, the more coats you apply, the higher the durability.
How to Replace RV Tabletop
My camper has a metal pole base, so I just unscrewed it from the other table and attached to my new tabletop. I did add another piece of 1/2″ wood board to reinforce more the area underneath the table where the pole mount would be attached.
I used wood glue and screws to attach the 1/2″ board, and then screwed in the table mount to that board.
If you have a folding RV table, you should be able to unscrew the legs and attach your new tabletop in the same way the metal legs were attached to the old one. Or, you could switch to a role mount RV table by purchasing the leg and two mounting brackets.
I feel like changing the tables and counters in my pop-up was the best decision I could have made. The update will hold up better than painting, wallpapering, or covering the tables, and it was still budget friendly. (I know, I know, the price of wood is OUTRAGEOUS right now, making it way less budget friendly than several years ago when I completed this project. I’m sorry!)
I’m starting to think about upgrading to a slightly larger camper to better fit out family of 6. If I do go out an make another crazy impulsive buy, I think I would go the same route with updating all the countertops with wood. I just LOVE the look!
We did this in our camper. I love it.