
Butterfly Cages for Raising Monarch Caterpillars
The transformation of caterpillars into butterflies is a fascinating natural phenomenon that you can observe right in your own backyard.
This post describes everything you need to know to safely raise monarch caterpillars in your garden, including the perfect butterfly cages to buy or DIY!
Five years ago, I set out to learn everything I could about the amazing monarch butterfly. I wanted my kids to witness firsthand the life cycle of a caterpillar, and after observing this incredible phenomenon once, we’ve become a bit obsessed with how to help save these amazing creatures that are now officially endangered.
Although this post is dedicated to the types of cages that are best for monarch rearing, you’ll find a lot of information about how I try to safely raise caterpillars. Rather than trying to release as many butterflies as possible, the best way to save the monarch is to plant milkweed!
You’ll find many tips on creating a butterfly-friendly habitat in your backyard, along with how to captively rear these beautiful creatures.
Supplies Needed to Raise Butterflies
Milkweed Plants
Before rearing monarch caterpillars, it is essential for you to have access to a large supply of milkweed, which are the host plants for monarchs. Milkweed is the only plant that a monarch butterfly will lay her eggs on, because it’s the only plant that monarch caterpillars can eat.
There are many different varieties of milkweed that are native to different areas of the country. Research the types of milkweed that are native to your area and plant some in your garden. This is the single most important step to raising monarchs. The butterflies will simply never come to your yard and lay eggs if you don’t have milkweed!
In the Midwest, common native milkweed varieties are common milkweed, swamp milkweed, whorled milkweed, and butterfly weed.
In our garden that has all of these kinds of milkweed, the preferred plants of our monarch butterflies is always the butterfly weed plants in early summer and the swamp milkweed plants in late summer.

Please note – butterfly weed (Asclepias tuberosa) is not the same as butterfly bush (Buddleia davidii). Butterfly bush plants are actually native to Asia, and although they can provide nectar for butterflies, monarch caterpillars do not eat the leaves of this type of plant.
Although I know this post is about monarch cages, I cannot stress enough the importance of planting milkweed in your yard to create the perfect monarch butterfly habitat. Rearing monarchs and releasing them will simply not help the endangered monarch butterfly species (officially added to the endangered animals list in 2022).
Instead, planting milkweed across the country (and especially along migratory routes) will be the only hope for the monarch population.
(Another way to bring native pollinators to your yard is with these DIY mason bee nests. They’re the perfect area for these early spring pollinators to lay their eggs!)
This post contains affiliate links. Feel free to read my full disclosure policy here.
Fine Mesh Cage
This type of popup cage is perfect for rearing a few caterpillars in your backyard. The fine mesh provides air circulation for the caterpillars but does not allow insects or other predators (like the dreaded tachinid fly!) to enter the enclosure.
The collapsible design allows for easy storage. Each of these cages have a large zipper opening for easy cleaning and addition of new plants. They each have a vinyl window for viewing on one side of the pop-up butterfly cage. I’ve used quite a few different types of pre-made enclosures, but I have found that ones that are slightly taller like the ones listed below work better to hold milkweed plants.
The black cage from Restcloud Insect is my favorite pop up butterfly habitat because of its height and the mesh that covers the zippers. Caterpillars seem to love to form their chrysalis on zippers, making it very difficult to open! The black mesh cage has a cover over the zipper to protect any caterpillars that choose to park it there.
Vases or Floral Tubes
These vessels will be the water source for your milkweed plants. I’ve found that jars with small necks work best so the caterpillars don’t accidentally crawl into the water. I prefer glass jars because they hold a lot more water than the floral tubes. Honestly, I just reuse small glass food jars that I’ve cleaned and disinfected.
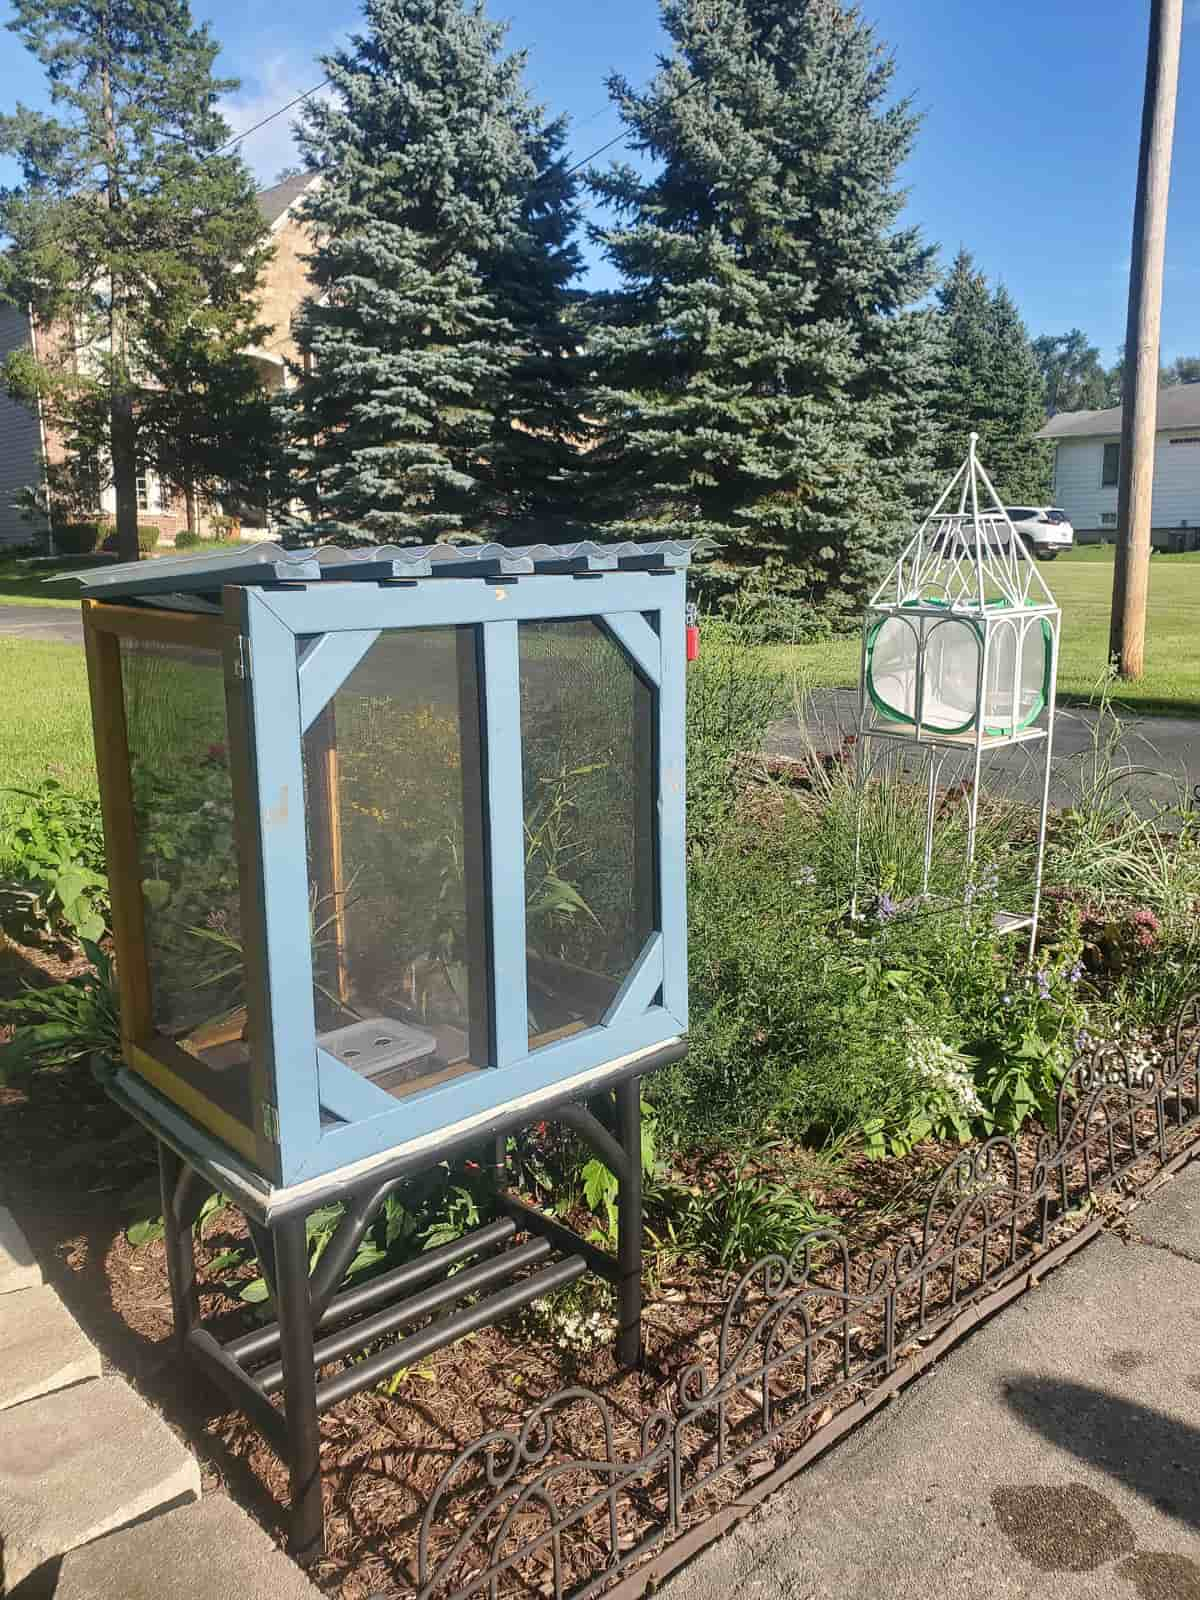
How to Make a DIY Butterfly Cage
After using mesh cages for a couple of years to raise caterpillar eggs we found in our yard, I wanted a more stable solution to hold more caterpillars safely. I built a wood structure that sits on top of a small table. It’s enclosed with fine screen for good airflow and has a large door that is easy to open. I’ve used it for three years and this design has worked perfectly for our needs.
For a more detailed tutorial of how to build a butterfly cage, check out the video in this post. The dimensions are based on the size of my tabletop, so rather than provide exact measurements, I’ll describe the process so you can adapt to any size.
1. Find a small table or build a base
I wanted the butterfly enclosure to sit off the ground to keep it protected. This side table from Facebook Marketplace was the perfect size for my project. After cleaning it, I painted it with spray paint to help it withstand being outside.
2. Tile the top of the table (optional)
Butterfly cages need to be cleaned and disinfected, so I added a tile top that can get wet and cleaned easily. The original table top was laminate and peeling off a bit, so I knew that as soon as it was exposed to water, it would be ruined.
I peeled off the laminate and then tiled the top using leftover tile from another project. I grouted the top just as I would a bathroom floor and sealed the outside edge with silicone caulk.
3. Build the wood frame
The frame is built from 2x2s. First, build the front panel which should be slightly taller (1″ – 1.5″ taller) than the back panel. These panels are simple squares with a 2×2 in the middle for To attach the boards together, predrill a hole through the first board. Then, use wood glue between the boards and screw an exterior screw to hold it together.
Once both the front and back panels are built, attach them together with 2×2 braces between the two panels. This creates the large enclosure that you will add a door to later!
4. Add screen to the structure
Fiberglass window screen works perfectly as a material for a butterfly cage. It’s flexible so it is easy to staple it to the frame, but the mesh is small enough to keep out other insect, especially tachinid files. Tulle fabric also works, but it doesn’t withstand outdoor elements nearly as well.
5. Add a roof
Of course, caterpillars can definitely be rained on. However, I wanted to give a little coverage to my enclosure so the water didn’t pool on the bottom of the cage. Even when using mesh cages, I recommend keeping the cage under an awning or patio umbrella for this reason.
To make the roof, I used leftover 1×2 boards and glued and nailed them to the top of the frame. Because the front panel is taller than the back panel, there is a slight pitch to the back of the roof.
Use corrugated roofing screws to attach corrugated PVC to the roof. A piece of plexiglass would also work well!
6. Make a door
To create the door, measure the size of the frame to make the door the exact size as the front frame. You can use L-brackets to attach the 1×3 boards together. I cut the boards at 45 degree angles for the corners, but you could also join straight boards together with L-brackets as well.
Use T-brackets to attach a center board for stability. Then, staple screen to the inside of the door and attach to the frame with small hinges.
7. Create a divider (optional)
I decided to add a plexiglass divider to the center of the caterpillar cage so I could raise two different stages of caterpillars safely. Since caterpillars of different ages shouldn’t be reared together, this allows me to separate them out.
Extra Considerations
The caterpillar enclosure sits on top of the table but is not attached to it, so it can be removed to easily disinfect. I screwed four screws that stick up about 1/2″ into the tabletop as a way to keep the wood frame from sliding around. It sits around the four screws and keeps it in place, but can also be lifted off the tabletop easily.
Important Reminders about Monarch Butterfly Rearing
This is an excellent article arguing that monarch caterpillars should never be captively reared. Although we do collect eggs from our yard and rear to release them, we’ve taken many steps to educate ourselves to do it safely. In short, we look at it as an educational experience for my children and something that brings us happiness.
- Make sure you have enough milkweed plants – Monarch caterpillars eat a lot! Each monarch caterpillar will eat about 20 milkweed leaves during its lifespan, which is about one mature milkweed plant.
- Keep your enclosure outside – There has been research to show that monarchs raised indoors do not have as strong of migratory instincts as those raised outdoors.
- Remove frass (caterpillar poop) everyday – It’s important to remove caterpillar droppings to keep the cage clean and diminish the risk of disease. Brush off caterpillar poop from the milkweed leaves and from the bottom of the cage. Some people even use small keyboard vacuums to suck up the frass!
- Disinfect cages after live butterflies emerge – Use a 10% bleach mixture to disinfect all surfaces (cage wall, floor, zippers, water vases, etc.) after butterflies are released.
- Watch for unhealthy caterpillars – If any caterpillars die, it’s important to remove all the other caterpillars and milkweed from the enclosure. Dispose of the milkweed and get a fresh plant. Disinfect the entire enclosure with 10% bleach solution and allow to dry before returning any caterpillars to the enclosure. Carefully watch the remaining caterpillars to ensure all are healthy.
- Keep caterpillars of similar size together – It’s important not to place large caterpillars (4th and 5th instars) with smaller caterpillars or eggs. If you do, the larger caterpillars will inadvertently eat the smaller caterpillars.
- Educate yourself on OE – If you’re thinking about raising monarchs, you need to be committed to testing for OE after a butterfly has emerged from its chrysalis. OE is a parasite that causes debilitating malformations in butterflies. It spreads very easily from an infected butterfly onto every plant and surface she/he touches. So if you release a butterfly with OE, the parasite will spread to all of your plants and infect every caterpillar that comes in contact with those leaves. This disease is one that people with good intentions of saving butterflies might inadvertently be spreading without testing their butterflies for OE. This video shows exactly how to test for OE spores using a handheld microscope (Linked is the exact one we use to check for OE spores on our butterflies!)
- Caterpillar rearing is illegal in California – It is illegal to collect eggs or caterpillars in California and may be illegal in other states. You can read more about this regulation at the California Department of Fish and Wildlife.
Where to Buy Milkweed Plants
My first recommendation to find milkweed plants would be to search for native plant nurseries in your area. I’ve been extremely pleased to see that many of our local nurseries have started to carry more and more native plants in the last few years. I’ve also seen small sections pop up at home larger home improvement stores like Home Depot!
In the spring, search for native plant sales in your area. Again, there has been an increase in the number of native plant sales in our area over the last few years as well.
You can also order native plants online to be shipped to you. My favorite native plant nursery in my area now ships their plants! I’ve linked the milkweed varieties that are native to Illinois with links to purchase below. These plants are usually most available in the spring, but I’ve found and successfully planted milkweed all the way into August and they’ve survived!
- Butterfly Weed (Asclepias tuberosa) – smaller plant with orange and yellow flowers
- Common Milkweed (Asclepias syriaca) – tall plant (4′-5′) with large leaves and pink/purple flowers on top
- Prairie Milkweed (Asclepias sullivantii) – similar to common milkweed with light pink flowers but not as tall (about 3′)
- Swamp Milkweed (Asclepias incarnata) – tall plant with thinner leaves and dark pink/purple flowers – likes moist soil
- Purple Milkweed (Asclepias purpurascens) – smaller version of common milkweed which makes it great for a more contained garden – dark purple flowers
- Whorled Milkweed (Asclepias verticillata) – shorter plants with small white flowers
Or, if you know someone who has milkweed in their yard, grab a few seeds in the fall. Plant them in a large pot a couple of inches into the soil. Then, leave the pot outside over the winter. (In a screen porch, unheated garage, or even just right in your backyard.) In the spring, you should have some new milkweed plants sprouting up and you’ll soon have the perfect habitat for monarchs!
Personal Note on Helping The Monarchs
I planted milkweed in our yard (in northern Illinois) five years ago. Every year, I have seen glimmers of hope that I am doing something to help the monarch population. The first year, we did not see nor have any monarchs lay eggs on our milkweed (at least that I could find).
In the second and third year, we started to find our first eggs here and there on milkweed leaves later in the summer months (in July and August). My best guess is that these were 3rd generation monarchs.
In the fourth year, we found eggs near the end of June, signally that the second generation of monarchs were probably finding our milkweed. By September, we had found over 100 eggs (Note: We did not captive rear all of those eggs as we simply do not have a large enough set up to safely raise all of them.
We leave many on plants, and in many cases, nature takes its course. However, an average of 10% of monarch caterpillars do reach adulthood in the wild, and we have found stray chrysalises in our yard from those lucky 10%!) We did release 27 adult butterflies last summer that we reared captively throughout the course of the summer.
This year, the fifth year of growing milkweed in our yard, we found our first eggs (over 10 of them) in the middle of May!! My thought is that these eggs may have been laid by the first generation of monarchs returning from overwintering in Mexico. To me, this is absolutely incredible and something that makes me stop and pause every time I see those first eggs.
I anticipate that this year we will find even more eggs throughout June, July and August. Then, those final caterpillars that hatch in September will metamorphosize into butterflies and make their trek to Mexico to overwinter. It’s an absolutely fascinating phenomenon that I feel lucky to witness every year.
Currently, we keep our butterfly cage on the back of our house, right next to our cat patio! Here’s a full tutorial on how to build a catio if you have a furry friend that loves to be outside!
Post by Jenny Leads
Jenny is the voice behind Refresh Living. She has a passion for helping people to create a home they love without spending a lot of money.
Hi Jenny! Thank you for this amazing post❣️ I hope you don’t mind me asking a few detailed questions and I really hope you answer:) I’m pretty handy with building but I’ve never tiled even though I’ve read and watched a million tutorials. After you removed the linoleum what was left that you ruled onto and did you have to prep it? Did you seal your grout and/or tiles so they can be cleaned later on?
Gratefully,
Cheri
Hi Cheri! I’m trying to remember, but I think I just tiled right over the laminate top on this table. I gave it a quick sand with 80 grit sandpaper just to give it more to stick to, but I don’t know if that was really needed as tile mastic sticks well. I did not seal my tiles. The grout and tiles can be washed even if they aren’t sealed, but they could stain if they aren’t sealed. This didn’t bother me and I didn’t want to add extra chemicals into the area, so I just skipped this step. I spray with 10% bleach solution between cycles and it’s cleaned up really well for the last 4 years. I don’t know if I mentioned it in the post, but I did caulk around the edge of the tiles (where it meets the table base) with exterior caulk to prevent moisture from going under the tiles. Everything has held up perfectly!