
How to Build a Catio (DIY Catio Tutorial)
Plans for building a DIY catio (cat patio) to let your cat sit outside in the fresh air without roaming free.
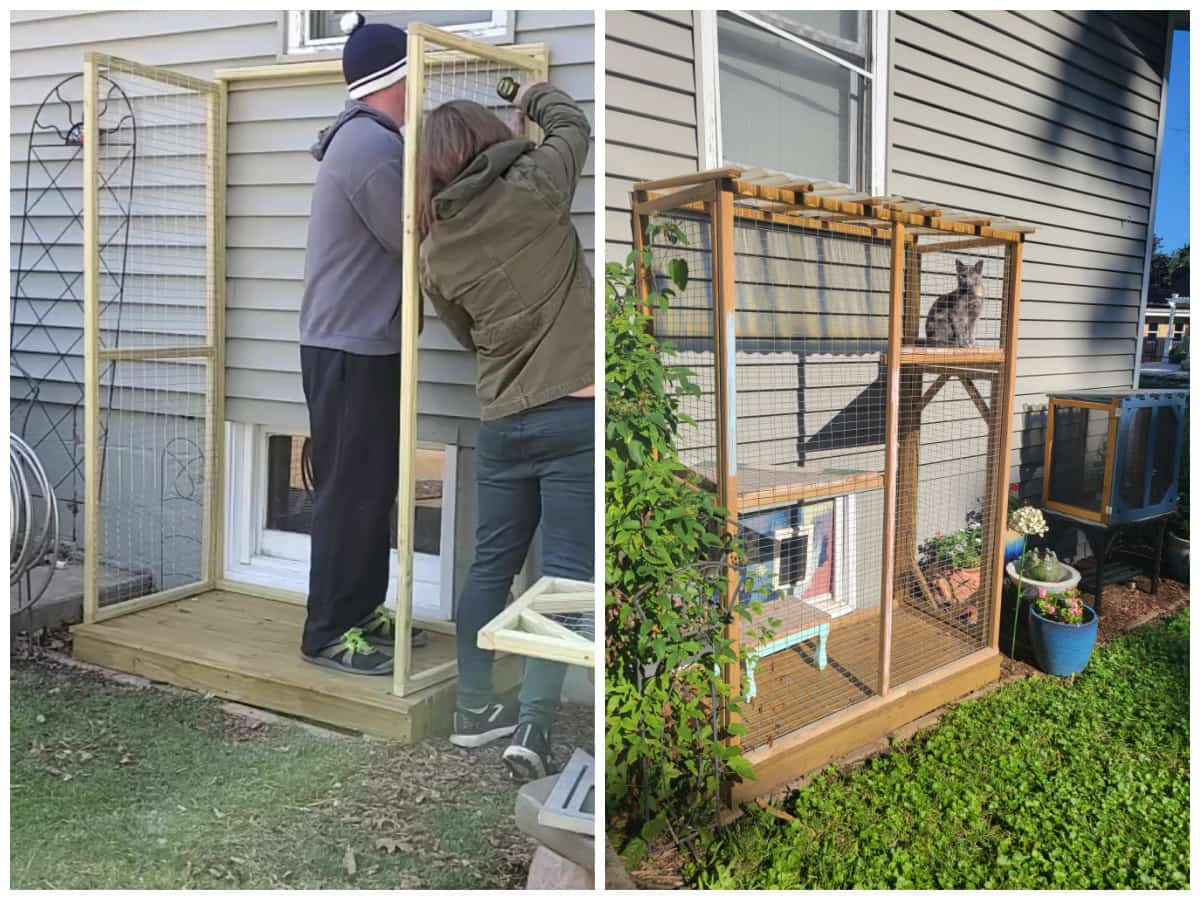
It’s easy to build a catio with a couple of pieces of wood from the hardware store and wire screen mesh. This post includes a step by step tutorial and a video tutorial on how to build a DIY catio.
I’m going to start with a little bit of honesty. I never thought I’d be writing a post about how to build a catio. NEVER. I’m not sure what this means for me and where I’m at in my life. All I do know is that I love our new cats and wanted to give them a space outside. And although I still like dogs more than cats, I’m happy because my cats are happy with their new catio. VERY happy.
In This post You’ll find:
Before we get started on this tutorial, let’s get something out of the way:
What is a catio?
Being a dog person for my entire life, I’ve never owned cats or even thought about cats. So this word was definitely new to my vocabulary a little over a year ago . A catio (cat + patio = catio) is an outdoor enclosure that is fenced in and gives a cat access to being outside in a protected area.

My cats absolutely LOVE being outside, but I didn’t want them to be outdoor cats and have free reign of the yard and neighborhood. This catio helps us to compromise. I leave the basement window (which connects to the catio) open during the day and night from spring through fall. Basically, they have access to this area whenever they want.
This post contains affiliate links. For more information, please see my disclosures page.
Supplies to Build a Catio
- 2 – 2×4″ treated boards (8′ long) – for base
- 4 – 1×4″ treated boards (8′ long) – for top of base
- 12 – 2×2″ treated boards (8′ long) – to build the front, back, and side panels
- 2″ exterior deck screws
- 1×2′ wire mesh (24″ width) – you could also use hardware cloth which has smaller openings
- 2 – 1×2″ boards (8′ long) – for roof
- 1″ metal roofing screws
- Corrugated plastic roof panel
Steps to Build a Catio
In this post, I will describe the measurements I used for my catio, but you could easily adapt the size to meet your needs. To start, you’ll want to be sure your catio is large enough to be in front of a window. This allows the cat to have access to the catio through a cat door. I used a basement window and it worked perfectly.
1. Build the base
The first step is to build a base for the catio to sit on. This provides a place to screw the catio wall panels into and keeps your cat fairly clean and off the ground.
The base is made of ground-contact treated 2×4″ lumber (since it will be in contact with ground). The front and back boards are 48″ long and the side boards are 23″ long. Two 8′ boards will be enough to make the entire base.
I screwed 1×4″ treated boards to the top of the base. Each one was 48″ long, so the side edges were flush with the edge of the base. The front and back edges hang over slightly. Then, I leveled the ground and put the catio base as close to the exterior wall as possible.
2. Build the wall panels and attach mesh
To build each panel, use wood glue and 2″ exterior deck screws to attach the 2×2 boards together. It’s important to pre-drill each hole with a drill bit that is slightly thinner than the screw you are using. This ensures that the wood won’t split when you screw into the wood (especially since the screw hole will be quite close to the edge of each board).
After building each of the walls, I attached 1×2″ (24″ wide) mesh to all of the panels except the back panel. I used 1″x2″ wire mesh, but you could also use hardware cloth that has even smaller openings. I would not choose chicken wire as it’s too flimsy. Also, if the openings are any larger than 1×2″, I would worry about other smaller critters getting into the catio and causing a whole lot of chaos!
Here’s a link to the exact mesh I used. I was having trouble finding the size I was looking for anywhere but Menards.
The back panel can remain open it will be closed in by the exterior wall and it allows for you to place the cat door access anywhere within that opening.
To attach the mesh, I used an electric staple gun, but a handheld staple gun will also work just as well!
Back Panel Cut List and Assembly
- 2 – 48″ long 2×2″ boards
- 2 – 67″ long 2×2″ boards
To build the wall panels of the catio, I used 2×2″ treated wood to build each wall. The back wall is made from two 48″ pieces of wood for the top and bottom and the side pieces each measure 67″ long.
Front Panel Cut List and Assembly
- 2 – 48″ long 2×2″ boards
- 3 – 65″ long 2×2″ boards
Build the front panel with two 48″ boards for the top and bottom pieces. The sides and middle post measure 65″ in length.
Side Panels Cut List and Assembly
- 4 – 23″ long 2×2″ boards
- 4 – 65″ long 2×2″ boards
- 3 – 20″ long 2×2″ boards
The left side panel on my catio is fixed and has mesh all the way along the panel. I made the right panel to allow for a small access door. Because there is a door, I used two 20″ boards above the door opening for a stronger header. I attached the wire mesh only to the top opening in this side panel.
If you plan to build a door in your catio, build the side panel with an opening for the door, but wait to attach the door until after the whole catio has been assembled (next step).
3. Attach base and panels together
To see the building process, scroll above to view the video of the assembly of the catio.
Starting with the back panel, I used 2.5″ exterior screws to screw that panel into the bottom base (making sure that the screw is going through the top boards and into the 2×4 of the base). Then, I screwed the back panel into the exterior wall (one on each side).
After the back wall is attached, screw the side panels into the back panel using 2″ exterior screws. (Don’t forget to drill a pilot hole first and then use wood glue before screwing together the panels.)
The side walls should also be screwed into the base of the catio, going right into the 2×4 of the base.
Finally, screw the front panel into the side panels and the base of the catio in the same way as the other panels.
4. Build a roof
- 6 – 27″ long 1×2″ boards
- 1″ metal roofing screws
- Corrugated plastic roof panel
This is a very simple roof structure that requires no fancy angle measurements or cuts. The back panel is slightly taller than the front and side panels, which gives a slight pitch to the roof. Screw the 1×2″ boards into the top of the frame using 1.5″ exterior deck screws.
I used the least expensive corrugated roofing panel which was a clear PVC panel, but there are other options like steel, polycarbonate and foamed PVC roofing panels as well. No matter what the choice, you can use roofing screws to attach the PVC panel into each of the wood rafters.
These sharp point roofing screws work great because they have a little washer that attaches tightly to the roof panel which keeps water out. Plus, they are self drilling so they go right through the plastic without causing any splitting.
5. Build a door (optional)
I decided to make a small door that fit into the lower opening in the right panel. I used 2×2″ boards to build the door in the exact same way that I assembled the panels. Plus, I added smaller boards cut with 45 degree angles at each end to attach within each corner for structural stability.
How’s the catio holding up?
I built this cat patio a year and a half ago, and it is holding up really well! We live in the Chicago area, so we have a wide variety of weather across the seasons. For the past year and half, I’ve kept the catio up and didn’t put it away over the winter. I think you could easily move it into a garage over the winter, but I didn’t really feel the need to do so because the wood is exterior treated wood. Plus, it’s very helpful that this catio is underneath a roof line that extends about a foot and half away from the house.
To install the shelves on the inside, I attached a couple more 2x2s in the corners on the interior. Then, I screwed 1x4s right into those 2x2s. Of course, both cats always want to be on the top shelf, but they don’t really want to be near each other. SO, I think I should probably add another top shelf to the left side of the catio as well so they both have a top spot!
Post by Jenny Leads
Jenny is the voice behind Refresh Living. She has a passion for helping people to create a home they love without spending a lot of money.
Wjy do you have 12 1×2″ listed in the first list of materials? I bought and cut them all based on your directions, only to find out later I needed 2×2! What a waste of materials! No good directions on the door making either.
Hi Sarah. I am SO sorry for that error. And it’s a huge one because you definitely need 2x2s to build a frame this large. I changed that error in the supply list so it doesn’t happen to others. Thanks for letting me know. The door is built in the same way as each of the panels, but I added 2x2s cut at 45 degree angles for each corner. You could also add two boards straight across the middle of the door to help keep it square. Sending you an email now!
the best support for a door/gate like this is to have one large diagonal from the outer top corner, to the inner bottom corner. this prevents the outer edge from sagging. your small diagonals do work, but also require more fasteners.
Great point; you’re right! I made my garden gates in this way, but I actually ran out of wood and didn’t want to buy another piece to span diagonally, so I just used scraps to make the corner braces. Thankfully it’s a very small door with no weight, so no issues with sagging. But on a regular door or gate this would definitely be a problem. Thanks for sharing this as I know it will be helpful to others!
This was a disaster. The choice of 2 by 2 for the upper structure does not seem to be a good one. The joints where the 2 by 2’s join together are very flimsy despite wood glue and deck screws. Any jostling and they get out of square very easily. Finally gave up on the 2 by 2’s. I now have a very sturdy base and have to figure out some sort of structure to build on it.
Hi Dave. I’m sorry it didn’t work well for you. I am wondering where you’re seeing the flimsy joints? Is it in the single panels before putting them all together? Here are a couple things that I made sure to do. When building each panel, I made sure that each corner (where one 2×2 met the other) was square and also added an additional 2×2 in the center of each panel because without it, it wouldn’t be sturdy enough. I could pick up those panels and move them around and they were fine. However, those panels by themselves aren’t extremely sturdy, which I think is maybe what you’re referring to? I will say that it’s when the panels are put together to form the full structure that there is even more strength. Each corner of the catio is essentially a 2×4, because two 2x2s are screwed together. If anyone tried to just build the structure with single 2x2s joined at the corners of the catio, it would definitely be a stick pile in minutes. I will say, my kids go in and out of the catio all the time, and have even climbed on the ledges (before they were caught…) – the one I built does not sway, jostle, or have any issues. It’s been outside for 2 years through storms (and with snow piled on top) and it’s totally fine. Now, of course building it with 2x4s would be stronger, but it just wasn’t needed in my case. Again, sorry it wasn’t able to work out for you.
I hope people don’t let this comment discourage them, I built a catio nearly identical to this over the weekend, and it was easy to do and turned out very sturdy. I expected the individual panels to maybe be a little flimsy, but I could easy carry them around without them wobbling at all. By the time I stapled on the wire mesh and screwed the panels together, it was a fortress. A bear could get into it, but a dog definitely could not, and my cats aren’t going anywhere. I used my impact driver to put in the 2 inch deck screws (after drilling a pilot hole) and those 2x2s weren’t budging.
Good luck on whatever build you do end up with.
Thank you for this positive comment. I would 100% agree with you – a bear definitely could get into it, but not other animals like dogs or racoons. We did have a small bird fly in and she did not fare so well. 2x2s make it sturdy enough for it’s purpose and help to keep the cost down! I’m glad it worked for you. Thanks for the tip on the impact driver!
I left a comment on the DIY catio project. It was a negative comment based on the difficulty of building the structure with 2 by 2’s. One day after leaving the comment it has been deleted. That doesn’t seem fair. Since you have my email you could have at least sent me an individual response.
Hi! I only go through comments once week – so your comment wasn’t deleted, I actually haven’t yet even read it, approved it, or responded yet. No comments can go through without my approval because of spammers. However, I have no problem posting someone’s negative experience. You’ll see your comment posted and responded to in about 10 minutes once I get to it down the list!
I’m 2+ years late to this thread, but I gotta commend you on your professionalism in dealing with negative comments. Folks seem to jump off the handle here, and you handle it with clarity and positivity. Job well done 🙂
As for the catio, my kiddo and I are going to make it our “after school project”. We have two tuxedo cats (similarly got them after our pup of 15 years passed away), and they’re going to love the sunshine! As a build myself, your plans are solid and the perfect mix of simplicity and utility. No crazy frills, and it’s an adequate/proper amount of space and verticality for the cats. Can’t wait to get started, and happy to send end results or updates if you’d like them! Thanks again!
Well thank you for coming here and bringing positivity and a personal story. This is precisely why I post my projects – if it helps someone else, then I’m happy, and I love to hear about other’s projects! As a middle school teacher, I have pretty thick skin but also have learned to model a lot of patience. It feels that sometimes when I’m talking to adults, I need to just pretend like they are 13… Please let me know how your catio turns out! I’m sure you’ll be able to make some upgrades being that you are a builder, but I am glad to hear that my plans seem solid to you. It’s still holding strong and the cats still use it every day!
I think the list of materials is missing some lumber, because the base has a center board that isn’t mentioned in the directions.
Thanks for letting me know. I will check on that and update it!
Do you mind me asking how much this cost you to make? I am trying to decide if a premade catio of a similar style is more or less cost effective.
Thank you. Yours turned out great!
Hi Mia. When I made it 2 years ago, it was about $75 in supplies. But, the cost of lumber is significantly higher now, so I went back and priced it out and it looks to be about $150 in 2023 (rough estimate). Because I had a leftover roof panel scrap, that also cut down on cost as well.
Thanks for the walk through and plan. Have been wanting to try one, and this gives me a good place to start and design.
I’m glad it was helpful and gives you some inspiration for your design. Enjoy working on yours!
I’m going to be making this but will be making it 4’Wx4’Lx4’H. It basically just to let my Daughters cat get some sunshine while I’m out in the garden or working on other projects outside. She’s not too excited about being outside unless Grandma (me) is with her. I even got her a hammock to go in the top. I’ve been wanting to make one for some time but most I’ve seen are huge. Thank you for this blog post.
That sounds like a great idea!! You’re right, the dimensions can totally be adapted. I can’t tell you how much time my cats spend out there – although one seems to go out only when we’re out there like yours, but the other is out there all day!
Thanks so much for posting this! I’ve never built a thing in my life, but I think I can handle this catio . I do have a couple of questions (sorry if they sound ridiculous!) Would the catio be stable enough if I didn’t attach it to the side of my house? I live in a condo and I don’t think I can put screws into the siding. Also, the one time I used hardware wire, the edges were very sharp. What should I do to the edges to ensure the cat doesn’t hurt himself on them?
Hi Lenna. Yes, you can do this! Great questions. I actually have my catio set up right now and it’s not screwed into the house. (I had it screwed in but then had to move it and never screwed it back in!!) It’s not as sturdy, but mine is still fine. I notice it wiggling slightly when the cats jump from ledges, but it’s honestly not going anywhere. I would say that you definitely don’t want to build it any higher than mine and not attach it. If yours is going to be shorter, it will probably be even more stable without being screwed in. For the sharp edges, I tried to butt all of mine up in the corners where the cats can’t access them. There was one panel on the front that I was worried about that didn’t fall in a corner, so I took screen molding (a thin, long piece of wood) and attached it on top of the hardware cloth and into the 2×2. This makes a finished edge and basically sandwiches the hardware cloth between the wood. You can find a piece of wood that will work in the lumber section by the baseboards and other smaller decorative wood. Best of luck on your catio!!
Hi, I have another question. I just realized you didn’t add a door to your Catio. Isn’t that some thing you would need to be able to occasionally clean, add water, etc.?
Sorry…you do have a door!
I have another question… I don’t see anything about hinges on your door. Could you add hinges on or do you have to remove the door every time you want to open it? Thanks!
I’m going to be giving g this a shot this week. Just wondering in measurements for the door? Also, I have the same basic basement window and I’m wondering if you could provide some directions for the panel with the cat door? Thanks!
Hi Amy. I think you may have already finished yours; I’m sorry for the delay! For the window, I just cut a piece of plywood to fit in the window and then cut a opening in the plywood to fit a cat door. For the side door of the catio, mine is 19 7/8″ by 45 1/2″. I ended up just making the door size based on the opening which I sort of just made up when building it. Best of luck on yours!
most weatherproof cat doors I find require a minimum thickness of 1.6 inches. plywood is usually only a 1/2 inch thick. perhaps you live in a warmer climate, but since I’m in Canada I need something a bit more insulated. do you have any wood panel suggestions that are thicker than plywood? thank you.
Hi Paige. I’m very delayed in responding to your comment and I’m so sorry. You probably already figured out a solution, but in case others are wondering, here are my thoughts on this. First, we’re in Chicago so definitely not as cold as Canada! We do close up the window during late fall and through winter, and the window leads into our basement so it’s a bit less of a concern. I think you could use a piece of edge glued board. Those come in thicknesses up to 5/4″, which would add some extra insulation. But to save money, I think I would just add foam insulation to the back of the plywood (or sandwich foam in between two pieces of plywood). Thanks for your question, as it has me thinking I should probably add foam to mine!
THANK YOU SO MUCH for the detailed tutorial!!! I had almost committed to buying a catio kit when I stumbled onto your tutorial and am so happy I did. I am not a carpenter and don’t have all the fancy tools but because of this tutorial, I was able to build a catio to fit my space.
I’m so glad Shari!! That’s such great news and makes me so happy it empowered you to do it yourself!
Hi! I did something similar but I CANNOT find a basement window compatible cat door…..would you mind linking/explaining yours?
Hi Brittany! I should definitely adda section about this because many others have asked as well and I didn’t describe it! I cut a piece of plywood to fit into my window opening. Then I cut a hole and used this exact cat door (it has a template inside so you know how big to cut the hole): https://amzn.to/3OTLnhq
I hope that helps. Best of luck on your project!
What is the name of the cat flap door you used in the window? How did you set it up (if it wasn’t meant for the window)?
Hi Kiana. The exact door I used is this one: https://amzn.to/3P9WxgW
I cut a piece of plywood to fit inside my window opening and cut a hole to fit the cat door. Then, I attached the piece of plywood into my window opening with L brackets. This could look different depending on the type of window you have though. Basically, the plywood is replacing where the window screen would go.
In case anyone is curious: I priced this out for Canadian Home Depots and it’s $295.20 for the supplies. Just thought put that out there as this is pretty close to the cost of buying one. I still think making one yourself will end up with a better quality product and you can buy specific supplies to make them to last through a Canadian winter. Food for thought.
Thank you so much for coming back here to comment after pricing it out! I am going to add this estimate to the post if that’s okay. (I should also really figure out the current cost in the US as well.) Thanks again!
Very, very helpful. Thank you so much, from one cat lover to another 🙂
You’re so welcome! And let me tell you, the cats LOVE it. It’s winter and one of my cats still goes out there every day!
Just wanted to drop a quick thanks for the simple and detailed plans and ideas. My daughter and I have been talking about a catio, but neither of us is particularly handy in that regard, so this is a great find. Thanks and take care!
I’m so glad it was helpful for you! It really is a very doable project, but I always find it helpful to see the steps broken down.
Thank you for the inspiration! We used these plans with a few modifications:
1) To add a bit of overall sturdiness and to save a bit of $, I bought 2×4’s and, using a table saw, ripped them in half for the framing. This added about ⅜” to each support because the actual width of a 2×2 is 1½. A 2×4 is 3½ (the blade removed about ⅛”
2) I used green pvc coated fencing to add durability and weatherproofing. The openings are 2×3 which added better visibility without sacrificing any safety. Purchased at Lowe’s: https://www.lowes.com/pd/Blue-Hawk-50-ft-x-2-ft-PVC-Steel-Welded-Wire-Garden-Welded-Wire-Rolled-Fencing/5001915763
3) I also modified by using Trex decking boards for the three platforms and constructed the two upper platforms to be the full depth and half the length of the enclosure.
Here’s a final pic: https://photos.app.goo.gl/K5AxvFUrpN9xcRmK6
Thanks for sharing this, Derrick! I think others will definitely find it helpful. I like the platforms you created, and I know my cats would prefer that as well. Thanks again for sharing!
Great prject and so helpful thank you! i hope to tweak the plans and use screen to spare the boys from mosquitoes.
More information on the pet door would be helpful if you have any. we have a very similar set up and tiny basement window.
Do you worry about the toxicity of the treated wood on cats paws and with licking? I might do treated for the foundation and cedar for the floor…maybe let them play in dirt 🙂
Hi there. You’re right on being aware of the treated boards. My shelves where they spend most of their time are cedar, but I think using cedar (or better yet composite deck boards) would be better for the bottom. Thanks for bringing that up – it will help others as well I’m sure!
What a wonderful project! I spent around $100 to do this. I did not do the treated wood, but I will paint it or stain it with something animal-safe. I did add 1×2 over the wire, so I had 2×2, wire, and then a 1×2. I predrilled every hole with a countersink. Once the 2×2 back, sides, and front were installed, the overall sturdiness of everything came together perfectly.
Thank you again for a great catio. Our two cats will love going outside and watching everyone in the pool, garden, and deck.
Thanks for sharing recent cost. A lot of people have asked, but I can only share how much it was 5 years ago. I’m glad it worked out well for you! We had our first 70 degree day this Spring and my cats have been out all day, loving their lives!
thank you so much for posting this!!!! I spent ages contemplating trying an ikea diy when I stumbled upon your video – I finished this yesterday and it’s perfect!! we just moved into a city apartment and unfortunately the windows are too narrow for his bed which he loved. but we do have a huge balcony which we discovered he loves to check out with supervision. I adjusted slightly so that I have a middle platform that aligns with the window and since I opted out of a base piece, it’s also supported by a scratch post I built. weather isn’t really a concern so i just added wire to the top instead of a roof. but the frame is perfect and direction super helpful. couldn’t have done it without your help 🙂
This sounds amazing! I’m so sorry I didn’t see this earlier, because others can gain insight from your modifications. Thanks for sharing! I hope your cats love it!
I am excited to give this a try. nice walk through and video. thanks!
Thank you so much for this post! Just adopted kittens and need a bigger enclosure to coral them!