
DIY Raised Garden Bed – Easy Build!
Follow this easy tutorial to make your own raised garden beds using cedar wood. Once the raised beds are made, fill them with this easy DIY soil mixture to allow for proper drainage for your vegetable garden.
How to make a raised garden bed
[wc_box color=”secondary” text_align=”left” margin_top=”” margin_bottom=”” class=””]
Supplies Needed:
- 1″ x 6″ x 8″ cedar boards
- 4″ x 4″ cedar posts (2″ x 4″ cedar boards will also work)
- 2″ deck screws (or other screws made for exterior applications)
[/wc_box]
For my raised beds, I chose to use cedar, which is naturally rot resistant. Another option would be to used treated pine, but because I am using these beds for my vegetable garden, I opted for the most natural product I could find. As a cheaper alternative to the 1 x 6 boards, you could also use cedar fence boards. They are thinner than boards, and you aren’t able to find 8′ lengths, but you could use them to create smaller boxes.
Rather than purchasing 4″ x 4″ posts, I used scrap cedar posts from the used playground that was passed down to us a couple of years ago. Some of the posts needed to be replaced due to deterioration, but I was able to cut quite a few solid pieces from the posts for these beds. Using 2″ x 4″ boards instead of the 4″ x 4″ will also work as a cheaper option.

I cut 21″ from the end of each of the boards and used these pieces as the front and back sides of my bed. The possibilities for dimensions and how you cut them from your wood boards are endless, but this size configuration allowed me to have no wasted wood. Figure out what works bests for you and your space!
I then measured the width of one board, doubled it, and added 6 inches to determine the measurement of my posts. I wanted the bottom part of the post to sit into the ground a bit, but I’ve seen them made where the post is flush to the bottom of the bed as well.
After all the pieces were cut, I drilled pilot holes through both the board and the post, and then used deck screws to secure each piece to the post. After the first layer of boards was attached, I completed the second layer, flipped it over, and placed it in my backyard.
L-shaped Garden Beds
If you’re looking to build an enclosed garden from raised planter beds, these garden beds are built in the shape of an L. You can combine 4 of them together and add two gates to create a full garden!
Soil mixture for raised beds
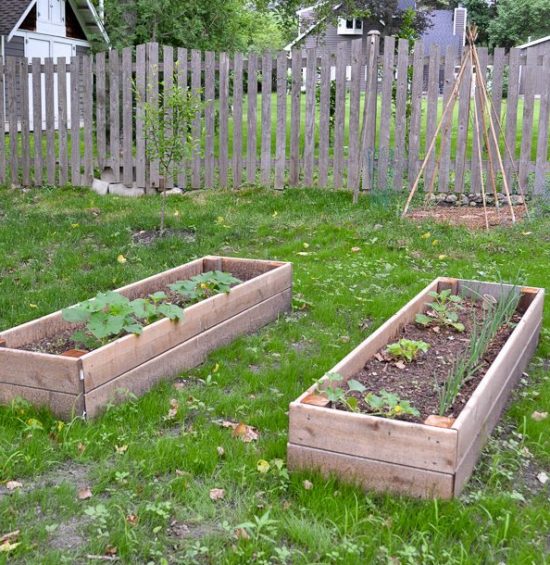
This area in our backyard is the last section of our yard, behind the garage. It has been a work in progress for years (and years and years and years). All I can say is that we found the foundation, dishes, and chimney from a house that used to be back here, along with a half buried car, hidden in the brush and trees. It’s finally cleared, all the concrete foundations have been removed, and we’re slowly landscaping, planting grass seed, and creating a mini orchard. Next year, I plan to make 6 more raised beds for this area and I’ll move my entire garden here, but we first need to continue to level and ready the ground to the right of this area. Slowly but surely, it will get done!
Post by Jenny Leads
Jenny is the voice behind Refresh Living. She has a passion for helping people to create a home they love without spending a lot of money.
I just had a conversation with a gardening friend about switching to raised garden beds next season, and than I find your post. Thanks for the tips, I’ll be adding your post to my Garden Board for reference. Thanks for sharing on Sunday’s Best.
My wife and I are new gardeners learning on a small budget during these pandemic times, and currently building two of these boxes for our backyard! Thank you so much for this video it’s helped a ton.
I’m glad it was helpful. My garden keeps growing each year so I have a new post coming soon about building 4 L-shaped beds!