
How to Build a DIY Loft Bed
Step by step tutorial on how to build a DIY loft bed or hanging bunk bed. It’s made from basic lumber and attaches to the wall and suspends from the ceiling or wall so there is no need for legs.
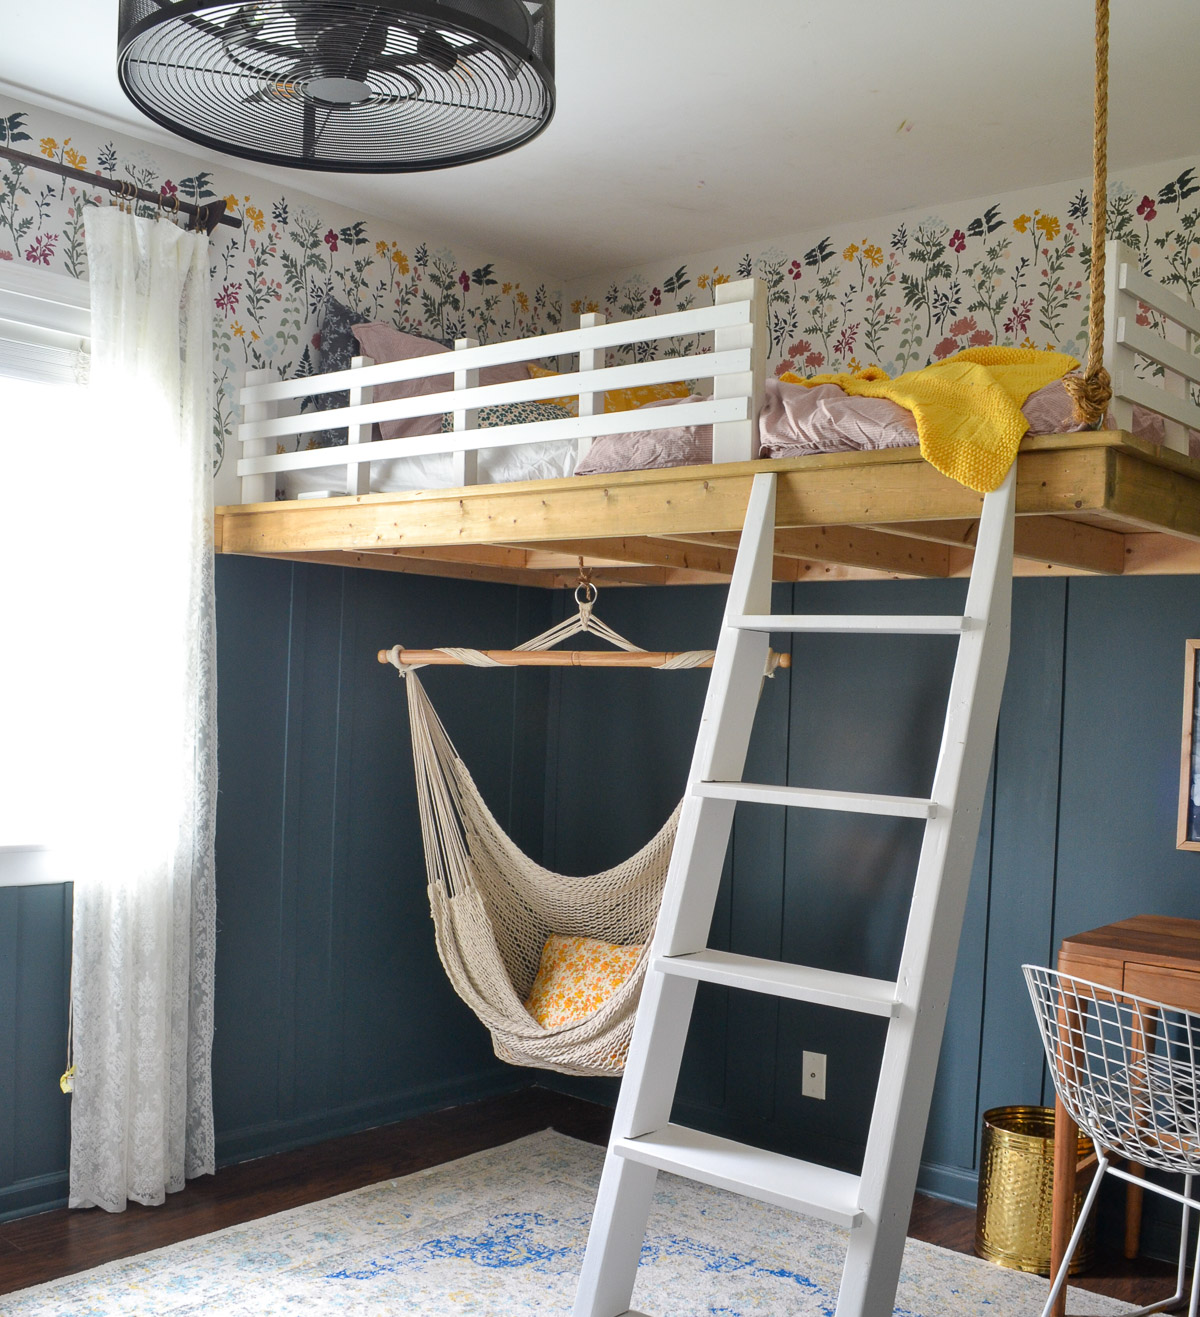
A loft bed is the perfect bed for a kid’s bedroom or a shared bedroom because it frees up so much more space as compared to bunk beds. I added this suspended loft bed in my daughter’s small bedroom and she absolutely loves it!
This space-saving loft bed plan includes step by step instructions on how to build a simple loft bed that is the size of a twin bed.
This loft bed design is perfect for small rooms because, without a leg, it frees up extra space under the bed for a desk, a second bed, or even a hammock that can hang from the lofted bed.
When my two oldest daughters shared this room, it was the only way we could fit two beds in the room. (After converting our attic to a bedroom, we were able to give my oldest daughter the room to herself, and I gave it a budget-friendly update with a ton of DIY projects. You can see the full modern girl’s bedroom makeover here.)
When I built this bed about six years ago, it was one of the first build projects that I had completed. Considering this, I’d say this is definitely a simple build and requires minimal tools, which makes it a great DIY project.
Because it’s a simple build, it will only take a couple of hours to build the bed frame and hang it in the room! After hanging the bed, installing side rails and a ladder will finish off the loft bed (more ideas on these steps below).
This post contains affiliate links. Please read my disclosure policy here.
Materials Needed to Build a Loft Bed
- (5) 8 foot long 2×4 boards
- (8) 8 foot long 1×6 boards
- Kreg Jig (optional, but highly recommended!)
- Wood glue
- Wood screws (Kreg self drilling 2.5″ pocket screws if using pocket holes)
- Aircraft cable wire – 1/8″ – 3/16″
- (2) Wire rope clips
- Eye screws (one with 2″ threaded shank for attaching to the bed, one with 2.5″ or greater threaded shank for screwing into ceiling joist)
- Circular saw (There are minimal cuts for this project, so a handheld circular saw will work fine. A miter saw will make the job go faster, though!)
Using a Pocket Hole Jig to Join Boards
I recommend using a Kreg Pocket Hole Jig to join the boards of the bed frame together. This little tool allows you to pre-drill holes called pocket holes, at the perfect angle, to join boards together.
You can use it to easily make 90 degree joints, or if you want to join boards of wood laying flat (to make a sign or something), it can be used for that as well. I’ve also used it to make furniture and cabinet doors. It really is a magical little tool and one I recommend to any DIYer!
There are two different models of Kreg Jigs that I recommend for simple build projects like this bed:
- Kreg Jig 320 Classic with Clamp: This small, inexpensive jig is clamped to the face of the wood before drilling the pocket holes. It’s the most simple design of a pocket hole jig but works perfectly if you don’t need to make hundreds of pocket holes.
- Kreg Jig 520PRO: This jig has the clamp built into it. The wood is set and clamped into the jig and then the pocket holes are drilled through the guides. This speeds up the process slightly over using the 320 Classic, but they are essentially the same thing. The 520PRO is about double the cost of the 320.

(Note: Kreg has changed the design of their Kreg Jig over the years and the newer versions look slightly different, but they do exactly the same thing! My older model is comparable to the current Kreg Jig 520PRO.)
If you would like to build this bed without a Kreg Jig, it’s still entirely possible! You will just drill pilot holes and then screw from the outside of the frame into the 2×4 joists. The screws will be visible on the bed, so you can countersink and fill the screw holes if you don’t want to see the holes.
Thinking about buying one of these handy little tools for all your building projects? This post compares the top Kreg jig models to help you make the most informed decision.
How to Build the Loft Bed Platform
Cut List for Platform Bed
- (2) – 81.5″ long 2x4s
- (6) – 42.5″ long 2x4s
- (8) – 83″ long 1x6s
How to Build the Frame of the Platform Bed
First, build the frame using the 2″ x 4″ boards. Use a Kreg Jig to make two pocket holes on each end of the joist boards. You will not need to make any pocket holes on the long 81.5″ boards.
If you choose not to use a Kreg jig, drill two pilot holes where each 2×4 will attach to the long 81.5″ board. Drill pilot holes slightly smaller than the width of your screw, right through the face of the 81/5″ board.
Next, use Kreg self drilling 2.5″ screws to attach the inside joist boards to one of the long boards. It’s helpful to work on a flat surface and use a 90 degree triangle to ensure that you are attaching the boards at right angles. Of course, it’s important to use wood glue at each joint before screwing them together.
How to Attach the Frame to the Wall
After building the frame, it can be attached to the wall following these step by step instructions. It’s much easier to hang the frame without the top boards installed yet.
When I built this loft bed several years ago, I didn’t trust my own skills and knowledge to hang a heavy bed in a room where my little girl would be sleeping underneath it every night. I did, however, completely trust my dad’s general contractor skills to do so! Now that I know how to do this properly, I would feel completely comfortable doing this on my own.
- Locate the studs in your wall using a stud finder. These tools are usually very accurate, but if you want to be sure you are hitting a stud before attaching the frame, nail in a small nail and be sure it hits a stud with resistance (after making it’s way through the drywall first).
- Mark the center of the studs with painter’s tape. Then, use a level to mark a level line on each of the walls at the height where the bed will hang. (Our loft bed is installed 32 inches from the top of the frame to the ceiling.)
- Use a tape measure to measure the distance between the tape on the wall, and use these measurements to drill pilot holes into the back board of the bed frame. Drill two holes per stud. Predrilling these holes before hanging the bed is helpful because it eliminates splitting of the wood, and gives you the exact place you need to screw without fumbling around while holding an awkward bed frame and trying to screw it into the wall.
- Use another pair of hands to hold up the bed frame along the marked level lines. Use 3″ wood screws to attach the side and back boards of the frame to the two walls. We used two wood screws per stud, but you could also use lag screws as well.
- Attach a temporary 2×4 board as the front leg to support the weight of the bed until the cable suspension is installed.
- (Our bed is installed in the left corner of the room, but this could easily be adapted to be installed in the right corner as well.)
Attach the Top Boards to the Frame
To install the top 1×6″ boards, you will screw them into the frame from the top down into the frame. First, measure the distance between the 2×4 boards of the base and use a pencil to mark these lines on the top of each board. Then, pre-drill the pilot holes (2 holes into each of the 1×6″ boards where it will be attached to the frame) using a countersink drill bit.
Then, stand on a ladder at access the top of the bed and screw the first couple of boards onto the top of the frame. Once there is enough room to sit on those boards, you can get up on the bed to install the rest of the top boards.
I spaced the boards out slightly with a small gap between each board so I didn’t need to rip down the last board against the wall.
Looking for ways to use up those extra 2×4 scrap pieces? Here’s over 40 ways to make scrap wood projects from leftover 2x4s.
How to Hang Loft Bed from Ceiling
We chose to suspend the loft bed from the ceiling rather than building leg in the corner. However, you could easily choose to support you loft bed with a 2×4 board. It will look similar to the temporary “leg” shown in the earlier photo, but it would obviously need to be cut down and secured to the bed frame.
To hang the bed from the ceiling, use an eye screw to screw into a joist in the ceiling. Use an eye screw with at least a 2.5″ threaded shank to screw into the ceiling joist. Then, screw an eye screw with a 2″ threaded shank into the top of the bed frame. This eye screw will pass through the top board and into the 2×4 frame. Using a 2″ thread is important because you want the eye screw to penetrate halfway into the 2×4.
If you don’t have a ceiling joist above the place you need it, you could also attach the eye bolt to a stud in the wall, and have your rope angled from the top of the wall to the corner of the bed.
Use airline cable between the two eye bolts to ensure it was strong enough to hold the weight of kids (and adults, too). Loop the airline cable through the eye bolt and then secure it with a wire rope termination clip. (You can also use cable ferrules, but you’ll need a crimping tool to secure these.)
We used 3/16″ airline cable similar to the product linked here. However, I would highly recommend purchasing this cable from a home improvement store rather than through Amazon!
To hide the ugly wire and make it safer for kids, I used a 3 ply large jute rope from Home Depot (you can cut the exact size you need) and unwound the bottom of the rope slightly.
Then, I placed the aircraft cable in between the strands of the rope and it wrapped up nicely right around the wire. For the bottom, I tied the three strands into a knot to cover the wire clasp.
Important note: I did not use a rope to suspend the loft bed from the ceiling. Rope can stretch and does not have nearly as much strength as aircraft cable. The rope is just wrapped around the cable to keep it safer and to help it look prettier!
Attach Railings and Ladder to Loft Bed
How to Make Guard Rails for Lofted Bed
To make the guard rails for our lofted bed, I used 2x4s, 2x2s, and 3/8″ x 3″ pine molding strips. The end railing braces (2x4s) are attached to the 1x6s top boards (not the 2×4 frame) by screwing them from underneath the bed, through the top boards, and into the 2×4 railing brace.
Attach the inside braces (2x2s) in the same way, spaced evenly apart across the span of the bed. The, use a nail gun to attach the wood molding pieces to each brace across the span of the side railing and end railing.
How to Build a Bunk Bed Ladder
I don’t have a tutorial for how to build the ladder, but this YouTube video gives a great tutorial on how to build a ladder. We used a very similar process to build our ladder. Of course, you may need to modify based on the height of your lofted bed. For the lumber for our ladder, we used 2x4s for the rails and 1×6 boards for the steps.
If you prefer to buy a wood bunk bed ladder instead of building one, this US-based small business makes wood ladders in a variety of sizes. Plus, you can customize the height if needed!
Frequently Asked Questions
How high are the ceilings in this room?
This room does NOT have abnormally tall ceilings! The height of the room from floor to ceiling is 96 inches (8 feet).
How high up is the loft bed and how much headroom is above the loft?
I chose to hang the loft bed slightly higher, leaving a little less headroom and more walking room underneath. The bed is 60 inches from the floor at the bottom of the frame. The clearance above the bed is 32 inches from the top of the platform to the ceiling. Refer to the FAQ below for the height of the mattress on this bed.
What size mattress fits on a loft bed?
Because I chose to hang the bed slightly higher, a regular 9 inch mattress didn’t give enough comfortable headroom. We used a 4 inch mattress on the loft bed and I feel it is the perfect height. There is enough headroom for even me to crawl around up there, but it’s also thick enough to be comfortable for a kid.
The exact mattress on our loft bed is from IKEA: MINNESUND foam mattress. When I bought this mattress several years ago, foam mattresses weren’t as easy to find online as they are now. If I was buying another mattress for this bed, I would choose this 5 inch memory foam mattress.
Did you space apart the boards on top of the bed frame?
Yes, I did put a slight space between each of the boards on the top of the bed. This allowed me to use only 8 boards without having to rip down another board to cover the extra couple of inches.
Can I build a loft bed to fit a full or queen sized bed?
I personally have not build a loft bed for a larger sized bed. If I wanted to make a larger loft bed, I would build my platform to span across the entire width of my room.
As the bed gets larger, more weight is distributed on that corner that is suspended. To eliminate that extra stress on that corner, building a loft that spans the entire wall would make it structurally sound.
What colors did you use to stain the wood?
I wanted to keep some wood elements in the room, so I opted for a wood and white loft bed. The bed frame is stained with Minwax stain in the color Driftwood.
The railings and ladder are painted in white paint. I used my favorite paint for cabinets, Alkyd Enamel paint, on the ladder because it’s durable and can easily be cleaned. You can read everything about alkyd enamel paint for cabinets in this post.
The best part of building this loft bed is how much area it freed up in the room. If you have a small space for a bedroom, adding a loft bed is a great solution!
Thanks so much for reading this post! Let me know if you have any questions. I’d love to see your finished project if you use this loft bed for inspiration of your own DIY loft bed.
Post by Jenny Leads
Jenny is the voice behind Refresh Living. She has a passion for helping people to create a home they love without spending a lot of money.
I love how simple you make this! I’m about to begin a loft bed in my daughters room but it will be screwed into the wall studs on 3 sides of the bed,.. only the front side of the bed will not screw into studs. Do you think it would still be necessary to anchor from a ceiling joist?
Hi Grace! Yes, if you are anchored into studs on the back and both sides of the loft, you should be fine and will not need something to anchor into a ceiling joist. Best of luck on your project!
Hi- With your Dimensions for your bed- did it fit a twin or full mattress. We love this design, but want to do a full and just trying to figure out the right size we need to build to make it work. Thanks 🙂
Hi Nicole! Sorry the delay in my response. It fit a twin size bed (with about 6 inches to spare, but some of that was used for the railing). Best of luck on your project (if you haven’t already finished it)!
Hi! Is there any benefit (or disadvantage) to using a sheet of plywood instead of 1x6s?
A sheet of plywood would do the same job! I just liked the look of the 1×6 boards, especially on the side that was exposed.
i love this idea! do you know the distanct from the bottom of the bed you have from the ceiling? trying to get an idea what distance to give mine that i want to do.
thanks!
I’m sorry for the delayed response. In case it’s still helpful – The clearance from the top of the bed frame to the ceiling is 31.5″ and the height from the floor to the bottom of the bed frame is 58″. I added this to the post as well because many others have asked me as well and I realized it’s not included anywhere. Thanks!
Hi Jenny love what you did with the loft bed. Planning on doing the same with our daughters room. Do you have any pics of you remodeling your attic? Thanks
Thanks so much Sabrina! I do have photos of our attic reno, I still need to get them into a post (1.5 years later!).
Love this and love the look of the hanging corner! I have a question and the wire. What is the measurement of your wire? The Amazon link has several options and with my lack of knowledge, is appreciate some guidance on what to get for that! Also, how did you trim the wire down to the length you need? 🤔 Thanks for your time!!!
Great question. It’s a 3/16″ aircraft cable wire. Here’s a similar one on Amazon (although this one is vinyl coated and mine wasn’t). I also updated my post as this is a question that I’ve been asked often and realized I should have been more specific. Thanks!
I could be messing up the math, but according to the cut list, don’t I need at least five 8 ft 2x4s? Two for each of the sides (81.5”) and three for the cross beams (41.5” each)?
Yes, you are exactly right – you’ll need 5 8ft 2x4s. Thanks for that catch! I updated it in the supply list.
Awesome, I really impressed with the idea that you use it.
Amazing, I really apricate effort. very. helpful information.
Love if! Just built one for my daughter! What mattress size did you end up using? My daughters bed is 32 inches down but with the mattress it sits up pretty high!
Hi Alyssa. I know exactly what you’re talking about and ran into the same thing! The twin mattress I had just sat too close to the ceiling for comfort. I ended up getting a twin mattress from IKEA that’s a little under 5″ thick. https://www.ikea.com/us/en/p/meistervik-foam-mattress-firm-white-50315875/ I’ve seen a lot of thinner memory foam mattresses that I think would also work, but this height ended up being perfect.
much obliged, to impart a strategy to us truly accommodating also
Hey there. I was wondering if you had plans for the ladder as well?
I don’t, because I forgot to take pictures, but I linked to this tutorial which is a very similar process to what we did. https://www.youtube.com/watch?v=kBBNnbR5BO8&t=282s
Would this work for a king bed?
Hi Lena. I’m not sure how well it would work for a king bed with the way I have it set up. I do think it would work fine if the room was small enough to just have the loft extend from one wall to another. That way, it would be attached directly to the studs on three different walls. Without having done this, though, I can’t say for sure
Awesome job!
Question:
Could you please explain how to make the side rails. You said that you used wood molding. I’m a complete beginner when it comes to this stuff. Could you please explain step by step on how to put together the side rails?
Hi! The side rails are made from 2×4″ boards (those are the boards that stand up and down) and then 1″ x 1/2″ board for the horizontal rails. If you go to Home Depot, Lowes, or Menards, they will have a lumber section with baseboards and speciality trim wood. This is a great place to look for a thinner piece of wood that will work great for the horizontal rails. The vertical wood is screwed up from underneath the bed into the 2×4 and screwed through the 2×4 into the wall in the corners of the bed. The horizontal rails are then just nailed into each of the 2×4 vertical posts. I hope that help! Best of luck on your project!
Thanks for the tip! I was about to construct the whole rail and then attach! But installing the posts first is such a better idea. I did everything except the wire. Instead I put 4×4 posts for legs and added 1×4 braces 6” from the frame to keep them stable. Then I attached to the wall studs. Thanks so much for such an excellent tutorial for this. My daughter asked for this for her bday. And here we are!
Hi Kate! Thanks so much for sharing your modifications – that’s super helpful for others who don’t want to suspend it from the ceiling. I’m sure your daughter is going to love it!
I love the color of stain you used. Can you please comment with the brand and name of stain? Thanks!
Hi Kate! The stain on the bed is from Minwax in the color called Driftwood. It gives a very slight grayish look to pine but sort of makes it just look like weathered wood.
Hi, Jenny. My daughter saw your loft bed and asked me to build two for our granddaughters. I’m a hobby wood worker and have a construction background. If I may, I’d like to offer some information about the design. The 2×4 outer support member is undersized and seen in the table. https://www.anthonyforest.com/assets/pdf/dv-2013-max-spans.pdf. Each screw eye has a working pull out rating of 2,500 lbs. https://www.lift-all.com/blog/2020/09/30/how-much-weight-can-an-eye-bolt-hold/. The 3/4 rope has a working rating of 405 lbs per rope (x2). Knots weaken the rope by 20 to fifty percent.
I built two beds using 2×6 for the outer support member, one inch rope spliced into an eye. A splice only weakens the rope by ten percent.
Thanks for your comment to help other readers. I will say that in the post it describes that I did not use rope (precisely for the reason you listed) and instead used cable wire because it is much stronger. The rope is purely decorative and wrapped around the cable wire. As for the 2×6 support frame – it sure won’t cause any harm to use larger lumber for the frame. I will say that ours has held up beautifully for a twin bed. If I was building any larger of a bed, I would have used a 2×6 frame. I am also deferring to the advice of my dad on this one, who has built three homes and countless home additions!
Hi, can you recall the amount it cost on supplies to build this? Minus the mattress? Thank you! : )
Hi Liz. Unfortunately lumber is significantly more expensive than when I built this bed several years ago. As a rough estimate, I think it will cost about $100 in 2023 for all of the lumber and supplies. (Again, that is a rough estimate)
I love the light fixture. Is it a fan as well? Where did you get it?
I learned they are called “fandeliers” when I was trying to find one for this room! Here’s a post with a bunch of options, but the exact one I got was from Menards https://refreshliving.us/best-ceiling-fans-for-rooms-with-bunk-beds/
Did you twist the jute rope around the whole cable? Or did you thread the cable though the rope and tie up the ends? Thanks for the clarification:)
Hi! I sort of did a combination of both? The rope is made of three pieces, so I untwisted them slightly and then it sort of twists around the cable on it’s own. So technically the cable is threaded through the rope. Then, I just tied a knot at both ends – top and bottom of the cable, to cover the eyebolts. I hope that helps!
Hi Jenny, when searching for new ideas, to get my daughters new room more organized and easier to navigate, I found a picture of this bed online. Yesterday my husband and I decided to build it, and when I searched for the picture again (because I couldn’t find it on my phone), I realized, that this was a DIY page. 😀 Anyhow, we built ours very similar, except we didn’t use top boards. (Built our own mattress frame!) We also decided to build a ladder straight into the wall next to the left of the bed, to save more room. (That way you really get the full effect of the bed floating!) We even bought the hammock you have in the picture! Question: We didn’t decide on a spot for it yet, because if we hang it the way you have it in the picture, the wood hits the walls once someone sits in it. Did you run into that issue? Thanks for the inspiration!
Hi Nina. Your lofted bed sounds amazing!! I love the idea to put the ladder into the wall – I bet that looks so cool. For the hammock, I ended up adding another 2×4 between two of the joists (so it spans perpendicular between two joists). I mounted the hammock on that 2×4 and it sits at the perfect spot. I hope that helps!
Hi! The floral walls are beautiful. Is it decals? Wallpaper? What a great gift to your girls this room is!
Hi Diana. It’s a stencil, so I used different colors to create the look of wallpaper. It took way longer than I thought it would! Thankfully it was during 2020 lockdown so I had the extra time!
Two questions, one are the holes easy to fix after dismantling the bed? Two is does this work with a queen bed? Also is this pricey?
Hi Eliza. I would not use this design for a queen bed, unless the loft spanned across the entire width of the wall. Also, I would suggest using 2×6 boards for the frame instead of 2x4s. For fixing the holes, do you mean the pocket holes or the holes on the top boards or the holes in the wall? Any of them can be filled, either with wood filler (and sometimes dowels) for the holes in the wood and wall patch or drywall mud for the walls. The cost of lumber is much higher than when I built this, so I can’t really give an accurate estimate on cost right now.
Hello Jenny
Thank you very much for your design, building one for my nephew right now.
I just went out and invested in the Kreg 520 pocket jig. And I thought I’d let you know that you’re referring to a product that doesn’t work for this design..
The jig can’t gap over wood greater than 1,5″, so it can’t make the pocket holes in the 2×4″ wood :/
Hi there! The Kreg 520 is just big enough to work with 2×4″ boards. Dimensions of wood boards aren’t the actual measurements. A board labeled as 2″ is actually 1.5″ wide, so it will work!
Hi there, looking at how the wire is threaded through the eye hook, how does the wire attach to itself? I zoomed in on the photo showing the eye hook and it looks like you have something securing the wire to itself, can you tell me what that is?
Hi Sam. I’m sorry for the delay. I actually updated the post because I realized I didn’t include that item in the supply list, nor did I explain it well! Here’s what we used – it’s a wire termination clip that secures looped wire. I hope that helps, and thanks for the question!
Hi there, I know this is a fairly old post but this is exactly something we were thinking of doing for my daughters room. My concern is how much weight it will hold. I still read my daughter books at night and I know she’s going to want me to climb in with her. I’m also afraid if she ever had friends come over and they decided to get on it, would it fail?
Hi! Great question. I go up on my daughter’s bed every night still and we’ve had absolutely no issues and it is completely secure. We’ve had two adults and two kids up there. Just be sure you are attaching the bed into every stud in both walls. For the corner, use airline cable that is secured into a ceiling joist. The ladder doesn’t actually add any stability, it’s all from the airline cable. However, you could easily add a corner leg if you weren’t able to secure into a ceiling joist. I totally understand the hesitancy though. I felt it too when it first went up – is this actually going to hold me??? Haha.