
Valentine’s Day Garland – Easy DIY Decoration
This Valentines garland is so easy to make. It’s the perfect DIY Valentines craft to decorate your home and is made using only cardboard and yarn. You can easily change the colors with different colors of yarn!
In This post You’ll find:
This Valentines day garland is a fun way to add a little Valentine decoration into your home without going over the top in pinks and reds. Plus, its an inexpensive DIY project because the only supply you really need to buy is a skein or two of yarn.

I’ve made another version of this DIY Valentine’s decoration using the same technique, but with wood beads on the garland instead of the pom poms.
This post contains affiliate links. You can read my full disclosure policy here.
Supplies for DIY Valentine Garland
- yarn
- jute twine
- string
- cardboard
- fork or pom-pom maker
- large yarn needle
(This supply list seems so silly to even list out, as there are so few materials and they are so simple!)
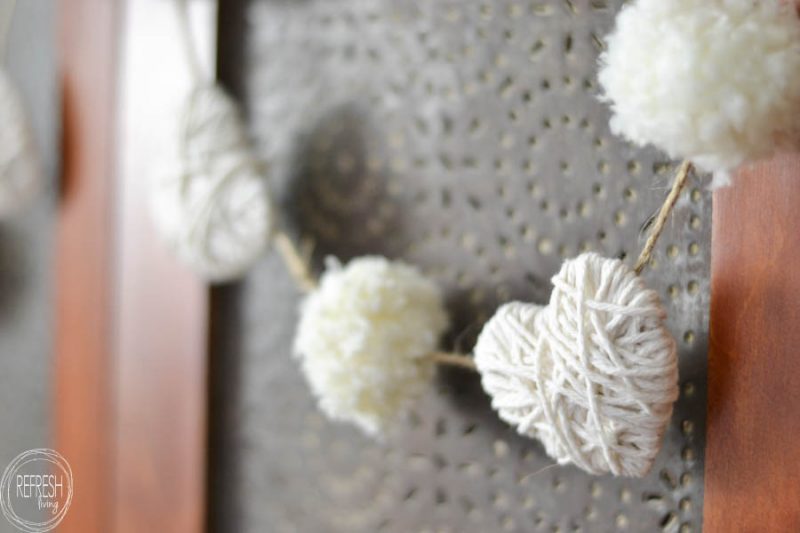
How to Make Yarn Wrapped Hearts
The first step is to cut out a bunch of cardboard hearts. I doodled different sizes and shapes before I found one that I liked. I cut it out, and then used it as my template so all of the hearts were the same shape.
Then, attach the end of the yarn with a small piece of tape to the back of the heart. Wrap the yarn around the heart, trying to cross the heart (so the yarn doesn’t slip) and to cover blank spots.
After the heart is fully covered in yarn and is as fat as you’d like it, slip the end under a piece of yarn in the back and tie a knot.
How to Make Yarm Pom-Poms
To make the pom-poms, you can definitely use a pom-pom maker, but I have had just as much luck with a fork to create this size of pom-pom.
Thread a piece of yarn (about 6 inches long) through the middle tines of the fork and just let it hang. Then, take the end of the yarn (that is still attached to the skein of yarn) and wrap that yarn around the fork, over and over and over again. The more times you go around the fork, the fluffier your pom-pom will be.
After wrapping, cut the yarn so it is detached from the skein and take the short piece of yarn that is hanging to tie a tight knot around the wrapped yarn.
Use sharp scissors to cut the yarn at both sides of the fork. Now, it should look like a pom-pom! Just round out the pom-pom by trimming away stray strands. You can also make your pom-pom smaller by giving it a haircut all the way around.
Assemble the Garland
To put everything together, I’d recommend a large yarn needle. Just thread a piece of yarn, string, or twine through the back of the hearts and/or through the center of the pom-poms.
I’ve found that the closer I can thread the twine through the top of the heart, but still spanning the width of most of the heart, the better. If you thread the twine too low or not enough across the whole heart, it tends to flip around and not hang correctly.
This antique pie safe is one of my all-time favorite pieces in my home. I wish I could say it is a family heirloom, but it’s not. I found it at an estate sale and instantly fell in love. We have quite a small home, so it’s sort of shoved in a small nook in our hallway/kitchen and not as prominent as I’d like, but it’s still awesome.
Which version do you like better? I actually only have the wood bead version now because my cat destroyed the pom-poms on the original version, so I guess I have to like that one better since it’s all I’ve got!
Here are a few more easy DIY projects for Valentine’s Day:
Post by Jenny Leads
Jenny is the voice behind Refresh Living. She has a passion for helping people to create a home they love without spending a lot of money.
That is super cute! It would be adorable in other shapes too – like stars.
Thanks for sharing it at Talk of the Town. You’ll be my feature pick at next week’s party!
Angie @ http://www.knickoftime.net
Thanks, Angie! Yes, you are so right about different shapes. Maybe I’ll be updating mine so I can keep it up forever!
Cute! Simple! Inexpensive! Classic-looking! Just my kind of crafty, seasonal decorating project. Thanks for sharing.
Thanks so much!
This is so cute, Jenny! Thanks for sharing at our party! Featuring you tomorrow night! xo
Awesome, that’s great news, Kendra! Thanks!
So cute! I love garlands! 🙂
I totally want to make this! And I’d leave it up year round because it’s too stinking cute not to! And… because I’m a lazy decorator and only decorate for Christmas #oops 😉
Thanks Corinna! I agree with keeping things up well past any season. I try to change things up, but let’s be honest, I get really lazy about it too!
Cute little garland! I’d probably make mine full of colours!
LOVE this idea!!
Love this. I usually score at the dolor store for little valentines decor.
Great idea! The dollar store is my go to for seasonal decorations too.
Love it, thanks for sharing on craft schooling Sunday!
Jenny, this is about the cutest thing i have seen. Thank you for sharing. I am going to give it a try. I am not very crafty so i get so excited when i see a tutorial.
Dear Jenny, thanks so much for letting Cindy of County Road 407 share your yarn pompom and heart garland with us for this month’s Pinterest Challenge. I really enjoyed making my own interpretation and hope you will stop by and see them all! Yours is perfect hanging on your pie safe! <3
Hugs,
Barb Chapman
http://www.frenchethereal.net
https://www.frenchethereal.net/2020/01/make-it-heartsy-garland-for-valentines.html
I’m so glad she used it as inspiration!
Both versions are perfection, and your instructions are clear and easy to understand. Will have to try this—thanks for sharing!!
I’m so glad you found it helpful. Thanks for taking the time to leave the positive note!