
One Way to Fix a Chair with a Broken Seat
I stumble across chairs with broken seats, particularly broken caning, all the time. Often, they are in great shape except for the seat, which makes them an inexpensive option to refinish. I’ll show you one method on how to fix chairs with broken seats and make them like new again!
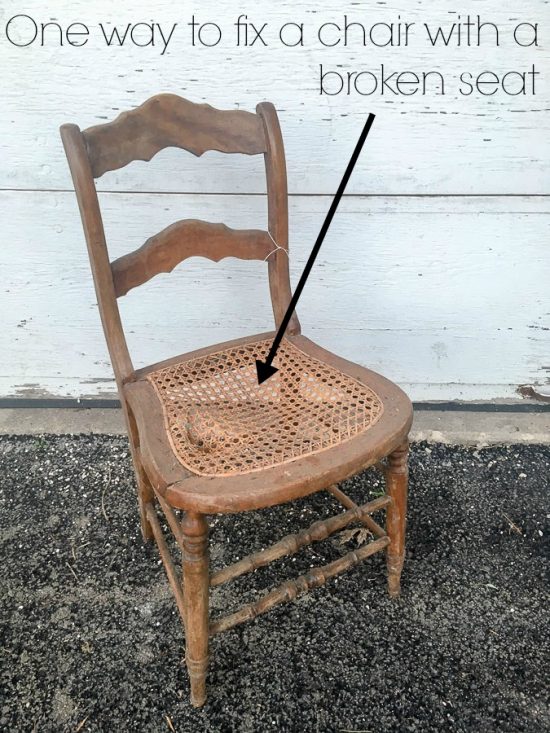
I started with a pair of these cane seat dining chairs. Unfortunately, the caning was damaged, or completely missing, in both of them, which meant I needed to find a new solution for the seat. The postive to finding chairs like this? I can often pick them up for super cheap – almost always less than $5 per chair.
A client asked me to refinish two chairs, one for each of her daughters’ desks. One of the girls wanted blue, and the other pink, but besides those requests, I have free reign to pick fabric, color, and style. These two cane chairs had great bones, and with new upholstered seats, I knew I could turn them into something I hope the girls will love.
I started by cleaning, lightly sanding, and then spray painting the chairs. It’s been so hot and humid here, which is certainly not ideal painting weather, so I had to wait until we had a cooler day to finally paint the frames.
As for repairing the seats, I decided to make new upholstered seats to cover the large hole in these chairs once the cane was removed. I created a pattern with a large sheet of paper (ripped out from one of my kids’ large coloring books) folded in half and then cut.
[wc_row]
[wc_column size=”one-half” position=”first”]

[/wc_column]
[wc_column size=”one-half” position=”last”]
[/wc_column]
[/wc_row]
I used the paper as my pattern to trace the form onto 1/2″ plywood (although 1/4″ plywood will also work, as long as there is enough edge on the chair frame for the plywood to rest on). A jigsaw would be the best tool to use to cut out a shape with curves like this one, but mine broke, so I used a circular saw and just made a lot of small straight cuts to create the curves.
After the seats were cut, I traced them onto 1/2″ foam, and then set to work on applying the fun fabric.
Whenever I upholster seats, I always wrap the foam in a layer of batting or liner fabric first. It just creates a super smooth finish, especially on the edges, for the patterned fabric to lay on.
I used an electric staple gun to attach the liner fabric on all four sides, and then wrapped the fabric on top of that.
I usually go a little staple gun crazy to ensure everything is taught and smooth.
I trimmed the excess fabric, and for this piece, I had extra fabric from the width of the bolt I purchased it from, so I folded it over and covered the wood. Of course, this is the bottom of the chair, so completely unnecessary, but the piece wouldn’t have been big enough to save for another project, so the bottom is almost as pretty as the top now!
To attach the seat to the frame, I drill a pilot hole from the bottom of the chair, up into the seat. Then, I choose a screw that is long enough to penetrate the plywood seat, but not too long to go through the top. I attached the seat with four screws, one in each “corner”.
You can probably tell that I completely finished the blue chair, but still need to finish the pink chair. Until then, I’ll let you envision how it turned out: it’s painted in the coral color you see in the pink fabric!
[wc_row]
[wc_column size=”one-half” position=”first”]
[/wc_column]
[wc_column size=”one-half” position=”last”]
[/wc_column]
[/wc_row]
Ready for some more furniture flipping inspiration? Check out these projects from my fellow furniture refinishing bloggers!
- How to Create Fabulous Painted Furniture with Cutting Edge Stencils by Just the Woods
- How to Refinish a Worn Out Dining Table by Lovely Etc.
- How to Fix a Chair with a Broken Seat by Refresh Living
- The Coffee Table Flip That Did Not Go As Planned by A Fresh-Squeezed Life
- Restoring an Antique Steamer Trunk by Repurpose and Upcycle
- The Best Way to Get Cheap Rustic Furniture by Thirty-Eighth Street
Post by Jenny Leads
Jenny is the voice behind Refresh Living. She has a passion for helping people to create a home they love without spending a lot of money.
I love your simple tutorial! The chair looks great now.
What a great idea! Love the pattern you chose too!
I wish I could leave a picture here of my chair. Thanks for the tutorial!
I wish you could too! Please feel free to send me a photo to my email. I’ll add it to the post to share with others!