
Refinished Spindle Bed
I was beyond excited when I saw this bed sitting in the corner of a room at a recent estate sale I went to. I actually wasn’t looking for a bed, but once I saw it, I certainly could not pass it up.
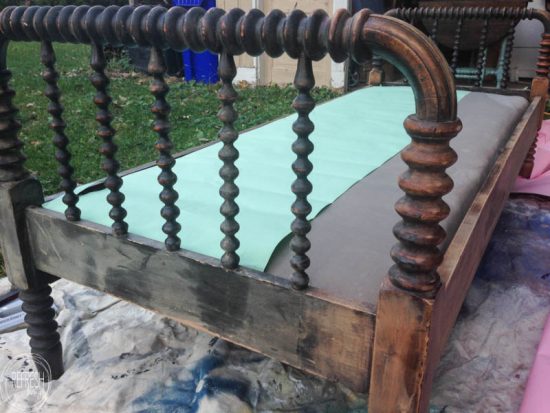
This antique spindle bed had definitely seen some wear over the years. I could tell one end of the bed had been repaired from a break, and the finish was not it great shape. It came with a mattress that sat on top of the cloth covered spring frame, but since this bed was going to be for my daughter, I knew I wanted to get her a new mattress.
As for the finish, I debated for a long time whether I wanted to strip and refinish the wood or not. Honestly, I think one day I will do so, but with being pregnant and knowing how long it takes to strip this type of finish, especially from spindles, I just didn’t have it in me.
I went to my go-to paint for a clean, beautiful finish, General Finishes Milk Paint. it covers furniture beautifully, and is quite durable, perfect for a little abuse in a kid’s room.

I added an extender which increases the dry time of the paint. I usually add some of this to my paint if I’m painting outside in warmer weather; since it slows dry times, it allows me to catch any drips when spraying.
Before painting, I gave it a coat of clear spray shellac, because after painting a test spot on the bed, the old finish was bleeding through the paint, which is typical for many old pieces of furniture.
After the shellac dried, I sprayed two coats of General Finishes Milk Paint in Snow White on the bed. One thing I love about this type of paint is that it sprays beautifully (just add a little water to the paint before putting it in the sprayer). For any piece with spindles, I almost always whip out my paint sprayer. It has saved me hours of precious time!
I planned to just place the mattress on top of the cloth covered springs, and actually took the time to recover the bed with mattress ticking fabric, but then something just wasn’t sitting right with me with those springs. Some of them seemed broken when you sat on them, so I decided to remove the new fabric I just put on the bed, and also remove the cloth and padding covering the springs, and also to remove the springs. Needless to say, there were a lot of antique nails to remove!!
Boy, am I glad I made the choice I did. Although it added quite a bit of time to this project, once I took off that fabric and moved the springs, I saw the layers, and layers, of dust, dirt, and even a little mouse house that had accumulated under that fabric. To think my little girl was going to sleep on that bed – she doesn’t have allergies, but this bed would have given her some!
After everything was removed and cleaned, I gave the bed one more coat of paint and then it was time to figure out how to find a mattress to fit an antique bed.
How to Make a Mattress to Fit an Antique Bed
Basically, this bed is the width of a crib mattress, but almost the length of a twin bed. They definitely don’t sell mattresses with these dimensions anywhere, unless I wanted to spend quite a bit of cash and have a custom made mattress for the bed. No thank you.
I figured out a different solution. You can buy all-foam mattresses online (I’ve also seen them at IKEA) to fit standard size beds. Foam is very easy to cut, so you can make a mattress to fit an antique bed!
I had my daughter’s foam toddler bed mattress (which was the perfect width, but I was still short by a foot or two. I ordered another foam crib mattress of the same height online, and then used my table saw to cut it down to size. You could also use a circular saw, jigsaw, or even a large knife to cut the foam. You might just need to make two passes at the cut since the foam is so thick (one cut on the top and one of the bottom).
Because the mattress is sitting in the bed frame, you can’t even tell there is a seam between the two pieces. It makes changing the sheets a little annoying, but nothing I can’t handle, especially for how much money I saved.
It’s the perfect size for my girl, and I really think it will last year for many more years.
I can still comfortably lay on it, and I’m tall and 8 months pregnant! Although the fit is a little tight when my daughter and I both try to lay on it.
Ahh, I just love it. The white is perfect for my girls’ room for now, but don’t be surprised if you see a post with it back to its original wood state when I have it in me!
Post by Jenny Leads
Jenny is the voice behind Refresh Living. She has a passion for helping people to create a home they love without spending a lot of money.
This is beautiful I personally have never purchased an antique bed because of the mattress sizes. Your workaround is great. I also find that single antique beds are a bit smaller so they work really well for younger children and give them a little more play room in the bedrooms.
I love antique furniture and this bed is so perfect for a little girls room! You did a great job! Thanks for sharing at the Family Joy Blog Link Party this week.
Do you need any additional parts for the sprayer? Also, will the paint extender work with chalk paint?
Hi Diane. The paint sprayer comes with all the parts needed. Although I just heard that HomeRight has a new paint sprayer with different attachments, so you don’t need to thin the paint and it works with different kinds of paint. It might be something to look into. As far as the extended, I don’t believe the extender I mentioned in the post would work with chalk paint. However, there probably is one that will work with it. I just have never tried it myself.
I’ve glued two pieces of foam together using Gorilla Spray Glue. It works great!!
Great tip! Glad to hear that type of glue works to hold together foam. I need to give it a try!