
DIY Beaded Chandelier (Upcycled from an Old Light)
Save hundreds of dollars by upcycling an old light fixture and lampshade to create a DIY beaded chandelier. This easy project creates a neutral farmhouse style fixture for over half the cost of buying it new. BONUS: Beads are way cheaper now than when I made this project several years ago, so it will be even cheaper to make it than listed later in the post.
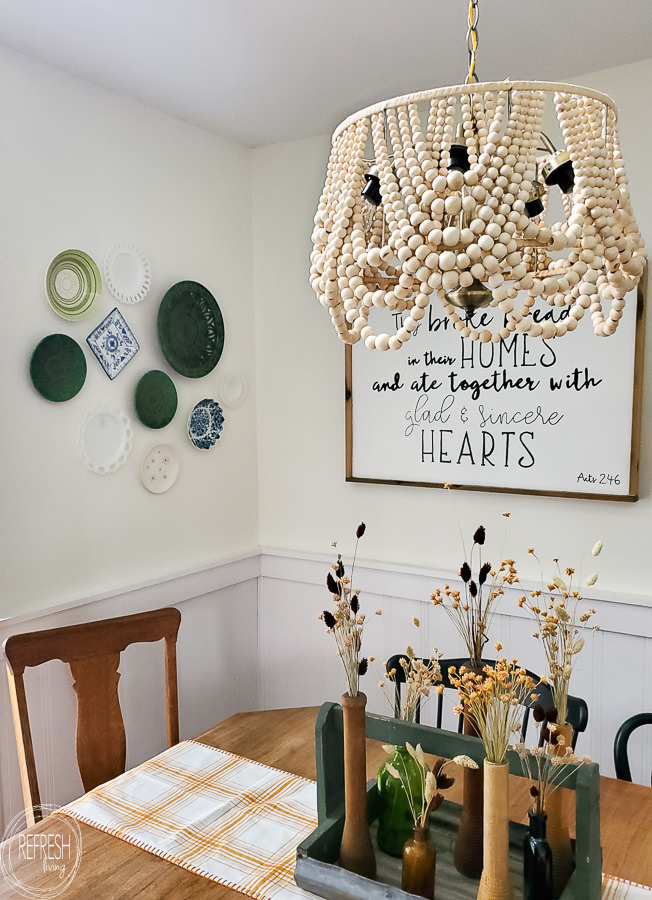
Almost ten years ago I created our kitchen chandelier by flipping over an old egg crate, drilling a hole in the top, and hanging a single bulb pendant light inside. I liked that it was unique, but the single bulb was not bright enough for our already poorly lit kitchen.

For the last year or so I’ve been trying to figure out what I wanted to replace it with. Of course, I could just find a new light fixture that I liked, but what’s the fun in that? I liked the beaded chandeliers I’ve been seeing, but the price tags were not as pleasing to the eye.
This post contains affiliate links. Read my full disclosure policy here.
Here’s this one from Pottery Barn for $799. ($799?! For a light fixture?)
And this one from World Market for $229. (Yes, that’s better, but I can make it for less!)
I knew I needed to find the perfect (used) chandelier to be able to make this work correctly. I was looking for something fairly simple, and that was small enough to fit in the old lampshade I had. It look me a couple of weeks searching Facebook Marketplace, thrift stores, and garage sales. Eventually, I stumbled upon this chandelier at the ReStore for $10.
I removed all of the glass shades from the fixture, and then used a paint pen to paint the sockets black.
This was the only update I needed to make to the actual light fixture. All the rest of the work came in creating the beaded lampshade cover. And, like most projects, it ended up taking way longer than I initially anticipated.
How to Create the Beaded Swags
I made one set of five strings of beads as a test to determine how many sets of five I would need to span around the entire lampshade. Because this was made with upcycled finds, the number of beads and thus, the length of the swags, will depend on the circumference of the lampshade. Later in the post, I describe how many beads I needed of each size to give you an ballpark of what you may need. The circumference of my lampshade was 32″.
To make each bead strand was simple. I just tied a bead to the end of a piece of cotton string so the beads would not fall off, and then threaded the beads with a large upholstery needle. Because the cotton string was not stiff, and became unwoven pretty easily, it was so important to use the needle. It would have been very difficult to get the string through the beads, especially the smallest ones, without the upholstery needle.
My lampshade was quite old, so when I ripped the fabric off of it, the top and bottom bar was still woven tightly with some sort of fabric. I used this to my advantage, and threaded each string under this piece to attach it to the shade.
If I had a lampshade that was only metal, I would have just tied each strand right around the top bar.
I ended up tying all the bead strands to that top bar. Five sets of five strands each were tied around the top, and then I came back and did five sets of longer swags that were three strands each and tied in the middle of the original swags.
Clearly, the beading of each strand, and tying of each strand to the frame, took a LONG time. But, after it was done, it was well worth the time, because it cost me less than $100!
Number of Beads Needed
All said and done, I ended up needing 3 bags of the 12mm beads, 3 bags of the 16mm beads, 4 bags of the 20mm beads, and 1 bag of the 25mm beads.
Cost Breakdown:
- $10 for the light fixture
- $2 for the lampshade
- $93 for all of the beads
I’ll be the first to admit that $93 is a lot of money for wooden beads! But, when I consider that the cheapest large wood bead chandelier I was able to find was $229, I was able to make my own and save over half the price! I’ll string wood beads all day if it’ll save me 100 bucks.
Post by Jenny Leads
Jenny is the voice behind Refresh Living. She has a passion for helping people to create a home they love without spending a lot of money.
It looks great!
Love it! Congrats!!