
Upcycle Old Drawers into Decorative Shelves
Old drawers from dressers and desks can be reused and given a new life as small shelves! Add decorative paper to the back of the drawers and pieces of wood to make pretty shelves to display small items, pictures, or even kids toys.
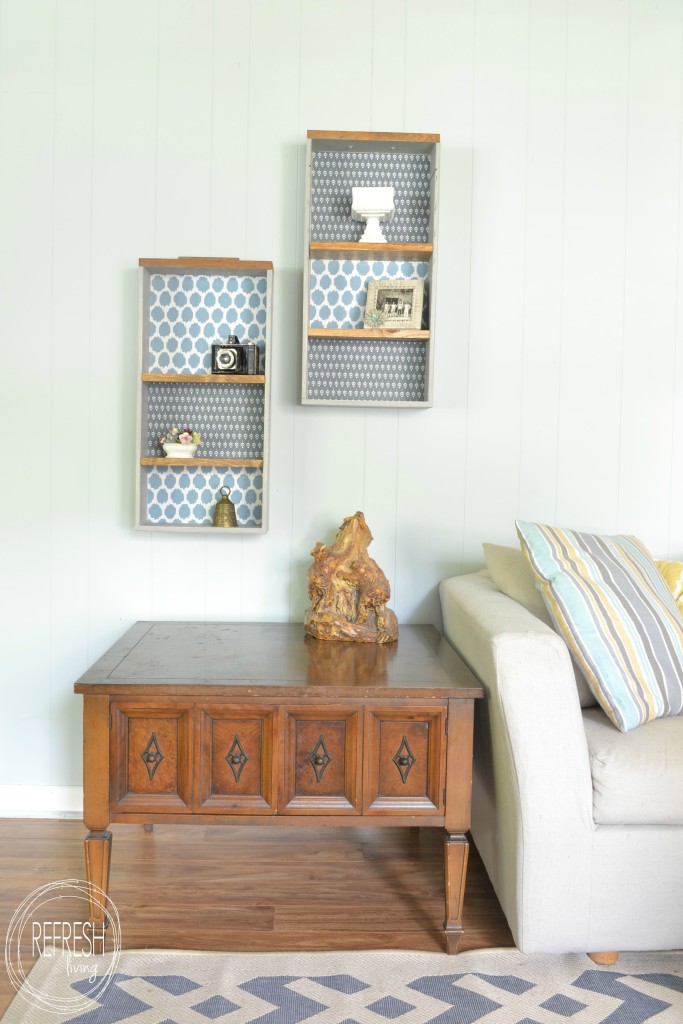
I love a cheap and easy upcycled project, and this one fits that description perfectly. I found these two solid dresser drawers at a garage sale and planned from the beginning to make them into little decorative shelves.

I started by painting them both with DIY Chalk Paint in white, and then used hemp oil![]() to create a resist to allow the white to show through the top coat of paint. I’ve tried out a few different types of resists, and each give a different look, especially depending on the type of paint I’m using for the top coat. If I’m using true chalk paint (for this project I used Annie Sloan Chalk Paint in Paris Grey), I find I need to add the hemp oil, and then paint the top coat on right away. If not, sometimes the chalk paint sticks right to the hemp oil! When I use milk paint, the hemp oil resists the top layer much more, and I usually see a lot more of the base color. If you’re wondering about different ways to create this look, check out this post where I compare hemp oil, wax, and Vaseline.
to create a resist to allow the white to show through the top coat of paint. I’ve tried out a few different types of resists, and each give a different look, especially depending on the type of paint I’m using for the top coat. If I’m using true chalk paint (for this project I used Annie Sloan Chalk Paint in Paris Grey), I find I need to add the hemp oil, and then paint the top coat on right away. If not, sometimes the chalk paint sticks right to the hemp oil! When I use milk paint, the hemp oil resists the top layer much more, and I usually see a lot more of the base color. If you’re wondering about different ways to create this look, check out this post where I compare hemp oil, wax, and Vaseline.
Once the drawers were painted, I cut pieces of coordinating decorative paper. This particular paper was double sided with a different pattern on each side, so I just alternated the two sides. But, you could find coordinating paper or fabric, or just use the same paper for the whole shelf.
I used Loctite Spray Adhesive![]() (high performance or general performance works best for this type of project, because you don’t want it to be repositionable) to adhere the papers to the back of the drawers.
(high performance or general performance works best for this type of project, because you don’t want it to be repositionable) to adhere the papers to the back of the drawers.
The last step was to cut down come pieces of 1 x 8 pine and stain them in a similar color to the drawer fronts. If I wasn’t creating on a budget, I definitely would have bought oak, since the drawer fronts are made of this type of wood, but pine is about 75% cheaper than solid oak. I’m okay with it and still love how they look. I air-nailed the boards through the sides of the drawers so they remain in place.
Super easy and super cheap!
I love this little picture. It’s my great-grandfather and the members of his rowing team in college. That’s all there is to it. Next time you see a free dresser on the side of the road, stop and check out the drawers before passing it by!
Post by Jenny Leads
Jenny is the voice behind Refresh Living. She has a passion for helping people to create a home they love without spending a lot of money.
These are too cute Jenny, love them!!! The paper on the back is super!
This is such an amazing idea! Thanks for sharing it. I’m Anita visiting from Creative Ways Link Party.
Thanks so much for stopping by, Anita!
Great upcycle!! Love the decorative paper you chose to back these new shelves!! 🙂
Thanks, Keri!
Good Morning Jenny!! Just popping in to let you know your post has been picked as a feature at the Welcome Home Wednesday Link Party! Stop by this morning to see your feature and link up! Don’t forget to grab your “Featured Button” too!
I love a good repurposed drawer projecr! These are so clever, great idea on adding the colorful background. Thanks for sharing your tutorial at Vintage Inspiration Party.
I’ve seen (and made!) a lot of drawer shelves, but I love how you used different papers behind each shelf – it really takes this idea up a notch! Thanks for sharing it at the Vintage Inspiration Party – I pinned it!
These shelves look great! Nice transformation. Thanks so much for sharing with us at Merry Monday.
Thanks, Sherry!
I saw these over at Just a Girl and Her Blog and I had to pop over to see the whole post about them, they are so cute!! I wonder what the grooves on the insides of the drawers are for.
Tania
Thanks, Tania, for stopping by! I know, I wondered the same thing… I’m thinking they actually might have been desk drawers, so maybe some sort of organizer?
Oh, that makes sense. They kind of add some quirkiness which makes them even more interesting :o)
Tania
Jenny, these upcycled drawers are adorable! I have two sitting around waiting for me to get to!
Thanks, Heather! I’m so glad you like them!
Did I miss how you attached these heavy drawers to the wall? Thanks.
Hi Pauletta – I actually don’t think I included it in the post, because it’s probably not the best advice! There is a lip on the top edge of each drawer, so I just put two screws in the wall for each drawer, and lip of the back of the drawer sits on the screws. If that didn’t work though, I would have used two key hole hangers on each side of the drawer, or attached a picture frame wire with D-hooks to each one. I hope that helps!
Super and creative idea….love it! Hugs
Such a nice idea!
Don’t know if you will see this, but I have quite a few small wooden drawers that I was going to make into cat beds. But these are so cute! Definitely going t make a few of these. Was a lovely book of papers at dollarama. Didn’t buy it as was $4 and I had no use for it. Now I can go it
I love the idea of using drawers as a cat bed! I love the look of wood drawers so much. 🙂