
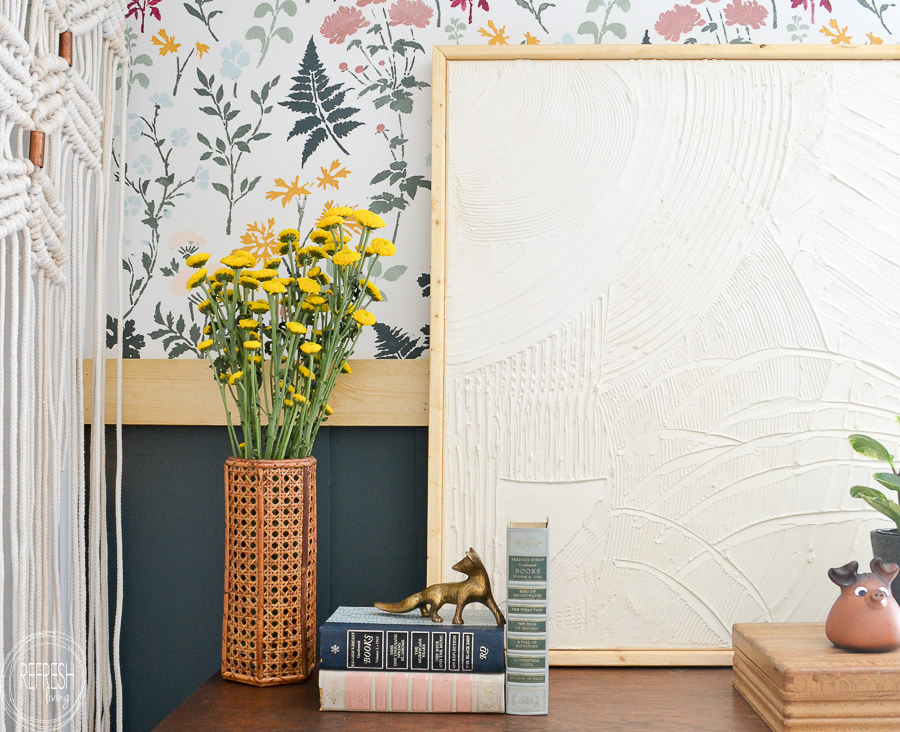
DIY Wall Art (Joint Compound Art)
Transform an old, ugly piece of canvas art from the thrift store, or a cheap new canvas from the craft store, into large scale modern art with this easy DIY tutorial using drywall mud to create plaster art. This large scale DIY textured wall art cost a total of $13!
I’m always looking for inexpensive ways to change up the look of a room. Adding artwork can oftentimes give a room a completely new look and feel, but it’s generally not always the most budget-friendly option. Thrift stores are great places to find cheap wall decor, but I find them to be hit or miss when looking for a particular type of piece.
Of course, there’s also the option of painting your own piece, which all of you artistic people would have no problem doing and creating a masterpiece. Me, on the other hand, would probably whip up something that looks like it was painted by a 5-year-old, so I know my options are far more limited when it comes to DIY wall art.
This DIY canvas artwork, however, is totally something even an artistically-challenge person (like muah) can do! Plus, it’s super fun, and a little messy, and really hard to mess up!
Supplies Needed to Make Plaster Art on Canvas

- Gallery-Wrapped Canvas (you can buy new, blank canvas in many sizes, or find a piece of canvas art at the thrift store that matches the size of art you’d like to make)
- Joint Compound (I’ve always called it drywall mud or spackle, but I guess it’s technically called joint compound)
- Trowels (or anything to create different textures – I used two trowels, paintbrush, and my hands)
- Spray Paint
- 1″ x 2″ wood (if you want to make an easy DIY frame for canvas)
Steps to Create Textured Canvas Art
1. Reuse or buy a wrapped canvas
To start, you’ll need to find a piece of canvas that matches the size of artwork you’d like to create. Preferably, I would have bought mine from a thrift store, but none of the canvas art pieces they had were close to the size that I needed. If you find a second hand piece, you shouldn’t need to do anything to it to prep it. You’ll just put the joint compound over the top of the old art and it will be spray painted later so any “art” remaining will be painted over in the end.
Michaels sells inexpensive canvas as well. I found mine on sale for 70% off, which is a promo I know they run a couple of times throughout the year. I purchase a “level 2 canvas”, which refers to the thickness of the canvas and strength of the stretcher frame, but they also have a lower level and a higher level. I found level 2 to work well for the 24″ x 36″ size that I purchased, but it you were doing a smaller piece, I think a level 1 canvas would work fine as well.
2. Apply joint compound to canvas
The next step is to throw on some wads of joint compound and start to spread it out as evenly as possible across the surface of the canvas. No need to be perfect here – it ends up looking great to have slight variations in the thickness.
A note of caution when spreading out the joint compound. I found that I added too much compound to start, so as I was spreading, I just scooped some of the excess off. Also, be sure none of the areas have a super thick layer of joint compound. This lightweight type of drywall mud isn’t made to be put on super thick on walls, and if it’s too thick, it’ll crack.
3. Add texture to the drywall mud/joint compound/plaster
To add various textures, use tile mortar trowels with different widths of teeth to create grooves. You can also use paintbrushes, the edges of serrated knives, sponges or really anything that can create texture!
This part is definitely a trial and error process. I found sweeping motions across the entire length I was trying to create worked the best rather than trying to start and stop within a section. And, if there was something I did that I ended up not liking, I just smoothed it out and started over.
The joint compound had about a 10 minute work time were it was easy to move and “shape” the drywall mud. After about 10 minutes it started to harden a bit in some areas and it was more difficult to create smooth passes. When you reach this point, just try to quickly finish up any areas you’re working on and then let it all dry.
4. Paint the plaster art
After the joint compound has dried completely, apply a coat of spray paint to the entire canvas, including the sides.
Drywall mud has an off white color which you could definitely use as is. I decided to paint it using an heirloom white spray paint to give it all a slightly warmer white color. Plus, the spray paint will seal the joint compound making it easier to clean later if needed.
5. Make a wood frame for the textured canvas art
I have a quick video on how to make easy wood frames for canvas, which is a nice touch to finish off the canvas art. All in all, I only purchased the piece of canvas for about $13, and all of the other supplies I already had. I never could have purchased a piece of art that large for $13!!
I updated my oldest daughter’s room with stenciled “wallpaper”, a DIY loft bed, and faux wainscotting without spending a ton of money. You can see the whole room here: Modern Girl’s Bedroom
Post by Jenny Leads
Jenny is the voice behind Refresh Living. She has a passion for helping people to create a home they love without spending a lot of money.