
How to Stencil a Wall without Bleed Through
Check out these 5 tips for stenciling a wall! Wall stencils are a great way to create the look of wallpaper without spending a lot of money. There are a few tricks that help get clean lines with stencils without the paint bleeding under the edges.
In This post You’ll find:
I LOVE the look of wallpaper, but I am certainly not a fan of the high price tag. Every time I think about using it for a project, I end up getting cold feet when I actually calculate the amount of wallpaper I would need and the ultimate price.
I have used it in a few makeovers in smaller amounts, but thankfully I’ve found a way to create the look of wallpaper for WAY less – wall stencils!
Although stenciling a wall can be time consuming (since you have to wait for the previous painted section to dry before painting the next section), it is well work the time you’ll put in when you’ve finished.
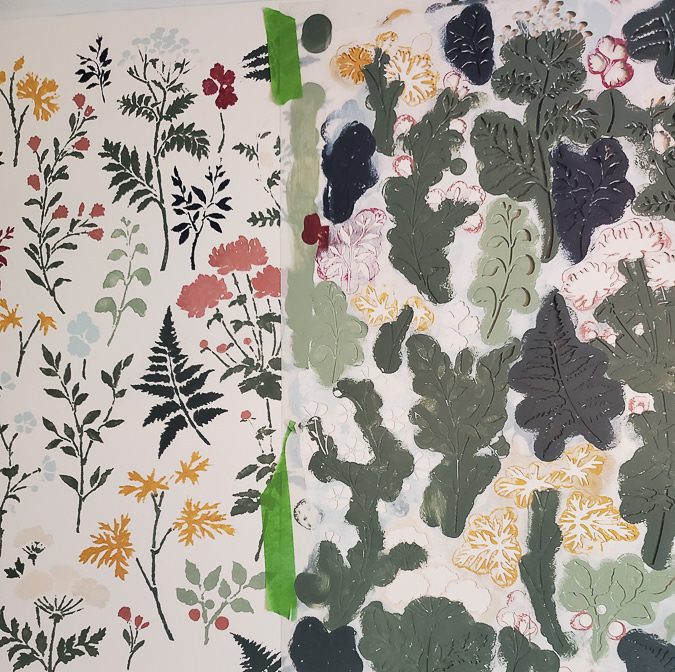
On this project, I created the look of wallpaper by using multiple colors of paint. When painting a multi-colored stencil wall, small color samples from the home improvement store work great. You can also use smaller bottles of acrylic paint from the craft store for smaller accent colors were you won’t need a ton of paint.
This post contains affiliate links. Feel free to read my full disclosure policy here.
Materials Needed for Stenciling Walls
In addition to the paint, you will need:
- Wall stencil – my favorites are from Cutting Edge Stencils
- foam roller
- foam dauber or stencil brush
- light duty spray adhesive
- painter’s tape

1. Prepare the walls correctly
First, make sure the walls are clean and dry. Also, it’s important for the wall you are stenciling on to be flat, without any texture. Stenciling over a textured wall doesn’t work very well, because the paint seeps under the stencil in any places the stencil isn’t flat against the wall surface.
Finally, you’ll want your base wall coat to be in a flat (matte) or eggshell finish. If you use any higher of a sheen, the stencil paint isn’t able to stick as quickly to the base coat, and thus there is much more bleed through under the stencil.
2. Attach the stencil to the wall
I personally love using light duty spray adhesive to help my stencils stick to the wall when I’m stenciling. I’ve found this helps prevent bleedthrough because the stencil is flush to the surface. Also, it just makes it much easier to actually stencil because you don’t need to worry about pushing the stencil against the wall.
The downside to spray adhesive is that it can gunk up the backside of your stencil pretty quickly. Rather than applying it every time I move the stencil, I try to get a few moves before lightly spraying it again.
Painter’s tape works really well for holding the stencil in place each time, because it removes cleanly without taking off any wall paint, and can be reused for a couple of rounds as well. You can definitely choose to only use painter’s tape as well. Just make sure you have several pieces around the stencil.
3. Use a foam roller or dauber
If you are stenciling in one color, a foam roller works really well for stenciling. There is a trick for the amount of paint you should use (more on that in the next tip), but I’ve have much better success with foam rollers as compared to nap rollers.
For stenciling in the corners, or if you are using multiple paint colors, I prefer to use foam daubers. They come in different sizes, which is helpful with efficiency when stenciling, and transfer the paint well. Stencil brushes are another option for stenciling in smaller areas. These are best used with a slightly circular motion over the stencil.
4. Precoat the wall in clear acrylic or the base wall color
This step is optional, but if you want super clean lines, this step will be a game-changer for you. Basically, before painting in the stencil color, you’ll first paint the entire stencil in clear acrylic paint or in the paint of your original wall color.
Then, you’ll let this paint dry (keep the stencil in place) and then go over it in the stenciling paint color.
Clearly, this step adds quite a bit of extra time to the stenciling process, but it will also give you the least amount of paint bleedthrough. Basically, the first paint (either the clear or wall color) will slightly seep under the stencil. Then, the stencil paint color will be painted on top, but it won’t have anywhere to bleed through because the first paint already did. But, you won’t be able to see that first coat because it’s clear or the orignal wall color!
If you’re stenciling a slightly textured surface, I would highly recommend this step. I used this process on a small concrete patio (seen here: how to stencil concrete) and the lines came out super clean.
For walls, I often skip this step primarily for the extra time it adds to the process. If you’re following all the other tricks and stenciling on a flat wall, you really won’t have much bleedthrough anyway.
5. Use a very small of paint
This is probably the most important trick if you want to limit paint from seeping under the stencil. Dip or roll your brush or roller into the paint, and then dab or roll some of the paint off on a towel or other surface. You shouldn’t see excess paint on the dauber or roller.
Then, lightly dab or roll the paint onto the stencil, without ever pressing very hard. Applying two light coats is going to give you much cleaner lines than trying to push to get more paint off the brush.
By using these five tricks, it’s possible to get clean lines when stenciling and create the look of wallpaper at a fraction of the cost!
I am making over my daughters room as part of the One Room Challenge. Here’s a look at the FINAL REVEAL of the girls bedroom! Plus, I have a ton of other budget friendly room makeovers that might spark some inspiration for your next project.
Post by Jenny Leads
Jenny is the voice behind Refresh Living. She has a passion for helping people to create a home they love without spending a lot of money.
This is such helpful information, thank you for sharing! That wall looks AMAZING!
Thank you for these tips! The first coat with the wall color is genius. Where oh where did you get your stencil? I love it!
Sorry so delayed – Cutting Edge Stencils
Thank you for all of this:) I’m about to start my first stenciling project and this tips are so simple to understand and very good beginner friendly. I feel less nervous already!