
DIY Coat Rack for a Small Entryway from Old Drawer Fronts
Small entryway? No problem! This DIY coat rack takes up only a small amount of wall space, but still adds a decorative touch to the room. Plus, it reuses old dresser drawer fronts and saves them from the landfill!
I have slight entryway envy. Basically, I walk into almost every other home and am in awe of the floor space next to the front door that allows you to put a small mat, a coat tree, and *gasp* maybe even a little console table for guests to place their shoes, coats, and belongings when they come to visit. Of course, I never let my envy last long, because first and foremost, it’s not healthy to think that way, and second, I’m blessed to have a home. Period.
I will happily make do with what I’ve got, and I’ve got a small entryway. In fact, calling it an entryway is quite generous, because it’s really just a front door that opens into our living room. It’s served as a problem for the twelve years we’ve lived in our home, and I never did anything about it because I didn’t know to do. But, I finally think I’ve found a solution for our small entryway that works for us! Plus, it fits my budget-friendly design philosophy: why spend money on something that’s new when I can reuse something in a new way? (I feel so strongly about refusing to buy new items whenever I can that I wrote a post about the home decor items I never buy new. If you jive with my design mantra, check it out.)
Welcome to our new (and more functional) entryway!
If you’re wondering why I just didn’t use the space to the left of the door as an entryway, this angle will show you why it just wouldn’t work.

Literally, a door smack dab in the middle of the room. If you’d like to see the rest of the room (of which almost everything is a second-hand find), you can see the space here: vintage modern living room.
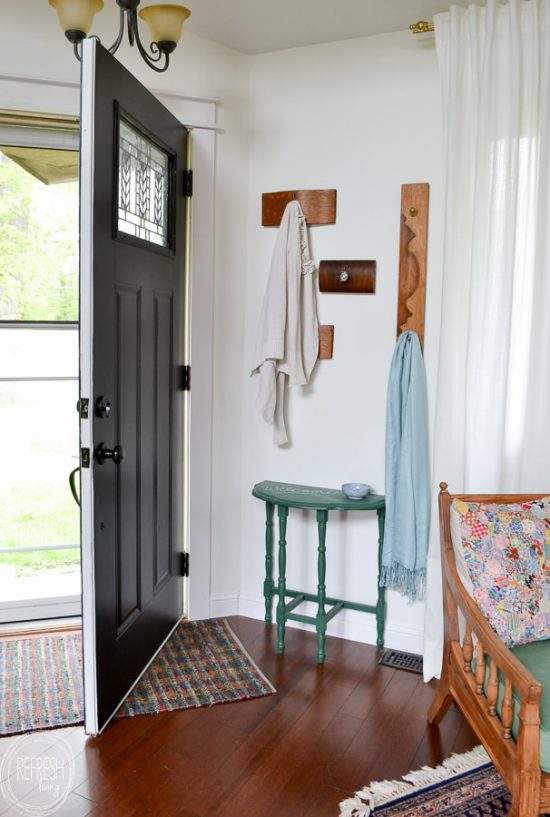
As you can see in the first image, I reused some old drawer fronts to create a decorative feature on the wall, that also can hold the guests of coats. Here’s how I put it together (and my trick for hanging pieces like this level and secure to the wall to hold heavy items).
Steps to make a dresser drawer coat rack:
Of course, you’ll first need to collect some interesting drawer fronts. I found almost all of these as single drawers hidden in the depths of basements and garages at estate sales. The long drawer front is from a dresser I was refinishing in which I took off the top drawer case, and then had this beautiful front left over. I also see single drawer fronts quite often at flea markets. In total, this pile cost me less than $10.
D-rings are my favorite brackets for hanging most home decor items on the wall. Of course, for an object like this, it’s important to hang a d-ring bracket on each side of the horizontal drawer front, so it doesn’t swivel when a coat is hung on it.
Now, the fun part when trying to hang an object with two brackets: making it level. I can’t tell you how many unnecessary holes I’ve put in different walls trying to hang items that needed two perfectly spaced, level holes. Then, I learned this trick and haven’t looked back since. The trick is to use lipstick!
Basically, use an unwanted lipstick (which is every one of the three I own) and slather some onto the screw head. Then, take your object and press it against the wall in the place you’d like to hang the frame/object. Sure, you can get out your level, bu frankly, that never works for me because our ceilings are not level, and it my frame is level but my ceiling isn’t, my eye thinks it looks unlevel anyway.
I always eyeball it and make my husband hold the frame for me. Once it’s in the right place, just gently press it against the wall. When you remove it, there should be two faint lipstick marks on your wall.
After the marks are made, use an extra d-ring bracket as a guide on where to screw into the wall. Simply place the hole of the bracket over the lipstick mark, and then make an X right in the top of the ring.
If there happens to be a stud underneath one of those X marks, you’re in luck, and you can just screw directly into the wall. (I use a simple stud finder like this one whenever I am hanging anything on the wall.) I actually planned for some of these hooks to fall on a place where there is a stud, to give the drawer fronts more stability. However, studs never seem to be in the places where I need them to be, and I often need to use brackets to secure the screws into the drywall.
Simple drywall anchors will provide enough grip in the wall to hold the screws, and any additional weight from a coat. After the brackets are installed, just screw into those (or directly into the wall if it happens to fall on a stud).
For the long, vertical drawer front, I installed one bracket at the top, and then just used a picture frame hanging Command strip on the bottom to secure it in place.
Love it? Pin it! (Thank you.)
[wc_row]
[wc_column size=”one-half” position=”first”]
[/wc_column]
[wc_column size=”one-half” position=”last”]
[/wc_column]
[/wc_row]
If you love finding creative ways to reuse old items, I think you’ll find something you love on my upcycled projects page.
Post by Jenny Leads
Jenny is the voice behind Refresh Living. She has a passion for helping people to create a home they love without spending a lot of money.