
Vintage Halloween Decorating Ideas
This Halloween decor is inspired by a vintage apothecary shop and combines DIY projects and old vintage photographs and ephemera.
Bring vintage Halloween decorating ideas into your home this season without actually buying actual vintage items OR the cheaply made decor found at some stores.
Instead, you can create a creepy look with printable vintage images to add to glass jars, inside old windows or frames, or to make your own DIY Halloween crystal balls.
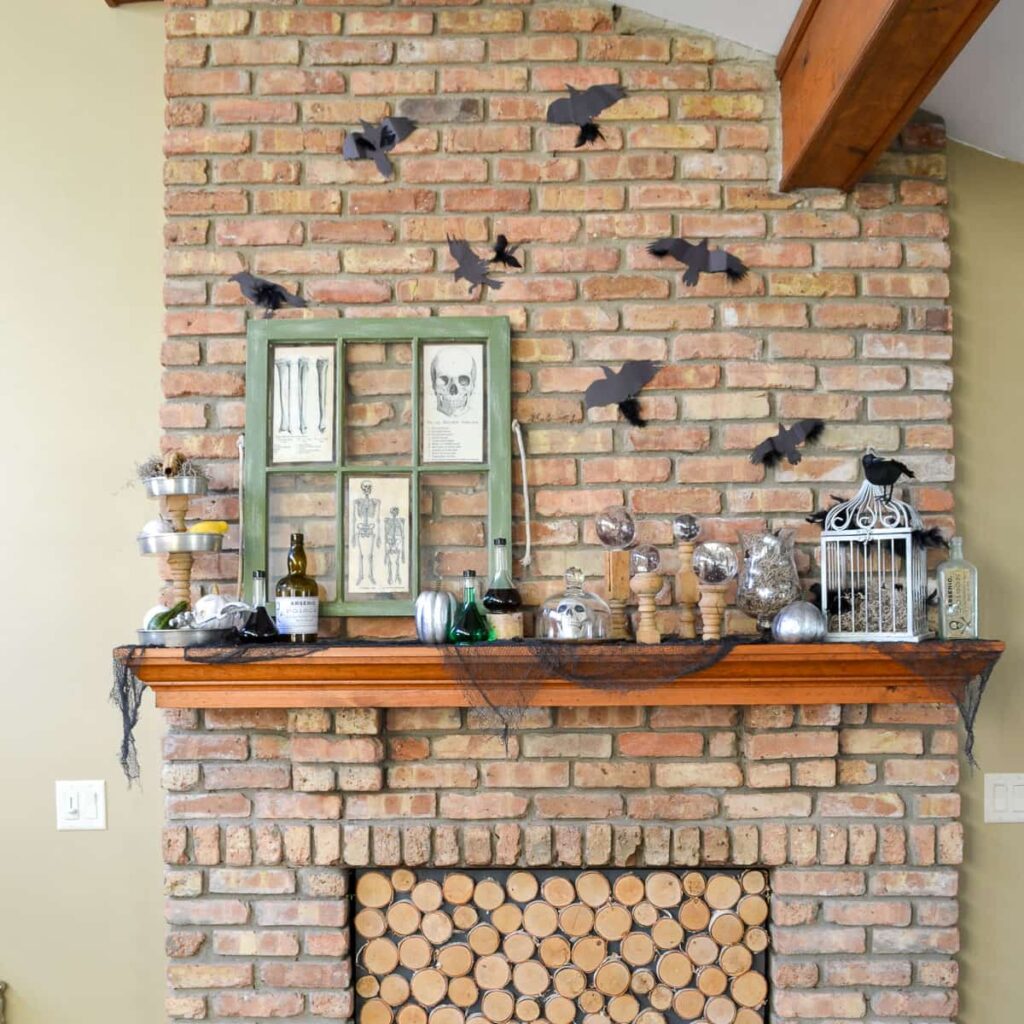
I will admit, I really don’t love decorating my mantel, but this Halloween mantel was SO MUCH FUN to decorate! Seriously, it made me love Halloween again, just as much as I did when I was a kid.
Actually, this is the first time I’ve really even decorated for Halloween. I find most of the decor (that is anywhere close to within my budget) to be cheap-looking and I’d much rather prefer to just keep up the pretty autumn decor all season long. (Mainly because I am lazy, but also because I love pumpkins and harvest corn!)

If you know anything about me, you know I will not, and can not, spend much money on decorating our home for the holidays. This entire mantel is a collection of items I already had around my home, thrift store and estate sale finds, and items from the dollar store. After stepping back to look at everything I included, I spent less than $15 to put this creepy mantel together.
Here’s how it all took shape.
Print Vintage Images to Make Creepy Halloween Decorations
I printed up a few vintage images from The Graphics Fairy that work perfectly for Halloween. She has an amazing page of a ton of creepy vintage Halloween images that are perfect for decorating on a budget, because they are all free!
You can see those skeletal images in my window, as well as on the vintage bottles as labels. I am in love with this arsenic label. Super creepy that it was actually a legit label used many years ago!
I also used creepy vintage images that I printed to create DIY Halloween crystal balls using old wooden spindles. Below is a full tutorial on this easy project.
DIY Halloween Crystal Balls
I used a packing tape transfer method to create my spooky gazing balls. I searched for vintage images of kids in Halloween costumes and found some pretty creepy photos online.
Then, I printed the images with a laser printer (places of employment are a great resource for the occasional page of printing 😉 or Kinkos or office stores also print in laser color, too).
To transfer the images to the tape, simply place a piece of packing tape over the image and use a credit card to rub the air bubbles out of the tape and to burnish the image onto the tape. Use a bit of pressure here, it helps to transfer the entire image.
Place the pieces of tape with the paper attached into a bowl of hot water and wait a couple of minutes until the paper starts to soften. You’ll use your thumb to roll the paper off the tape, and the image is left on the tape. Eerie factor amped up once again!
Because my images were bigger than one piece of tape, I simply used two pieces of tape and lined them up perfectly on the image.
Then, after putting them in water, removing the paper, and letting them dry, I put a piece of tape across the back of the image in the opposite direction. It also made them more rigid, which allows them to stand up well in the crystal balls.
I cut out the images into circles to fit the inside of the ball, and left a small tab that I taped to the opening in the ornament. I drilled holes into the top of the spindles using a spade bit, and them glued the ornaments crystal balls into the holes in the spindles.
Other Vintage Inspired Halloween Decorating Ideas
Of course, there is nothing creepier than black birds. Bats and spiders don’t creep me out, but big black birds do. I found the bird on top at the dollar store, and added feathers from a black boa from the dollar store to the inside of the cage and onto the wings of the flying birds.
Those flying birds are just printed from images I found using an internet search. I copied them into Microsoft Word, expanded them to the size I wanted, and printed them off.
Then, I glued them to a couple of pieces of construction paper and cut them out. Easy and virtually free.
I put some old furniture legs I found in the basement of an estate sale to use in this mantel as well. I cut one up and made this stacked display from old pie tins from the thrift store.
I added in a dollar store skull and hand skeletons to the set up, and spray painted some foam pumpkins with metallic silver paint.
That skull on the top was free. We found it in the soffits of our garage when we finally started to repair the decrepit structure this summer. Yep, I put some sort of raccoon/massive rat (please don’t be a massive rat….) skull in my home decor. I know some might cringe at this, but I sort of love it, in a creepy sort of way. So does my “scientist” four-year-old daughter.
Some vintage barber shop bottles that I bought at an estate sale finish out the mantel. Of course, I had to fill them with colored water.
For all of you vintage-loving and thrifty folks out there, can you see why this spooky DIY mantel was so much fun!?
Post by Jenny Leads
Jenny is the voice behind Refresh Living. She has a passion for helping people to create a home they love without spending a lot of money.
Love your mantel! Looks great (and spooky)!
Thanks Steffi – it was so much fun!
Your Halloween decor looks wonderful. I used the same Dollar Tree bird for a wreath. I love seeing all the different ways people use the same item. Thanks for sharing your fun Halloween tutorials with us at Snickerdoodle. Pinning.
Thanks so much for stopping by, Beverly! I was so glad to find those birds hiding on the bottom shelf – you can’t beat $1 – and you’re right, there’s so many different ways they can be used!
This is adorable. I like how simple it is make all of these things.
Thank you for sharing this with us on the #HomeMattersParty. We hope to see you again next Friday at 12 AM EST when we open our doors again.
Did you find that the more projects you did the more you thought of to do? Your mantel is such an exercise of creativity on a budget, bravo to you. Your mantel is wonderful. Love it all, especially
the crystal balls and scenes in them on the balister parts, so clever. You used your imagination and ingenuity to make all those decorations with what you had in the house. Good lessons for your kids.
Enjoy rest of weekend
Yes, you are so right about how one project led to the next. It takes me awhile to come up with designs, because they are always changing!
I love how your mantel turned out and that you did not spend a fortune on it! The crystal ball project is super cool!
Thanks Mary! Decorating on a tiny budget is my idea of a good time for sure!
I am loving all your Halloween ideas and I hope you will link up this post over at the Hauntingly Beautiful Decor Halloween Link party! I want to try the spooky gazing balls for sure!
https://followtheyellowbrickhome.com/hauntingly-beautiful-decor-halloween-link-party-friday-features/