
Vintage Map Paper Christmas Trees
An easy way to reuse decorative paper, wrapping paper, old books, or even old maps is to create unique paper Christmas trees! This easy DIY Christmas craft can be made by kids and adults alike. Use pretty or unique paper and add some glitter to give it that extra shine for the holidays.
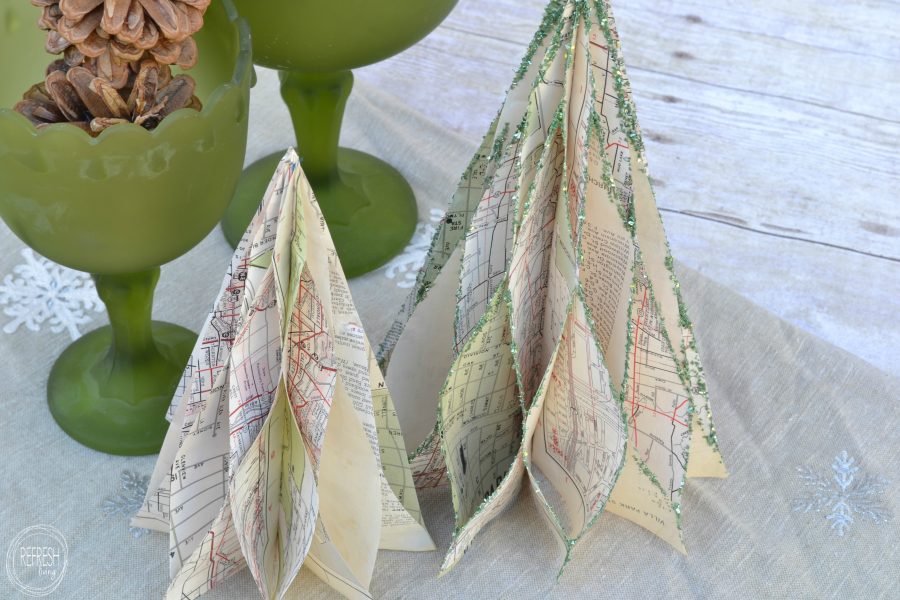
It’s beginning to look a lot like Christmas…in November! I picked up a stack of old maps at an estate sale over a year ago, without an idea of what I was going to do with them. I loved that the maps were of Chicago and the surrounding suburbs.
I’ve seen Christmas trees with old books and always loved the look, so I figured I would give it a try with the maps instead. I happened to find a map with muted greens and reds of a town right near my house and thought this would be the perfect paper for my paper Christmas trees.

I folded the pieces in half, layered a few pages on top of on another, and cut out triangles. Then, I unfolded them and sewed a wide stitch down the middle of the tree.
You could easily stop at this point, fan the pages out, and call it perfect, but I decided to add a honeycomb effect to the trees. To do this, you glue two pages together, move down a bit, glue alternating pages together, move down a bit, and then glue the first two pages together again. If you’re using craft glue like me, you probably want to find some clothespins to hold the pages in place. Otherwise, you’ll be stuck waiting for glue to dry.
Using hot glue would eliminate the need for clothespins and would definitely speed up the process and also make it a little easier.
I added glitter to the edges of one tree, but kept the other one as is. I actually can’t decide which one I prefer. You could also add fake snow to the edges which I think would give a really neat effect as well!
These paper Christmas trees couldn’t get any easier. I might try out this project with other types of paper next year because I love decorations that cost virtually nothing!
Post by Jenny Leads
Jenny is the voice behind Refresh Living. She has a passion for helping people to create a home they love without spending a lot of money.
So cute! I love decorating with maps, and this is a great twist for the holidays. Pinning!
Thanks so much for sharing, Vineta!
Oh they look so beautiful ! I love the idea of using those old maps! And the way you folded them into trees is so pretty! I could see those in my living room!!!
Thanks, Katrin! They were super easy to make to, plus the possibilities are endless as to what types of paper you can use!
In Love… with those trees, There are absolutely adorable. Maria
🙂 Thanks, Maria!
Jenny, these are way cute! I like them with and without glitter. Hard to decide! I ,love the vintage look of the maps, and it would be fun to experiment with different paper patterns. Thanks for sharing!
Shonee
http://www.hawthorneandmain.com
Thanks so much, Shonee! Glad to hear I’m not the only one who can’t make up their mind about them.
My guestroom is decorated with a travel theme so this would be perfect for Christmas! I am pinning!
What a great idea to use with a travel theme. Thanks for pinning!
Wow, those map trees are super cute. I love how you followed through with the honeycomb effect, too. I’d like to give it a try, myself.
Oh I love them! SO unique! It was fate that you picked up those maps 🙂 Also I randomly noticed the name “Addison” on one of them, that’s my daughter’s name…yay! Thanks for sharing at Welcome Home Wednesday!
Isn’t it so fun to look at the names and details? I love the name Addison!
How many sections of map did you use to cut? I love this..Might make up a few also