
How to Use Chalkboard Paint on Glass
Learn how to paint chalkboard paint on glass to turn old windows, picture frames or mirrors into unique, DIY chalkboards. You can also use it on wine glasses or glass cups!
Every time I’m at the thrift store, I pass by beautiful wood frames on picture frames or mirrors that can be reused in so many ways – one of those ways is to make them into a chalkboard for decorating or for kids to play with!
Or, this technique can be used to paint wine glasses or drinking glasses (to write names in chalk on the glass). Here’s a full post with other ideas on ways to use chalkboard paint for home DIY projects.
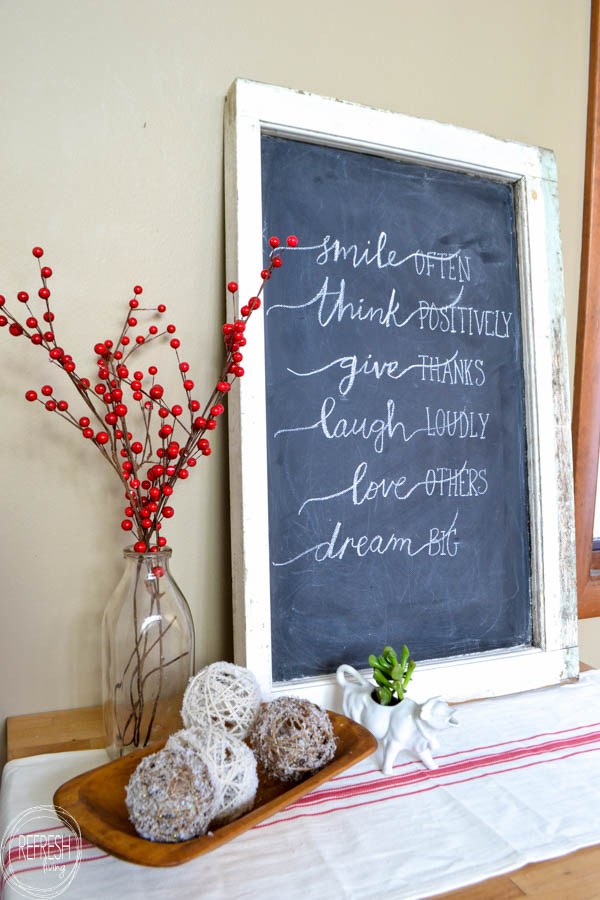
For the photos in this step by step tutorial, I turned an old window into a chalkboard by painting on the glass. I’ve also used this technique on 6-pane windows as well to make weekly menu boards and calendars.

Can You Paint Chalkboard Paint Right on Glass?
Glass can be difficult to paint because it is so slick and paint does not adhere to it well. However, chalkboard paint can be used on glass by following a few steps for a smooth finish that will adhere to the glass.
There’s no need to prime when using chalkboard paint on glass because of it’s natural adhesion power. Once it fully cures, it won’t scratch off from the glass with normal use.
Other Paints that Work on Glass
- Chalk Paint: Most brands of chalk paint will adhere to glass. Just be sure to seal with a topcoat to protect the paint. Here’s my side by side test of all the major brands of chalk paint.
- Glass Paint: You can buy small, 1 ounce containers of glass paint at the craft store. These cure by heating them up in the oven or for allowing to dry for a full month. Most brands can even be placed in the dishwasher. Here’s a project I used this paint on to paint mason jars.
- Any Paint with Bonding Primer: There are some primers that will adhere to glass. Then, once that primer is painted on the surface, you can use any paint on top of it and it will stick.
I’ve tried out a few different types of paint when painting chalkboard finishes on windows, and painted quite a few different windows to use in my home and to sell at markets. I’ve figured out the best paint to use to paint a chalkboard window, as well as the best steps to get a smooth, lasting finish.
Supplies:
- rubbing alcohol
- chalkboard paint
- foam roller
- paintbrushes (one fine point and one angled brush)
- fine grit (220) sandpaper
- piece of chalk
- chalk, chalk pencil, or chalk marker
Steps to Paint Chalkboard Paint on Glass
Scroll through the images to see the step by step process ->
- Clean the glass: Use dish soap and water or a multipurpose cleaner to clean the entire surface. Once it dries, wet a rag with rubbing alcohol and rub it over the surface of the glass to remove any leftover residue.
- Choose the best paint: I’ve tested spray chalkboard paint (in several brands) versus chalkboard paint in a can, and I recommend the chalkboard paint in a can. The spray paint doesn’t adhere as well, and it gives a slicker chalkboard surface that doesn’t work as well for writing. My favorite brand of chalkboard paint is Rustoleum, but Krylon makes a version that can be tinted to different colors which is nice.
- Tape or cut in the edges: Use painter’s tape to cover the edges of the frame or window. Or, freehand paint near the edges of the frame with an angled brush. (If painting a picture frame, just remove the glass insert and skip this step.)
- Roll the interior part of the glass: Use a foam roller or 1/4″ nap roller to apply a light coat of paint to the entire surface. If the paint is still wet from the area you brushed, you can roll over that to smooth out the finish. (Using less paint in this step is the key to achieving a smooth finish at the end!)
- Lightly sand after the coat of paint has dried: Use 220 grit sandpaper to lightly sand the surface. This step help remove small imperfections or brush strokes (but it won’t fix larger grooves because chalkboard paint dries to a hard finish and can’t be sanded down much). Use 120 or 80 grit to remove larger ridges, if needed.
- Repeat steps 4 and 5: Remove the sanding dust with a damp towel or tack cloth. Then, repeat steps 4 and 5 by painting another light coat, waiting for it to dry, and then lightly sanding. You’ll need at least three coats to build up the chalkboard layer.
- Allow to dry and the season the chalkboard: After the last coat has dried for at least 48-72 hours, take a piece of chalk and rub it (on it’s side) across the entire surface of the chalkboard, in multiple directions. (This is called seasoning the chalkboard. It helps the chalk to write smoothly and helps it to erase properly.)
If you’re like me, you hate writing on chalkboards because your handwriting never looks as good you envision it in your head. Don’t worry, I’ve figured out a foolproof way to write perfect letters on chalkboards (or any hand made signs).
I love changing up chalkboards to match the seasons, or to hold a quote or verse that I love. It’s a cheap home decor item that can stay up in your home for the entire year!
Post by Jenny Leads
Jenny is the voice behind Refresh Living. She has a passion for helping people to create a home they love without spending a lot of money.
Learned from your window to chalkboard tutorial. Thanks.
Joy
What a great idea! Thanks for the directions!
Good ideas. Very creative in finishing chalkboard window. Love your sayings. Ha e a good year as you create.
I had no idea about the “seasoning”. I have a big old frame with glass that has been scratched and this might be the perfect project! I would love it if you would stop by and share this at the Celebrate Your Story link party! Here is the link if you have a sec: http://celebrateanddecorate.com/celebrate-story-60/
This is such a cute idea. I’ve never done a project with chalkboard paint. May have to give it a try sometime. Thanks for sharing at Over the Moon.
Hi Jenny! Love how this turned out! Your tutorial is completely thorough! I want to try this. A chalkboard sign is just what I need for my mantel! Thanks for sharing at Dishing It & Digging It! I look forward to seeing more of your creativity this year!
This is beautiful!! This would be perfect for my future home office. Wonderful post.
This turned out beautifully Jenny! I am totally with you and grab old windows whenever I see them. They just look so lovely as chalkboards. Thanks so much for sharing it at the Inspiration Galore Project Party. Pinned and shared. Have a lovely weekend!
Love this, Jenny! So beautiful!!
Ok, I love that you are using an old window as a chalkboard! I never even thought of painting the glass with chalk paint! Thanks for the tutorial and linking up with Funtastic Friday! You’re one of my host picks for this week’s Friday link party!
I never knew you could do this yourself! I always thought you had to get these custom made. Thanks for sharing!
I’m so glad it was helpful!