
Eat-In Kitchen Makeover Reveal: $100 Room Challenge
Welcome to our dining room. Actually, it’s really just an eat-in kitchen area that just barely fits a table and six chairs. It’s where we eat together as a family, because there isn’t another spot in the house where we could fit a table and chairs, and therefore, I call it our dining room.
I feel as if the $100 Room Challenge was practically designed for me; it gives me the kick in the pants I need to actually finish a space AND it only allows me to spend $100 to makeover the space. Perfect. Thanks so much to Erin from Lemons, Lavender, and Laundry for hosting this challenge!
Alright, let’s take a look around.
Before:
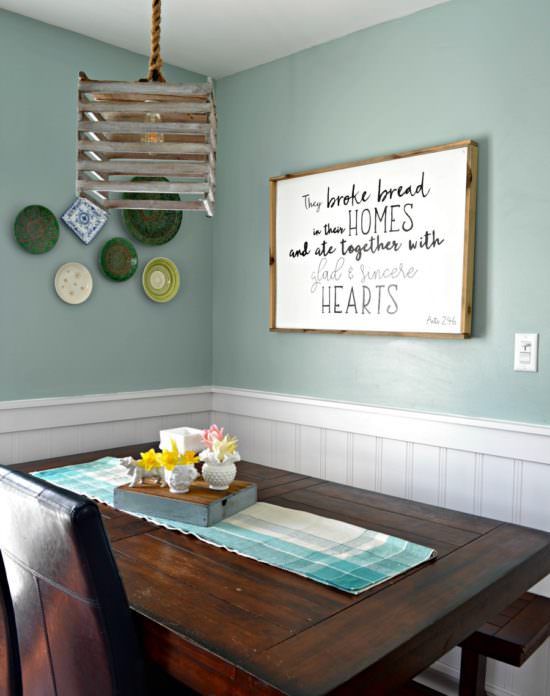
Let me remind you where this room started. I had already made a large sign for the space, and started hanging plates on the wall. I made a light fixture from an old egg crate and installed wainscotting and all the trim. But then I stopped, and the room sat unfinished for years.
 Especially this corner of the room. I spy at least 5 projects left unfinished. I know I am not alone in the haphazard conglomerate of fridge papers, magnets, and who knows what else piled on the side of my fridge. Wait until you see how it looks now.
After:
Eeeek. I’m so excited about this room. It was already my favorite room in the house because I love our family meals together here, and truly it would be my favorite no matter what it looked like. But now that I’ve put in a ton of time, creativity, and love into this space, it’s extra special.
I found a couple more milk glass plates at an estate sale last weekend and added them to my gallery wall. Those green plates were from a handmade market in Spain where I studied abroad. I’ve always loved green and always had them displayed, but now I feel as if I’ve finally found a way to make it work in this space.
I brought in green by painting the side of my fridge with vintage green chalkboard paint (the same paint I used on an entire wall in my daughter’s vintage schoolroom nursery), in the fabric on the chairs, and the natural green of the plants in the window.
I really didn’t mind the side of my fridge before, as having areas in my house that are disorganized doesn’t really bother me, but I clearly didn’t know what I was missing. Now it’s organized and beautiful, and there is still a place for each of the kids’ artwork and papers. Ahhhh. Is this the zen feeling that accompanies an organized life?!
You can read all about how I transformed our boring side of the fridge into a framed command center!
I’m definitely drawn to vintage enamelware, and I always pick up pieces that I love, without knowing exactly what I’ll use them for. All of these plants have been planted in enamelware that I’ve picked up over the past few years. I never pay more than $5 for a dish, so these are plant containers on a budget!
I’ve figured out how to help plants survive in containers without drainage holes. I planted all of these plants with this method.
I used some old barn wood to make these floating shelves. I’ll have a tutorial on this soon, too.
There is nothing special about this view, except my favorite piece of furniture ever! I found this antique pie safe at an estate sale 4 years ago. The color of the wood actually matches the quartersawn oak chairs that I brought into the room.
Speaking of chairs, each of these chairs cost $5. In fact, I rarely pay more than $5 for a chair. I’ve had to pass up a few beauties in the past because of the price, but I promise if you hold out, you will find gorgeous chairs for a steal of a deal. The larger black chairs were in the room before, they were just yellow. I spray painted them in black, along with the small vintage chairs.
Since I used up my entire budget for this room, I had to get creative with the centerpiece. We found these old milk glass beauty product jars buried in our backyard. A house used to sit on the back plot of our land, and apparently someone just buried a bunch of the glass jars at one point or another. Most of what we find is in pieces, but we’ve unearthed a few whole bottles! The flowers all came from my mom’s backyard. $0 decorating at it’s finest.
And although it’s a pain in the butt to paint, and there are still some unfinished projects up above, you can’t beat that vaulted nook with light natural light streaming in!
All of the work I’ve put into this house over the past 5 years is finally paying off as I finish these rooms. Sometimes I turn on the light before bed just to take another peek at this space.
$100 Budget Breakdown:
- $37 – dining table (originally purchased as a set for $72, but then I sold the 5 chairs for $35)
- $15 – 3 chairs (two oak chairs and one small thonet style chair – the other thonet chair was holding a plant in my yard, and the two larger wood chairs were already in our dining room)
- $16 – supplies for refinishing (wood bleach & spray paint – everything else I already had)
- $8 – fabric for chairs
- $10 – barn wood (for shelves) and cedar wood (frame around fridge) – purchased from an estate sale
- $8 – extra plants (all the rest I already had growing in a tiny windowsill in my kitchen)
- $6 – two milk glass plates
- $0 – leftover chalkboard paint, glass jars, flowers, stash of vintage enamelware
TOTAL COST – $100
I still can’t believe I brought in a “new” dining set within an $100 budget. It goes to show that you can create a beautiful space on a budget, it just will take a lot longer to acquire everything you need for the space.
Love it? Pin it! (Thank you.)
Post by Jenny Leads
Jenny is the voice behind Refresh Living. She has a passion for helping people to create a home they love without spending a lot of money.
Love how you used the chalkboard on the side of your fridge, it looks amazing! The shelves on the window are adorable, will have to give this one a try!
Thanks so much, Maria! I am SO glad to have a place for all my indoor plants now.
I love the new dining table and how you used the space on the side of the fridge. Very clever!
Thanks, Liz!
Jenny, I love those plates on the wall. I have always loved that look! Wow I did not know that there was green chalk paint around. Need to get some. Those chairs are a find and love how you interchanged them. Have a great weekend.
Thanks Maria
Thanks so much, Maria! It was so much fun to put it all together.
So many things to love in your space but the chalkboard and the table are my favorite!!! It turned out soo good!
Thanks Jessica! Those are two of my favorites, too!
Oh my gosh Jenny, I love everything about this space! The chairs, the enamelware planters, the collection of plates, just everything! It all ties in so beautifully, and that chalkboard organizer totally transformed that corner. I think my favorite part is how many of the pieces have special meaning. You can just feel it in the happy vibe of the room!
Wanna come do my fridge like that?! I LOVE it so much. (I’m gonna be looking for that tutorial!) You did an amazing job in here. I cannot believe you got a dining set… what?! Rockstar bargain hunter. Thank you SO much for participating in the challenge this month!
That chalkboard command center turned out so well!!
This is so great Jenny! You did a fabulous job! I love the chalkboard on the side of your fridge and the shelves over the windows. So neat!
Ahhmazing! I love the soft color you used in here and your beautiful plates from Spain! How cool! Your enamel planter display looks beautiful! You must love all that natural light pouring in! wow! You got so much STUFF for $100! What great scores??
Thanks so much, Morgan! I can’t believe how much I was able to bring in for under $100!
It looks so pretty now!! The chalkboard came out adorable!!!
Thanks, Tracy!
I love everything about the room! It’s gorgeous! I think a farmhouse tray to put the milk glass bottles on would look really cute and would make it easier to move them when you need the space.
What a great idea, Pam. Now that you say this, I actually have the perfect tray that will work, and it’s a chippy green – my favorite! Thanks for the tip.
The room looks beautiful! I can’t believe you found those little jars buried in your yard! They are so cute. I actually loved your old table also but love your new look. Was wondering how you hung your plates as I don’t see holes in them? I bought a ton of succulents once and most died. I’m going to again using the pea gravel. I also love your table chandelier that you made. You are so talented!
Hi Debra. Thanks so much for your kind comments! For the plates, I used E6000 glue (but any type of super glue would work) and glued a small d-ring picture hanger to the back of each plate. It’s funny that you asked, because I was actually thinking of writing up a quick tutorial on it, but wasn’t sure if it was something that anyone wanted to know. Anyway, they’ve been up for over a year and I haven’t had any problem with changes in humidity and what not affecting the glue – those d-rings are still stuck tight!
I meant to type that I’m going to ‘try’ again using the pea gravel lol.
I love that sign! It’s so pretty and simple!
Thanks, Kate!
What a gorgeous makeover and I love the colours of the walls and general colour scheme. Thank you for sharing with us at #overthemoon link party.
Thanks, Sue. I think the colors are one of my favorite parts too!
This looks truely fabulous. Well done with $100. I love how you incorporated things that are personal to you. It makes it so homey
I recently did my dining room with all thrifted finds. Go take a look.
Thanks, Mary! I will definitely take a look as it sounds right up my alley.
Wow, so cute! You inspire me.
Thanks so much, Joanna. That’s so nice of you to say.
Lovin that side of the fridge painted! Mine is gray and annoying! It may need a makeover! Sharing on Twitter. Thank you for sharing on Merry Monday! Hope to see ya next week!
Kim
Thanks so much for sharing!
It’s so pretty and interesting! Love the funky vintage modern farmhouse vibe going on. The color palette is perfect and all of your DIYs are amazing. Wonderful job.
Oh, thanks so much!! It’s definitely my favorite room!
Okay, Jenny, this looks fab, and rightfully featured on Marty’s Inspire Me this week! Way to go!
Oh, thanks so much, Rita. That’s so nice of you to say!
What a transformation. I love it all. The chalkboard on the fridge is great and I love the “chandelier!
Thanks! It’s so much fun to create with found objects!
Hello, I know I’m a few years late, but just saw your video. I have some bistro chairs that I’d also like to refinish in black. I have a little question and thought maybe you had an answer. I noticed that two of your bistro chairs have what looks like a round piece of wood on them. Did you make those, or are those the original seats? I ask bc two of my chairs seating have badly warped or raised veneer. I’m trying to find a solution to hiding the seats…If you have any tips, let me know. Thanks! 🙂
Great question! The chairs I found didn’t have seats in them, so I cut those seats out from plywood. It is only 1/4″ plywood since they are so small, it’s still strong enough to hold someone sitting in them. I will say that they are chairs used by my kids, but my husband and I still sit in them occasionally with no issues. After cutting out the circle, I just stained them and finished with a couple coats of polyurethane so they are easy to wipe off. (If you flip the chair over, you should see nails or staples or maybe screws holding the old wood in place. Just remove those to take out the seat and use it as a pattern for the new piece.) Best of luck on your project!