
How to Paint a Refrigerator
Wondering how to get rid of rust on a fridge? Wanting to know how to paint your fridge to give it an updated look? This tutorial and video will show you how to paint a refrigerator to make it look new again! This step by step process includes using primer and appliance epoxy paint.
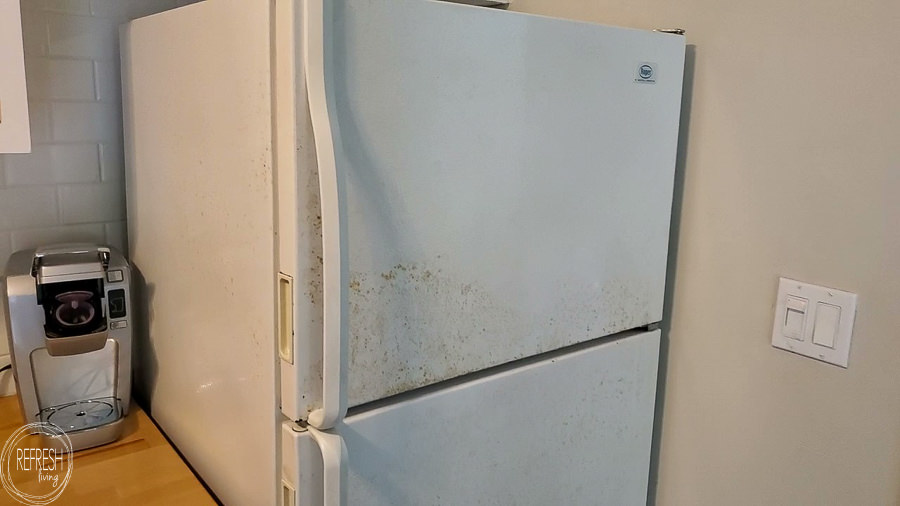
Our fridge is rusty. We have a rusty refrigerator that runs perfectly well, but looks awful. What’s worse, nothing seems to be working to get rid of the rust. In fact, it’s spreading like crazy! After living with it for about a year, I finally decided to do something about it. I’m so glad I did, because it ended up being pretty easy, and now looks like new (if I do say so myself).
This fridge is at our small lake house cottage in Wisconsin. I updated the kitchen on a budget by refacing the kitchen cabinets myself and painting them to give them a fresh new look. You can find all my lake house renovation projects here.
Supplies to Paint a Fridge
- Degreasing cleaner
- Sandpaper (between 220 and 120 grit)
- Tack cloth or lint free rag
- Rustoleum Rust Reformer spray paint
- Rustoleum Appliance Epoxy spray paint (comes in white, black, stainless steel, almond and biscuit)
How to Paint a Fridge (even if it is rusty)
1. Remove doors from the fridge
The first step is to remove the handles and doors from the fridge. I would highly recommend moving your fridge and doors outside or into a ventilated garage to paint them, as the appliance epoxy used in a later step has a lot of fumes.

2. Clean and prep the surface of the refrigerator
To prep the surface, clean the fridge with a degreaser cleaner (I used dish soap, but any cleaner should work) to remove dust, grime, oils, and anything else that might be on the surface. Make sure to rinse off all of the cleaner before moving on. To scuff up the surface to allow for best paint adhesion, lightly sand with between 220 and 120 grit sandpaper. Then, wipe off any remaining dust with a tack cloth or a lint-free cloth. I like to wipe shiny surfaces like this with a bit of rubbing alcohol before painting to ensure everything is clean.
3. Tape off gaskets and cover inside of fridge
After everything is cleaned, tape off the gaskets with painter’s tape, and cover the inside of the fridge with newspaper. Spray paint is quite the sneaky little bugger, so just be sure every surface you don’t want to be spray is covered well.
4. Prime the fridge before painting
I started with a light coat of the Rustoleum Rust Reformer spray paint to make sure the rust does not come back through the new paint. I sprayed a light coat on both doors, but didn’t end up using it on the fridge frame as the rust was pretty minimal there.
Update: Three years after painting the fridge, I have noticed very small pockets forming on the side of the fridge. This is the area where there were minimal rust spots that I did not prime. On the other hand, the doors have none of these marks which I’m sure is because I primed them with the rust reformer.
After observing how the primer and paint held up over the years, my best advice is to prime the entire fridge with rust reformer, even if you only have minimal rust pockets.
5. Apply the appliance paint
After following the dry time on the can, it was time to apply the Rustoleum Appliance Epoxy spray paint. At first, I was super nervous because the paint kept dripping out of the can onto the doors. I figured out a couple of tricks along the way to minimize the dripping, but in the end, the drips ended up leveling in perfectly with the paint and you couldn’t even see any of them (at all!) once the paint dried.
How to minimize dripping when painting a refrigerator with appliance epoxy:
- Hold the can as vertical as possible, so prop the doors up vertically, or at an angle, to paint them.
- Shake the can A LOT, and often, during painting.
- Don’t worry about them! In the end, they ended up leveling out perfectly.
- For the couple of massive drips that happened, I ended up lightly dabbing my finger in them a bit. (I know, sounds counterintuitive to everything you know about painting…) But, it ended up working out really well. In the end, this paint is really forgiving and gives a flawless finish, even if you mess it up a bit.
Less than $20 for a “new” fridge? Sounds good to me!
Frequently Asked Questions
How many cans of paint do I need to paint a refrigerator?
All the surfaces ended up needing two coats of the Appliance Epoxy. All in all, I used three cans of the Appliance Epoxy and two cans of the Rust Reformer. However, if I was doing this project again, I would prime the entire fridge which would probably require 3 total cans of primer for the fridge.
Can I paint my fridge white instead of black?
You can definitely use this process to paint your fridge white instead of black. Because the rust reformer primer is black, I would recommend using one coat of white primer after that step. Then, you’ll need less coats of the appliance epoxy in white. (Primer is much cheaper than appliance epoxy!)
Post by Jenny Leads
Jenny is the voice behind Refresh Living. She has a passion for helping people to create a home they love without spending a lot of money.
Such an awesome blog! All the information provided by you is really very helpful for all. I agreed that we should keep our project dust-free with the piece of a tack cloth. Everyone should follow the tips provided by you, it will make their work easier. Keep Posting! Keep Sharing!
You’re encouraging me to update my mobile home kitchen myself, or with minimal help, with your blogs. I’m single, no male friends to help with such things either, so I’m glad I found you on Pinterest. I wondered what to do with my fridge, so now will just keep it and paint it! A mere $30 investment until it dies a natural death is worth it! Thank you.
Hi Theresa! I’m so glad you are gaining inspiration to DIY some of these projects. You can totally do it! Be sure to mask off all the other places of the fridge you don’t want painted with painters tape and plastic (that’s the mistake I made and got a little bit of overspray inside the door – although still WAY better than a rusty fridge!)