
How to Reface Cabinets – DIY Guide to Replace Cabinet Doors
Kitchen cabinet refacing is a great way to cut down on the expense of a full kitchen remodel. It’s a DIY project that allows you to only replace your cabinet doors but still completely update and modernize the look of your kitchen!
By only replacing cabinet doors, you will save on demolition and installation by reusing your existing cabinet boxes. Plus, if you choose to paint the new doors and old cabinet frames, you’ll save even more money.
Let’s jump into exactly how to complete a DIY cabinet refacing project to make your old cabinets look new again!
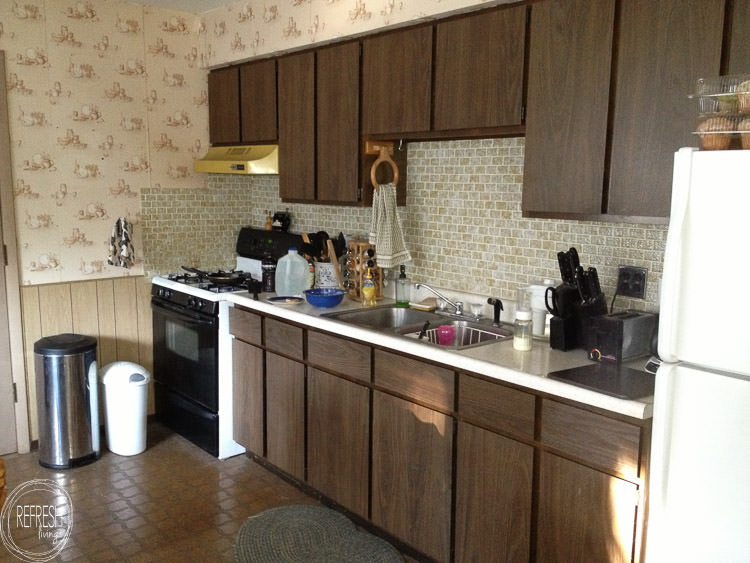
Kitchen remodels are expensive. When updating this small 1970s kitchen in 2017, the cost to demolish, remove and install new kitchen cabinets would have been about $7,000.
Of course, you can save money by removing the cabinets yourself, purchasing stock cabinets and installing them yourself, and/or purchasing and then painting your new cabinets yourself.
However, there is no kitchen remodel project as budget-friendly as simply replacing the cabinet doors, which cost me less than a third of what it would have to replace the cabinets!
This post was originally published in 2017 and has been updated in 2023 with new photos, new cabinet manufacturers, and more detailed information on the process.

What is Cabinet Refacing?
Cabinet refacing is the replacement of cabinet doors and drawer fronts while reusing the cabinet boxes in your kitchen. You can order completely new cabinet doors and draw fronts and attach them to your current cabinet boxes.
It is a DIY friendly process because the cabinet doors can be ordered online and installing them requires only a measuring tape and a drill.
Should I Replace the Doors on My Kitchen Cabinets?
There are a few factors that you should consider if you’re thinking about refacing your cabinets. If you agree with these statements, then refacing your cabinets might be the best option for you!
- My cabinet boxes are in good condition.
- I am happy with my current kitchen layout.
- I’m unhappy with the look of my current cabinet doors.
- My cabinet doors are not solid wood.
For my kitchen update, all of these statements were true. Although my cabinets are over 30 years hold, the existing cabinets (boxes) are still in really good shape. Plus, when weighing the difference of 1000s of dollars, I would choose to live with my current kitchen layout, even if I didn’t love it.
Clearly, my cabinet doors were not solid wood. They were two laminate pieces with a woodgrain texture that were stuffed with corrugated cardboard. I kid you not. These doors needed to be replaced!
Options for Kitchen Cabinet Refacing
Full Service Cabinet Door Replacement
If you Google search “cabinet refacing”, you’ll see a lot of “all-in-one” refacing services pop up. Basically, they come to your house, measure your doors, and replace them for you. If you’re looking to refinish your kitchen without spending a lot of money, and you have some basic DIY skills, this option is probably not for you.
When I replaced my cabinet doors in 2017, the only information I could find on cabinet refacing were results advertising all in one cabinet refacing services. So, I figured out how to DIY my cabinet refacing by myself and then wrote this post to help others who want to do the same thing.
Now in 2023, many others have now also written DIY posts on this topic and they’re much easier to find when searching. However, I’m sure glad you found this post and I hope it’s been helpful so far!
DIY Cabinet Refacing
Refacing kitchen cabinets is a DIY friendly project! Continue reading for how I ordered, painted, and installed the new cabinet doors and new drawer fronts. It was truly a one woman job and is one that you can do as well.
Hybrid DIY with the Help of a Contractor
If you feel that installing new cabinet doors is a bit above your DIY level, I would still look into ordering the doors yourself, and then hiring a local contractor to install them.
My hunch is that it will still save you money over hiring someone to order and install them. (Honestly though, you are probably totally able to tackle this one. I did it completely by myself, without ever needing to turn to my handyman dad even once.)
How to Order New Kitchen Cabinet Doors
Ordering new kitchen cabinet door fronts is easy to do online. You’ll need to know the measurements of your doors and then you’ll choose your wood and finish options.
Choose an Online Cabinet Door Manufacturer
When I refaced my kitchen cabinets several years ago, there weren’t as many online manufacturers of cabinets doors. Today in 2023, there are many more options. I am going to highlight two companies I have experience with.
Cabinets Now
Cabinetsnow.com is the company that created my kitchen cabinet doors and I was extremely pleased with the entire process. The wood doors are extremely well made and they offer a wide range of cabinet door styles and wood finish options.
I would recommend using this company if you would like to order solid wood doors that you plan to keep as wood finished, or if you plan to paint your own doors and drawer fronts.
Update: Cabinetnow.com now sells pre-painted doors and drawers in 20 Sherwin Williams colors.
Nieu Cabinet Doors
My friend used nieucabinetdoors.com to reface her cabinets, so I’ve been able to see them in person. This company offers pre-painted cabinet doors in 12 options that are all Sherwin Williams colors. Or, you can select any Sherwin Williams paint swatch for a flat rate of $450.
To paint your old cabinet boxes, you’ll just need to pick up a can of cabinet paint color matched to the Sherwin Williams color. I have a full post on the BEST paint for kitchen cabinets, which should be helpful when picking out your type of paint!
This post contains affiliate links. Please read my full privacy policy here.
Measure Doors and Drawer Fronts
Next, you’ll need to measure the size of each door front and drawer front that you want to replace. Make sure to get the exact measurements of each one, or else you might run into issues with the doors not fitting the frames properly. (This is one of those times I would recommend measuring 10 times and ordering once!)
Choose the Wood Species or Paint Color
If you plan to paint your cabinet doors yourself, there are two options available at Cabinets Now:
- The first option which works for painting is an MDF panel/paintable hardwood frame. This is the cheaper option because the inside panel of the door will be MDF.
- The second option is a paintable veneer panel/paintable hardwood frame. This option is slightly more expensive. The interior panel is MDF covered with a thin layer of veneer to match the wood species of the frame. This creates a more unified look when painting because every surface will be the same material.
If you are selecting a pre-painted door, I would highly recommend visiting a Sherwin Williams or Lowes store to take a look at the color swatches in person. Grab a few options and bring them home to see how they will look in different areas of your kitchen.
I ended up testing out three different shades of dark blue on my old cabinet doors. It’s amazing how different a color can look in different amounts of light!
Decide the Style of Edge Finish
There are so many options on the style of cabinets. My doors are a simple shaker style with the default edge.
Add Hinge Core Holes (if needed)
Depending on the type of hinges you’ll be using, you can have your cabinet door manufacturer pre drill cup holes or cup and dowel holes for hidden cabinet hinges.
You can also save money here by buying your own Kreg Concealed Hinge Jig. This handy little tool drills precise cup or cup and dowel holes in your cabinet doors.
Order Cabinet Doors
Okay, this is definitely the scariest step! Pushing that order button is down right terrifying, but it’ll be fine (as long as your triple checked your precise measurements).
Doors Manufactured and Shipped to your Door
Both companies package and ship their cabinet doors with extreme care. They arrive ready to be painted and/or installed on your cabinet frames.
Installing New Doors and Drawer Fronts
I upgraded our cabinet hinges from face hinges to concealed slow-close hinges. I think the look of new hinges makes everything feel brand new.
First, attach the hinges to each cabinet door. Then, screw the hinges to the existing cabinet frames. Use the screws to adjust the placement of the doors.
The drawer fronts attach with small screws and brackets that are connected to the drawer boxes. Save those screws when you take off the original drawer fronts and reuse them!
To attach the drawer fronts, drill a pilot hole into the drawer front where the screw will go in. This ensures the wood doesn’t split when you screw in the screw.
Before and After: Cabinet Door Replacement
Here’s a look at the progression of this 1970s kitchen. You can see I tried to update the laminate doors with paint, which held us over for a few years before replacing the cabinet doors and drawers.
Now, it’s a brighter, more open, modern space that looks like a totally new kitchen!
Here’s how out little kitchen turned out after replacing the cabinet doors. Don’t they look like entirely new cabinets? And, if I do say so myself, don’t they look gorgeous?!
I chose to create a more open look to the cabinets by completely removing the doors from two of the upper cabinets. Then, I used a circular saw to cut out the middle stile of each one, and painted the interior frame to match the outside.
5/4″ pine boards became the new open shelves and I now have a place to display all the vintage kitchen goodies left from my grandparents.
I painted the bottom cabinets in Advance Alkyd Enamel paint from Benjamin Moore in Polo Blue and I painted the upper cabinets with Behr Alkyd paint in white. Both paints were a satin finish.
I purposely used two different brands of paint because I wanted to compare both products. You can read all about my comparison between these different types of alkyd paint and the best paint for kitchen cabinets here.
The hardware brought the whole space together, and I love the look on both the lowers and uppers. The drawer pulls are all the 5″ Octo Pulls in soft brass from D. Lawless Hardware. They also carry a 3″ and a 3-3/4″ inch pull in this same design.
I still think it’s amazing how new cabinet fronts and some paint can completely give new life to the entire kitchen!
Update: Since writing this original post, that old white fridge started to develop rust spots, that literally spread over the entire fridge like chicken pox. Instead of just throwing in the towel and buying a new one, I tried to paint it. Guess what? It worked! Here’s that post on how to paint a refrigerator.
Thinking about painting your kitchen cabinets? Check out these posts:
I’m super pleased with the results of my refaced cabinets. It looks like an entirely new kitchen, for a fraction of the cost!
Like it? Pin it. (Thank you!)
Post by Jenny Leads
Jenny is the voice behind Refresh Living. She has a passion for helping people to create a home they love without spending a lot of money.
I have been wanting to do this for a long time. Can’t wait to see your follow up post on how you did it. Turned out great!
Wow! I cannot believe those are the same cabinets. The space looks amazing!!!! Now I want to come vacation at the lake with you ????
Your refaced cabinets turned out great! Thanks for sharing with us at Snickerdoodle Create Bake Make Party! This will be one of my features this Saturday. Be sure to stop by and check it out! Roseann from This Autoimmune Life
Your lake house kitchen looks wonderful! I love the contrast between the blue and the white. Thanks for sharing at Snickerdoodle Party. I’ll be featuring this at today’s party. Hope to see you there.
Amazing transformation! Great idea saving money and the results are wonderful.
Enjoy your “new” kitchen. Happy Summer, Kippi
This is so gorgeous! I love the Polo blue! The pulls are also so pretty! I just love everything about this! Haha!
What a great difference refacing the cabinets made. It looks fantastic.
Wow! This is a wonderful transformation. I had no idea that you could order new doors online!
Thanks so much for joining the Grace at Home party at Imparting Grace. I’m featuring you this week!
Congratulations on the Feature at To Grandma’s House We Go. I love how you kitchen turned out. You did a fabulous job. I really was shocked at the inside of your original cabinet doors. Thank you for sharing.
Very professional !!!
Gorgeous kitchen cabinet redo, but will never understand open cabinets! Who wants to see dishes, mugs, assorted bowls, spices out in the open?? UGH!!
Haha – I understand. Honestly, my decision was partially to save money! Thankfully, I can easily add doors should I change my mind since the cabinet boxes are still in tact.
Maybe you already tackled the fridge, but I know you can buy a peel & stick black chalk board surface for walls—so perhaps you could wrap the front with that instead of painting.
I love this idea – thanks!! (That project is still on my to-do list….)
Would love to know more about the Behr vs. Benjamin Moore outcomes, and how both of the paints are holding up. Thank you for posting this article. This is a project planning for at this time. Thank you!
I’m working on that post right now, and I’ll be sure to link to it in this post as soon as it’s done!
Hello!!! When buying the shaker doors did you buy them pre drilled or did you just use the previous hardware you had and drilled your own holes for screws?
Hi Mandee. I’m actually working on a post with that information right now, because I realized I left quite a bit of details out of this post that might help people with this process! I had the holes pre drilled when I ordered the doors, and bought new hardware (because I wanted to have hidden hinges rather than the ones that screwed on the front of the cabinet faces like my old ones). There is an easy to use tool that Kreg makes to easily drill the cup and dowel holes, but I was glad I ordered them pre drilled.
Your kitchen is a similar size as mine and I’m basically looking at doing the same thing–shaker cabinets, two tone, butcher block (on one side of my kitchen). What was the cost of just your shaker cabinet fronts and how many were there in total? Just trying to get a ballpark on this option. Thanks!
Hi. Good question. I had 6 drawer fronts and 12 cabinet doors and the cost of these was about $900-$1000. I ordered paint grade wood doors in Shaker style (which kept the cost down), but did have them prebore the holes which cost about $75 extra for all of the doors. I hope that helps a bit. Have fun on your project!
I am curious about your backsplash. It looks different, what did you do?
I took out the old backsplash and put up subway tile. Thankfully, subway tile is pretty inexpensive (I often see 3 x 6″ tiles on sale for $0.15 each), but if it was out of my budget, I probably would have used tile resurfacing paint to just paint the old tile.
Love the cabinent! But, I’m curious about the tile backsplash. Is that peel and stick or did you retile?
I did re-tile it with a white subway tile.
Hi, I am curious if you used a top coat on all the cabinets after you were done painting?
Hi Mikki. I didn’t use a topcoat. One of the perks of alkyd paint is that it gives a super durable finish as is!
Another question. You said you chose maple. I see where is two choices for maple. Did you use just maple or natural maple?
Hmm, I actually don’t remember. It’s the paint grade maple, so whichever of those two is less expensive is the one I picked. 🙂
I read the other comments and didn’t see anyone else mention it but it seems you also changed the countertop which really brings it all together. I’m curious where you bought that piece and the sink from. It really goes well with the polo blue on the cabinets below
Yes, you’re right. There have been two updates done to the kitchen – about 6 years ago I painted the cabinets and installed the butcher block and sink, and then 2 years ago I replaced the doors and gave it all a new paint job. The butcher block is from Menards and the sink is actually from my old house!
Hello! I love your kitchen! Did you use a paint or an oil for the butcher block or you can order it like that! I love the look
Hi Sarah! The butcher block counters I bought unfinished from a home improvement store (all 3 major stores carry them in stock in store) and then they are finished with 5 coats of clear polyurethane. So no extra stain or color was added, but poly will also darken the color of wood, which is why it has the look it does. Thanks for stopping by!
When you took the doors off, did you paint the Boxes (frames) or did you cover them with some sort of paneling? We have a large kitchen and I don’t want to spend 10’s of thousands replacing all of them. The cabinets look great by the way.
I painted the new doors as well as the boxes. I didn’t paint the inside of the cabinets, though, just the outside frames. Good luck on your kitchen! I’d highly recommend just replacing the doors. Saved us so much money!
Your kitchen looks amazing! What a difference new cabinet doors can make, wow!
What a wonderful job! I am so impressed. My kitchen layout is fine, but my cabinets sadden me. I cannot afford to redo the my kitchen, and I love what you have done. Thanks for sharing.
It’s definitely a more budget friendly option that redoing the entire kitchen. Or, even a coat of paint can work wonders as well!
I love that dark blue color Jenny! I’m actually using one of the “cabinet refacing services” from Google right now. It’s N-Hance of Fort Wayne, and so far they’ve been pretty great to work with. Maybe a little different than what you described above. They let you go through their shop and really pick the right look for you so it’s all customizable and then they’ll do the install once your doors are ready. I’m honestly thinking of doing a similar look to yours so I hope you don’t mind a copy cat haha. Thanks for sharing.
Thanks for sharing! This sounds like a great alternative for those that might not want to do the install themselves. I bet it’s still saving a ton over completely new cabinets!!
This is amazing! This seems much ‘easier’ and less involved than painting old cabinet doors as well. How long did this process take you (outside of waiting for them to be shipped)?
Yes, it was a pretty easy process! I’ve painted three different kitchens, and then refaced this one, and I’ll say it honestly takes about the same amount of time. When refacing, there’s extra time in drilling all the hardware holes that you wouldn’t need to do when painting old doors, but when painting old doors,there’s more prep. It maybe took 6-8 hours total to paint the frames and doors (not including dry time), and then 3-4 hours for install.
The cabinets look awesome, it was Very well done! I love how others kitchen remodeling ri decorate. Such a fresh beautiful kitchen.
Cab you do a price comparison on what the cabinet (minus any extra..like counters) resurfacing saved you over bying new cabinets. I’m at the stage of deciding what to do with mine.
Honestly, I didn’t quote out this kitchen so I can’t give an exact difference. Also, it totally depends on the type of cabinet you purchase. I’ve bought semi-custom cabinets from Menards (just made the box sizes they offer fit into my layout) which are significantly cheaper than full custom cabinets. But, if I was using those prices for this kitchen, I would say refacing was about 1/3 of the cost of replacing the full cabinets. Again, that’s a very rough estimate though.
Wow, this kitchen transformation is stunning- it doesn’t even look like the same room! I got my kitchen cabinets redone by a local cabinet refinisher last year and used a similar shaker style cabinet. I would have loved to DIY it and use your process, but I have a bad back and had to call in a company instead. Your process for cabinet refacing seems like a great alternative for people who love home projects!
Thanks for sharing, Sarah. I think hiring local companies are still a great idea. Refacing will save money over a completely new ones even if you do hire it out!
I agree Jenny! We actually just did a cabinet door replacement with our local N-Hance service, just like Sarah. We found your post a while ago and loved the two-toned look. When it came time to update our cabinet doors, we wanted to do something similar but just didn’t have the time to do it on our own. I’m all about DIY, but sometimes you just have to call in the pros.
Hi, this looks fabulous! I guess you also painted the wood around the doors? My kitchen is a laminate so I wonder if I can paint the surrounding surfaces. Did you also install the backslash yourself? Thanks!
Yes, you can definitely paint laminate, but just be sure to use a high-bonding primer before painting. I did install the backsplash. Subway tile is super affordable and pretty easy to install!
OMG! I have been searching for a really tight budget friendly way to reface our cabinets- Home Depot wanted $16,000 to do it for us!
I will be looking into this- thank you! Your little kitchen looks amazing!
Right?! I couldn’t believe the cost for companies to reface them. Best of luck on your project!
Every kitchen and client has so many variables to help them decide what is best for them. I love the way these turned out!
Wow, gorgeous! Found you on Pinterest because I want to replace our kitchen doors as well. And….I’m in Wisconsin! Where is your lake house? I’m hoping to reface myself, but it is so daunting!! I’m not so great with the DIY (although it seems to be all I watch on YouTube lol)
Hi Michelle! First, I think you could totally do it. Just measure your doors 5 times before ordering 🙂 (That was the scariest part for me!) We’re by Lake Como, which is right by Lake Geneva but most of the time people have never heard of it but do know where Lake Geneva is.
I know this is a late post. Can you please tell me what material you used to hang yout pine shelves? Thanks!
Hi! I used metal cabinet braces because my interior of the cabinets still had the holes for the original shelves. Here’s a link to the ones I used for mine. https://amzn.to/2VDtquK
I’d like to have a more open look with my cabinets. That would make my kitchen look different too. But it all depends on what my wife thinks.
I love the way these turned out! Every client has their own style!
Great tips thanks for sharing this with us. Your information’s are really helpful.
Great job keep up the good work. Thanks for sharing this with us.
Great design and I like the reface of your kitchen!
WOW looks so wonderful! Thanks for sharing 🙂 I like your kitchen!
Your updated kitchen looks amazing. thanks for sharing.
Amazing transformation Thanks for sharing. Your floors also really help pull it together, what kind are they?
Hi there! They are just a laminate flooring. Honestly, I purchased them on clearance about 10 years ago, so I know the design won’t be able to be found today. Sorry that wasn’t more helpful!
How about the counter, is that wood? How did you source that and what advise do you have for using wood versus another counter?
Butcher block countertop is from Menards, but available at all home improvement stores and also IKEA. I sealed with four coats of oil-based polyurethane to keep it water tight, but you could also use an epoxy sealer as well.