
How to Make a DIY Wood Sign with Perfect Lettering
Instead of buying a generic wood sign, you can easily create a custom sign, large or small, with your own design or saying.
I love Hobby Lobby, but I find myself getting irritated by the cheap wood signs they sell that are all knock offs of original designs created by artists and creators.
Instead of buying a sign that everyone else has in their home, I prefer to make my own original DIY wood signs that are unique to my family and home.
This post has information on how to build a wood sign that can be perfectly painted with a design, lettering, or a quote, even if you have awful handwriting or minimal artistic abilities!
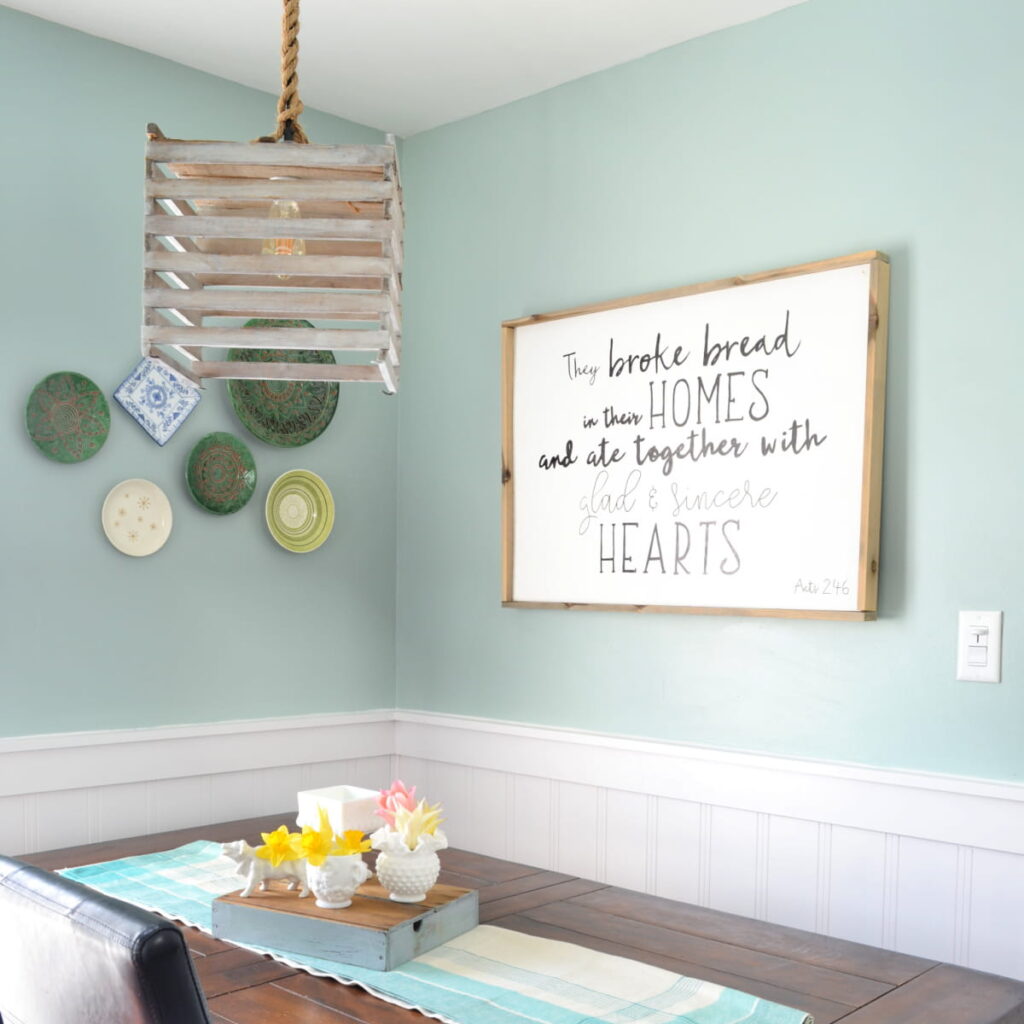
These signs have a base of white or black with contrasting lettering and a small wood frame around the perimeter.
How to Make a Wood Sign with a Wood Frame
There are two options for making your own signs with quotes. You can use a base of 1/4″ plywood or a base of 1/2″ plywood. The base is the wood you will paint your background color (usually white or black).
1/4″ Plywood Base
This plywood is thinner, which makes it the cheaper and lighter option. It’s easy to find small (or large) pieces) at all home improvement stores.
Because it’s so thin, you’ll need to add a few pieces of wood on the back for reinforcement and so the wood frame has something to attach to. You can’t nail into 1/4″ well and will stability.
1/2″ Plywood Base
This plywood is thicker, which makes it more expensive and heavier. It’s easy to find at all home improvement stores.
Because it is thicker, there’s no need to add any extra wood to the back. The frame pieces can be nailed directly into the plywood.
I prefer to use 1/2″ plywood when making smaller signs, because it’s easier (one less step) and the weight isn’t a factor.
When making large signs, I use 1/4″ plywood. This helps cut down on extra cost and weight that’s just not necessary.
Supplies Needed to Make Wood Framed Lettered Sign
1/4″ Plywood Base
- 1/4″ sanded plywood, cut down to the size you’d like to make your sign
- 1″ x 2″ boards – 2 pieces, cut to the longer side of your plywood panel (these reinforcement boards for the back, so they can be cheap pine – no one will see them once it’s hung up)
1/2″ Plywood Base
- 1/2″ cabinet grade plywood, cut down to the size you’d like to make your sign
Additional Supplies:
- 1 x 2″ wood boards (for the frame of the sign)
- 1″ and 1.5″ trim nails
- hammer (or you can use an air nailer, if you have it)
- stain and/or paint
- paint pen (here are my favorite ones for making signs)
- computer and printer
Make the Base Panel of the Sign
You’ll start by making the base of your sign.
Cut the Plywood
If you don’t have table saw, circular saw or jigsaw at home, employees at some home improvement stores will cut down pieces of plywood to the exact size you’d like, or they also sell smaller pieces (I’ve seen 24″ x 24″ or 48″ x 24″).
Home improvement stores sell both 1/4″ and 1/2″ plywood. Recently, I’ve noticed that craft stores are carrying 1/4″ plywood panels as well (however, I have not seen 1/2″ panels sold at craft stores).
1/4″ Plywood Sign: In order to be able to nail the wood frame into the panel, you’ll need to add a little extra to the back. Cut down two 1×2″ boards to the same length as the longer side of the plywood.

Apply glue to the 1×2″ boards and nail (with 1″ nails) them to the back of the panel, by nailing through the front of the plywood panel. You can use wood filler to fill in the holes on the front of the sign, if you’d like.
1/2″ Plywood Sign: Because 1/2″ plywood is thicker, you don’t need to nail the 1×2 frame boards to the back. All you need to do is cut your piece of 1/2″ plywood to the size of your sign.
Paint the Base of the Sign
Paint the smooth side of the piece of plywood with your base color. Most of the time I see signs with a white background and black lettering or a black background with white lettering, but this a custom sign, so you get to pick your colors!
If you want to paint your sign white, I’d recommend priming it first with a stain blocking primer, so the knots from the wood don’t eventually bleed through.
Design, Print and Paint Lettering for the Sign
You can use a pre-made design or design your own lettering using a free graphic design program like Canva or Picmonkey.
Then, you can transfer the printed image to your wood using this technique on how to transfer letters to wood. The post also has directions on how to enlarge lettering for a large wood sign!
After transferring the design, paint over the outline using paint pen or acrylic paint and a brush.
Attach the Wood Frame
After the paint or stain dries and you paint on the lettering, you can attach the wood frame.
You can use any kind of wood for this step. I find pine boards to work well as an inexpensive option. Oak wood is very pretty for frames as well, but does cost more. Or, save money and rip down an old cedar deck or fence board or other 1″ thick left over scrap piece of wood for a more rustic look.
- Mitered Corners
- Overlap Corners
First, decide on the corner joints of your sign. You can create mitered corners at 45 degree angles or simply overlap the corners. (Both options are very easy, but the overlapping frame corners is easiest because it requires straight cuts.)
You can stain the boards, add a coat of clear coat, or leave the wood raw depending on the look you want to create.
Attach the Wood Frame to Sign
Once the frame pieces have dried, it’s time to attach them to your back panel.
1/4″ Plywood Base
Use wood glue and 1.5″ nails to attach the longer frame boards into the reinforcement board you added to the back. Add a nail every 2 inches or along those two sides.
For the shorter sides, you will only be able to nail into the top and bottom of that frame piece (because that’s the only place where the reinforcement board will be).
1/2″ Plywood Base
If you use 1/2″ plywood for your sign base, just nail the frame right into the side of the plywood on all sides.
After it’s all put together, it’s ready to hang on the wall! Use saw tooth picture hangers or d-ring hangers as hanging brackets attached to the back of the frame. This kit contains both d-ring hangers and sawtooth hangers!
I LOVE using this easy DIY framing technique on handmade signs, but it can also be used to frame canvas artwork as well! Scroll to see a few projects where I’ve used it –>
Post by Jenny Leads
Jenny is the voice behind Refresh Living. She has a passion for helping people to create a home they love without spending a lot of money.
Love your sign, Jenny! It looks so pretty in your kitchen.
Thanks, Amy! I’m a big fan of it too. 😉
Very nice … Do you fasten the sawtooth hangers to the 1×2 crosspiece on the back?
You got it – nail the sawtooth hanger to the wood frame!
Your sign is beautiful! Thanks for sharing how you framed it up to, because that really finished it perfectly.
Thanks for linking up at Knick of Time – I’m pinning this to the Knick of Time party board, and giving you a shout-out on FB tomorrow! 🙂
Thanks so much, Angie, for sharing on social media! It’s much appreciated!
Anxious to read how you created the lettering. It’s a great statement piece. Visiting from Talk of the Town.
Thanks, Victoria! We love how it brings together the space.
What a great sign and tutorial. One of my favorite verses! Thanks for sharing at the Talk of the Town party.
Thanks, Becky! I’m so glad you like it. 🙂
Thank you for showing how you framed your painted sign! I’ve painted lots of signs, but never put a frame around them. I’ve visiting from Talk of the Town!
Thanks so much for stopping by, Carol. I’m glad it was helpful!!
This is awesome! Thanks so much for sharing the how-to with us at Brag About It! Your project will be featured at next weeks party and we hope to see you next Tuesday!
This is awesome, Jenny! I love your sign and the verse you chose is perfect!
just curious what fonts you used?
Love this sign! Great for making something to fill a wall. I have a perfect wall to make this on!
Thanks for linking up with Welcome Home Wednesdays!
liz @ j for joiner
Good Morning!! I wanted to stop by and let you know that your post has been selected as a Feature post for the Welcome Home Wednesdays Link Party!! Stop by this morning to see your post linked up and don’t forget to grab your Featured Button too! ~Lisa~
That i super neat! Thank you for sharing. 🙂
After you designed your quote what did you do in order to paint it on? Did you print it off and just trace it or what?
This post should help – basically, I printed the lettering across multiple pages, and then used an image transfer technique to get a stencil of the letters. Then, I used a paint pen to paint in the letters. All the details are here: https://refreshliving.us/2016/04/design-lettering-signs-free.html Let me know if you have any other questions!
I’m curious on the plates on the wall. What kind of glue did you use?
I used a d-ring glued to the plate with E-6000 glue. On two of the plates I used the plate hanger discs that stick to the back of the plate. I’ve only been able to find them at Hobby Lobby, though.
What material do you use for the inside quote? Are you painting that on paper or is it something that printed out somewhere?
Hi Elizabeth. Thanks for the question. This post should really help. I basically print an image onto multiple pages of paper, transfer it to the wood, and then write over it with a paint pen. The post I link will walk through the process, but if you still have questions, just let me know.
I’m having a lot of trouble getting the size right for my wood. I followed your directions exactly and it ended up being too big. So I scaled it down and it made no difference. When I change the print setting in paint to span 2 pages, it is changing the font size to fit 2 pages, not simply allowing my words to use the 2 pages (if that makes sense). Help!
Hi Danielle. Let me see if I can try to help. I know that sometimes I end up needing to adjust the page sizes in different ways until I’m able to get exactly the right size, and it can be finicky sometimes. I know in the post I described how to use the “Fit to:” button where you choose the number of pages it spans across. It sounds like it might be better for you to use the “Adjust to:” button instead. First, select landscape or portrait direction. Then, increase the percentage until it spans across the number of pages that should match your sign. You can click print preview to eyeball it and see if it should work for your sign size. I’ve found that using the percentages can give more of an exact match. In fact, I’m thinking I should add that option to the post, because it’s actually the way I prefer to do it now. Let me know if that doesn’t work or if you have any other questions. Have fun making your sign!
Hi there! Quick question — I have been making a couple of these signs lately and with both the 1/4 inch plywood and the 1/2 inch plywood, it split some after cutting on the edges. Enough that it isn’t a flesh board there. Luckily it was just one side on the last one I did so I am just making that the back. Do you have experience with this? We are using a miter saw.
Hi Alicia – sorry it took me so long to get back to you. So all saws with create a rough edge and a clean edge cut. For some, the clean side will actually be on the bottom of the wood. I think it has something to do with the direction the saw blade spins, but I can never remember which is which, so I always just do a test cut. I wonder if your saw gives the clean edge on the bottom? If both sides are splintering, your blade might be dull. Another trick is to sandwich your piece of plywood between two scraps of wood and cut through all of them. It keeps the cut cleaner as well. I hope that helps!
I stumbled across this tutorial a dog my GOSH THANK YOU a million times over!!!! As a first-starter Wood sign DIY-er, this is exactly what I was needing to help me figure out how to not have to use thick wood, and still maintain a stable frame with enough stability; and not having to use wood glue!!!!! I don’t have many tools, so this is just perfect!!!!!! Thank you so much!!!!! Please please keep this around and if you can refresh or bump it, it should be shared some more lol!!!!! I’m sure there are newbies like me just getting started and trying to still learn that could really use this!!!! I am actually in the process of making two signs for family as we speak, so I came across it at just the right time, since I wanted to use the thinner wood….. now I can use less material and keep the cost down, and make it less heavy!!!!! 🙂
I’m SO glad you found it helpful! You’re right, I should republish this one! 😉