
Modern Vintage Bathroom – DIY Remodel
This mid century modern bathroom is full of vintage AND modern touches – remodeled with DIY power!
This DIY bathroom remodel was a gut renovation that I slowly put back together to create a mid century modern bathroom with a mix of vintage and modern elements.
I’m a big fan of saving and splurging when it comes to room renovations. In this space, you’ll find a lot of second hand decor and ways that I saved money, but also some new elements that were a splurge. The combination creates a budget-friendly makeover that still looks completely new!
In This post You’ll find:
I’ve been dreaming of remodeling our main bathroom ever since we bought our house – 15 years ago. I made some temporary fixes which you can see in this before tour, but I always planned to do a gut renovation when the time was right. And the time was right about a year ago when I ripped out the entire bathroom over Christmas break!
Then, over the course of the last year, I’ve been slowly putting it back together. Finally, I can say that the room is completely done. Welcome to our vintage-inspired, yet modern, bathroom!
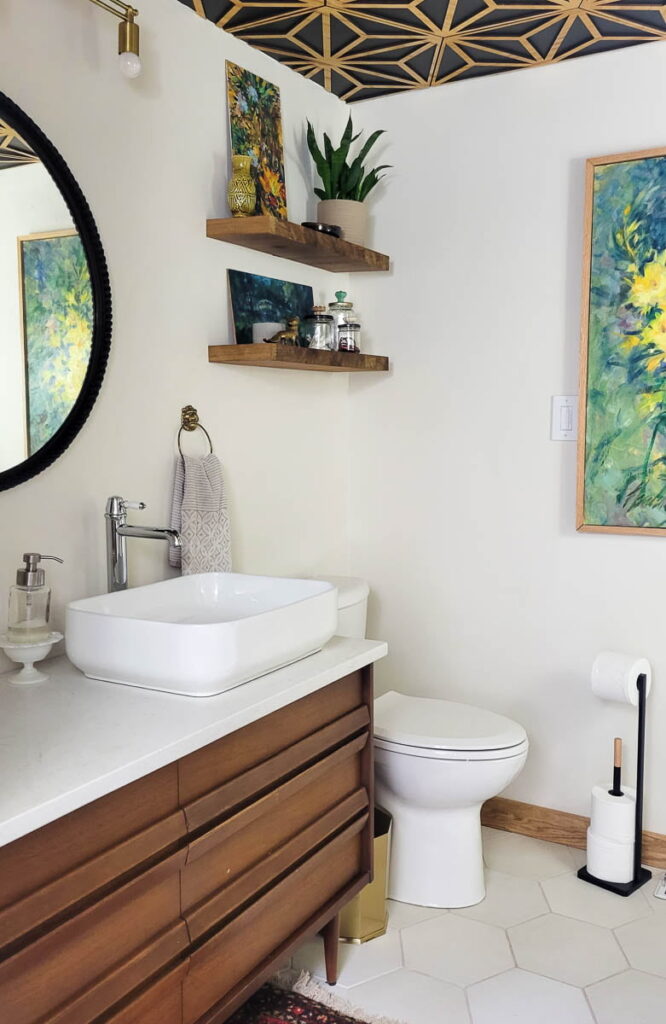
DIY Mid Century Modern Vanity
This MCM vanity started as a $100 dresser I found at a garage sale. I waited a long time to find the perfect piece for my vanity primarily because it needed to be the correct length for the space I was working with between the wall and toilet.

I checked FB Marketplace and visited a local second hand furniture store frequently for months, and finally I stumbled upon this dresser at a garage sale. It was the perfect length and was definitely meant to become our bathroom vanity.
The vanity top was just a piece of laminate, so I decided to remove it and add a piece of quartz to resemble marble. Buying this quartz slab was the splurge for this vanity as it cost $450 for the slab and for it to be cut to size.
The light above the vanity is this beautiful raw brass light fixture made by Peared Creations. There were so many fixtures that I loved from this company based in Ohio. If you’re looking for a new light fixture, I would recommend checking out their site!
This post contains affiliate links. You can read my full disclosure policy here.
New Modern Tile in White and Green
I decided to splurge on my new bathroom tile and buy something that is more expensive than what I usually consider. Honestly, I fell in love (well, as much as you can fall in love with tile) with these matte green tiles from the Makato collection from Bedrosians Tile and Stone. They have slight variation in color within each tile, are a long subway style, and have a matte finish. All of these were characteristics that I loved and I just couldn’t find any that compared to the look.
Here are the specific tiles I used in my bathroom:
- Makoto 2.5″ x 10″ Matte Ceramic Wall Tile in Midori Green
- Makoto 2.5″ x 10″ Matte Ceramic Wall Tile in Shoji White
- Makoto 10″ x 11.5″ Hexagon Matte Porcelain Tile in Shoji White
Obviously, choosing to install the tile yourself is definitely a way to save on a bathroom remodel. I have tiled a few other (smaller) areas, but this was the first full bathroom I tiled by myself. My dad worked with me on the other full bathroom remodel I tiled, so I felt very accomplished when I finished this tiling on my own!
Maybe I went a little crazy combining two different tile patterns with two different colors, but I honestly love the way it turned out. I used a basketweave design for the green tile with black grout and a vertical stack with white tile and off-white grout.
I saw some pictures of this green tile with lighter grout and I personally loved the black grout, so I gave it a try to use two different colored grouts. I think it works, but I also am not a designer (and won’t ever claim to be)!
Black Ceiling with Decorative Wood Pattern
I’m sure you’ve seen glimpses of it in the photos – I painted the ceiling black AND added a decorative patterned oak wood design on the ceiling!
Here’s a full tutorial on how to install a wood fretwork ceiling or feature wall.
This was a last minute idea and I sort of just rolled with it. I think I love it. And if I grow tired of it, I can easily remove it and paint again.
I decided to use Ekena Decorative Wood Fretwork in oak to create a one of a kind decorative ceiling! This decision was definitely a splurge for me but one that I’m glad I made.
Each panel is cut from a thin piece of veneered plywood, so it was important to seal the front, back and edges since it’s a room that is exposed to moisture.
Here is my favorite sealer that penetrates the wood and creates a water resistant finish. I use it on tabletops all the time, so I knew it would work for sealing this wood ceiling as well.
Inspired by this crazy ceiling idea, I pulled together 25 other unique ceiling design ideas that you can use to give any room in your home a cool new look.
Full Tour of Modern Bathroom
I have more pictures to take of this space and a quick video tour that I’ll add here soon.
A few more budget-friendly room makeovers:
No posts
Looking to give a room in your home a facelift with the power of DIY? This post walks you through what to include in a DIY room makeover and how to plan for transforming a space.
Post by Jenny Leads
Jenny is the voice behind Refresh Living. She has a passion for helping people to create a home they love without spending a lot of money.
Love it all, but my favorite is that green tile! Great job, Jenny!
LOVE IT! ARTIST!! What happens when you finish your house???? Mine next???
I love the green tile too and the ceiling with the wood! WOW! Absolutely beautiful!!
Thanks so much!! I love the green tile. I know at some point it look dated, but for now, I love it!
Just curious why it looks like there’s space between the borders of the ceiling fretwork pieces. Is that the standard installation practice? Like with tile?
Hi! Great question – and great observation. They can be installed flush against each other or with small gaps. To be honest, I did not plan to have any gaps, but I mistakenly installed them starting from one wall when I should have started in the center. Because I had ripped several of the pieces in half and didn’t want to waste them and buy new ones, I just went ahead and installed and had to have some slight gaps for the panels to work against my very wonky walls. If I were to do it all over again, I wouldn’t install with any gaps!
Love this bathroom! What tile did you use to outline your shower niches to avoid grout lines? I don’t see that option within the Makoto line. Thank you in advance!
Hi Katie. I apologize for the delay in my response! I used pieces of marble for inside the niches. I think they’re actually sold as floor transitions. Mine were from Floor and Decor but I know you can get them anywhere. They were a pain to cut correctly at 45 degree angles because the niche is slightly angled out for drainage, but once I figured that out they actually worked really well. If I did it again, I might just butt up the joints at 90s to not have to deal with the angled 45s. Have fun with your project!