
Green Desk from an Antique Baker’s Cabinet
I’ve always had a special place in my heart for antique baker’s cabinets, but I always need to pass them up when I see them because we just don’t have anywhere to put it in our small house. (Well, unless I put in a bedroom, I guess. But that might be a little strange.)
So, when I saw this possum-bellied baking table at an estate sale, it caught my eye right away. I gawked at it for awhile, but I had no idea where I’d put it or how I’d use it, so I walked by it, multiple times. Finally, on my last pass through before checking out, it struck me. I could turn this into my desk!!
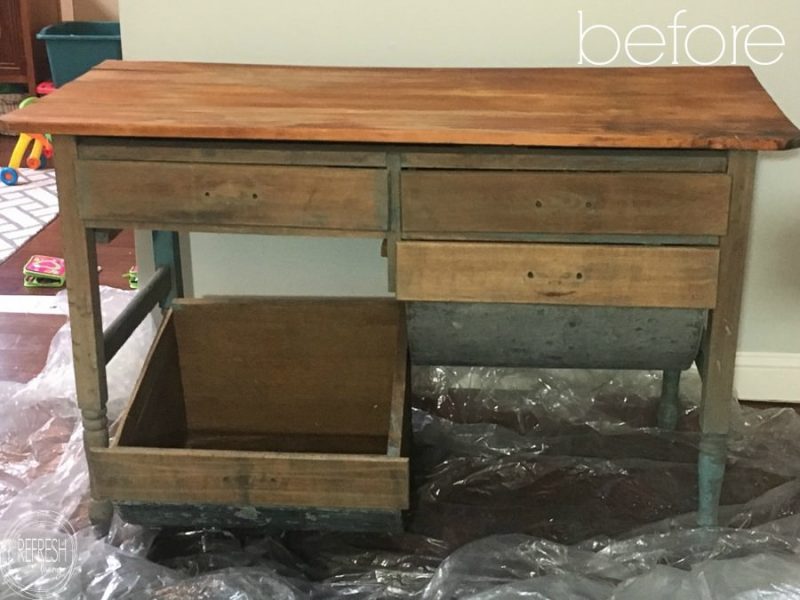
Thank goodness that drawer was broken and laying on the ground, because I don’t think I would have thought about slipping a chair into that opening if it had been in tact.
Because the desk had been sanded down to the natural wood in most places when I bought it, I knew it would be the perfect candidate for milk paint (linked is my very detailed post on all things milk paint). I love to use milk paint on unfinished wood, because it actually penetrates into the wood, and gives it the look of how authentic antique pieces were once painted. If you’re interested in learning more about the best kind of paint for painting furniture, you can read about all my favorite uses for five different types of paint (milk paint being one of them).

I mixed together 3 parts Miss Mustard Seed Milk Paint in Boxwood and 1 part Artissimo to darken it up a bit. There were a couple of places where some turquoise paint was still on the legs of the table and I decided I wanted to still show some of this original paint. I just put a little bit of hemp oil over those spots and painted the milk paint right over it. Once the paint dried, I sanded away some of the green to reveal the turquoise underneath. Using hemp oil is one way to distress furniture to reveal the base color, but here’s a full post on how to distress furniture.
After everything was painted, I decided to use hemp oil to finish off the desk. Now, this topcoat is not permanent, and needs to be reapplied every several months, but I love the natural finish it gives to the desk. I can always decide to add a more permanent topcoat if I get sick of reapplying.
Some gold pulls finished off my new desk! Now, I just need to figure out what to do with the other flour drawer. I just can’t get myself to throw it away, but with it’s curved bottom and large size, I’m a little stumped on what to do with it.
The top clearly is not original to the piece and was added at some point. To update it, all I did was sand it down and then added a couple of coats of hemp oil to bring out the natural beauty of the wood.
That flour drawer needed some major clean up, too. There was sticky, moldy bits of flour still stuck in the drawers! Thankfully, it all cleaned up nicely and was well worth the work.
Although my new desk is fun, so is checking out inspiration from other creative furniture refinishers! You can read all about the ladies in our Furniture Flippers group here, and then take a look at how their projects turned out below.
[wc_box color=”secondary” text_align=”left” margin_top=”” margin_bottom=”” class=””]
1: Two-Toned Dresser from Lovely Etc.
2: Modern Desk from an Antique Baker’s Table from Refresh Living
3: How to Build a DIY Wood Table and Layering Paint Technique from Just the Woods
4: Modern Vintage Style Chair Makeover from Repurpose and Upcycle
5: Small Painted Table with Graphic from A Fresh Squeezed Life
6: How to Get the Rustic Furniture Look for Cheap from Thirty Eighth Street
[/wc_box]
If you’re looking for other painted desk ideas, I’ve rounded up a ton of different DIY designs that are sure to bring some color to your home office or kids room!
Post by Jenny Leads
Jenny is the voice behind Refresh Living. She has a passion for helping people to create a home they love without spending a lot of money.
Looks great Jenny!!!
That is not only an awesome score, but you rocked the makeover. Yay!!
Thanks Larissa! It was so fun and now I just love the piece.
this was such a hot mess. I love the save, It looks great now!
Hehe – seriously – it was a hot mess. I’m so glad it has a second life now!
It’s gorgeous!! Love that green and I’m tending more and more towards some color in my home!
Thanks Katrin! I was a little worried about the green to start, but I’m so glad I did it!
What a fabulous transformation. Pinned!
Thanks Lindsey!
I absolutely love, love, love, this makeover. The color is perfect too. I’ll be Pinning this post. Thanks for sharing on Sunday’s Best. I’m looking forward to seeing more of your projects, and thanks for Sharing on Sunday’s Best.
Looks so great and I love that color. Thanks for adding it to the Waste Not Wednesday linky party
This is crazy amazing! Love the color choice too. Thanks for sharing your post at the Inspiration Spotlight party. Pinned, and sharing. Cheers! See you again soon.
This is MARVELOUS! I love baker’s cabinets–I have an oak one that belonged to my mom, and it’s one of my prized possessions. But now, if I ever happen upon a beat-up one, I’ll have an awesome idea of how to repurpose it!
Thank you for joining the Grace at Home party at Imparting Grace. I’m featuring you this week!