
Update a Boring Light Fixture
Old light fixtures can easily be updated to give them a new look, without spending a lot of money. It’s easy and cheap to spray paint a light to change the color, but you can also change out the shade and add other elements to completely overhaul the look and feel of the light.
This dining room chandelier makeover allowed me to reuse an old fixture in a new space and give it a new look without spending any money!
I may have a slight obsession with upcycling old light fixtures and rarely ever buying new ones. In fact, our dining room has had three different chandeliers over the last 10 years, and none of them were purchased new.
 The first chandelier…
After removing this brushed nickel chandelier from our eat-in kitchen area several years ago, I replaced it with an antique egg crate chandelier that I made. After having that light for several years, I upcycled a new dining table light by reusing an old chandelier from the Restore and creating a DIY beaded chandelier.
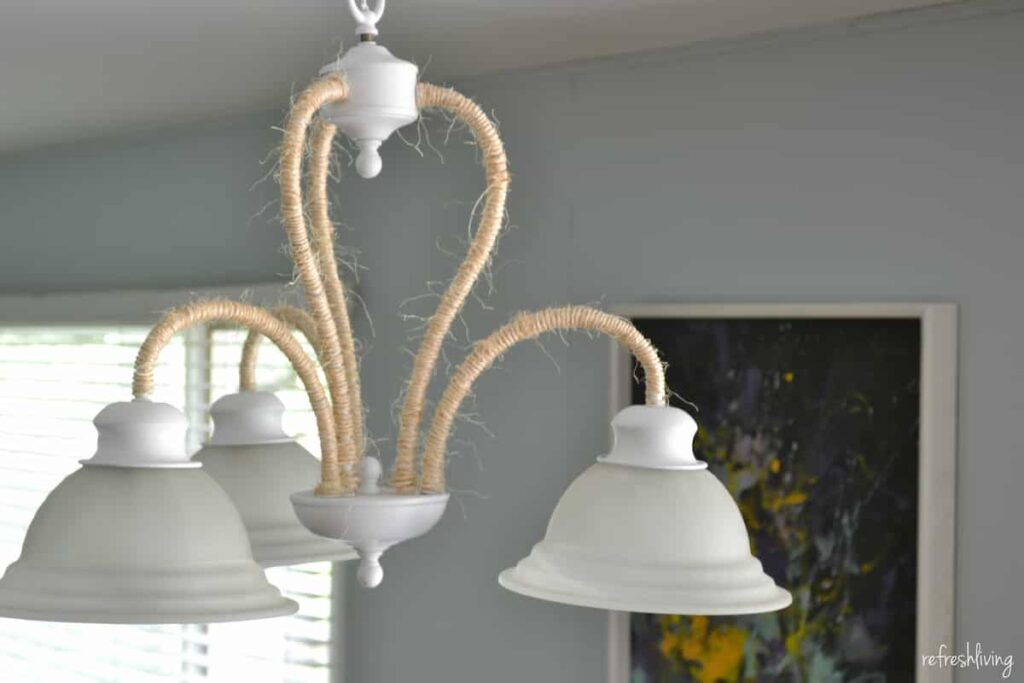
However, the three arm chandelier still worked perfectly fine, and I didn’t want to just get rid of it, especially because I was working on a DIY renovation of our cottage in Wisconsin and needed new light fixtures. So, I took this boring silver chandelier and gave it a quick, easy update.
BEFORE
How to Update a Light Fixture
1. Lightly sand the metal
Paint sticks better to surfaces that are lightly sanded, but it’s not really necessary when painting a chandelier because it’s never really touched. When updating metal fixtures that are more high use (like door knobs or lamps), it’s best to lightly sand the metal surface with 220 grit sandpaper so the paint adheres well.
2. Remove the shades and tape off sockets
Remove the lightbulb and then unscrew the nut under the glass shade. Remove the light shades and set aside (or donate them if you’re planning to replace the shades). Use painter’s tape to tape off the sockets and any other areas you don’t want painted.
3. Spray paint the metal
Lightly spray two coats of spray paint over the surface, letting dry between coats.
4. Wrap rope around arms of light fixture
To give this light fixture a nautical look for our lake house, I wrapped the arms in sisal twine. I used gardener’s twine because it’s what I already had around the house. This does create some flyaway, scraggly pieces. Jute twine is usually darker in color and does not have as many stray pieces (but still looks rustic). They have so many more colors of jute twine offered on Amazon now. Think of all the different looks you could create with all these colors!
To attach the rope, add dab of hot glue to the bottom base of one of the arms, and then tightly wrap, adding hot glue every inch or so. At the top, use a tight square knot and trim off the remaining twine.
To give this light fixture a new update, I plan to purchase some new shades because I don’t really love the shape of these. However, it was a FREE light fixture and an easy update, so I can’t really complain.
Lakehouse Remodel Update
It took us over ten years to slowly renovate our lake house in Wisconsin. But, all our hard, DIY work has paid off! Here’s a look at the same view of this kitchen/dining room area over the years. (I’m the little girl sitting next to my dad.)
Post by Jenny Leads
Jenny is the voice behind Refresh Living. She has a passion for helping people to create a home they love without spending a lot of money.
The light fixture looks great now! I am loving the wrapped in twine look and using it here really shows of the gorgeous curves in the light.
Thanks, Gilly! I definitely like it more than I did before!
THis is fantastic!! Love the light, love the rope, love the room!!
Thanks, April! The whole place is slowly coming together, and it feels great!
Jenny
I love your revamped light fixture! What a great way to spruce up what you already own! You can’t beat free! I always love seeing the pictures of your lake house! What a magical place! Thank you for sharing!
Cat
Thanks, Cat! We love it up there, and I sure love decorating it on the cheap!
I love the updated look of your light fixture. I’m a huge fan of rope projects. We have a ceiling fixture I’ve been thinking about making over. You may have helped me decide! Thanks for sharing this:)
Thanks, Wendi! It was so easy, and super cheap – one of those projects that I shouldn’t have put off for so long!
Yes, Jenny, you’ve made a world of progress! It’s looking sooo good… and that rope and spray paint look awesome! Thanks so much for sharing at our party! Hope you come back again tomorrow…. and have a great rest of the week! xo