
Cane Headboard (DIY Tutorial and 5 Best Cane Headboards)
Want to buy or build a cane headboard? I’ve got you covered! This is a step by step tutorial on how to build a cane headboard AND a list of the top 5 cane headboards you can buy with links to the products. It’s easy to make a DIY cane headboard, but there are also plenty of options to buy a beautiful cane headboard as well.
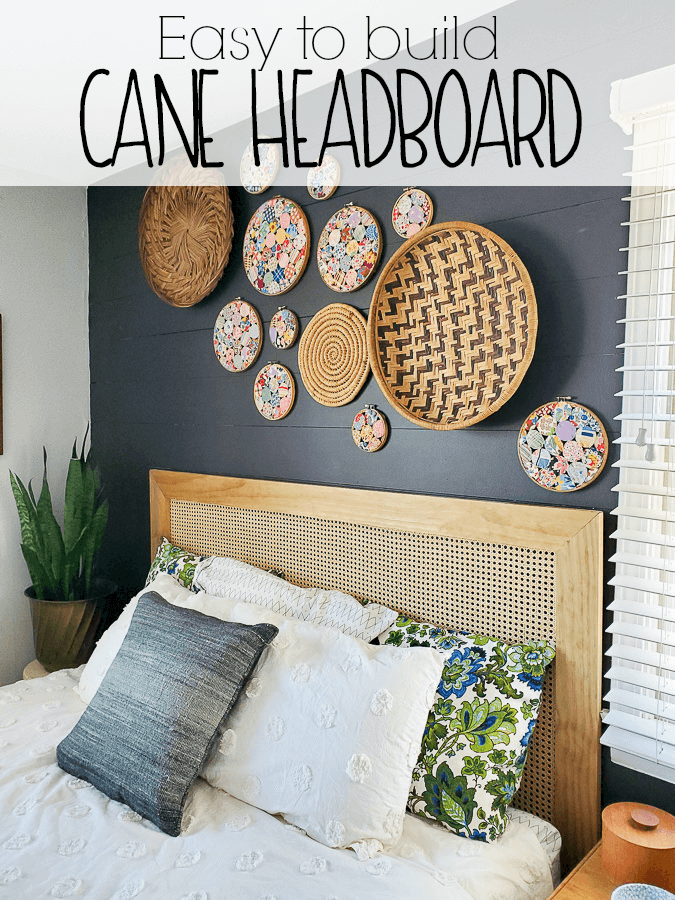
About a year ago, I participated in the $100 Room Challenge and updated our master bedroom with a budget of, that’s right, $100. This cane headboard was part of the design, and because I built it myself, I was able to create a queen sized headboard for about $60.
If you’d prefer to buy a cane headboard instead of DIY, jump ahead to the second half of this post!
How to Build a Cane Headboard
Materials Needed to Make a Cane Headboard
This post contains affiliate links. Please read my disclosure policy for more information.
- 5 feet of 24″ wide 5/8″ open cane webbing (5 feet was enough for a queen headboard)
- 1″ x 10″ wood board –
- 1″ x 4″ wood board –
- staple gun
- French cleat wall hanger
- Kreg Jig
- handheld drill
How to Assemble the Headboard

The first step in making your own headboard is to assemble the frame. To make my frame, I used 1 x 4s for the three edges that would be showing and a 1 x 10 for the bottom piece. I chose a 1 x 10 because I wanted to rest the headboard on the base of our bed, so in order for the headboard to sit high enough above the mattress, I needed this wide piece of wood.
When deciding the size of your headboard, it’s important to note the width of the opening. The widest caning I could find at a decent price was 24″ wide, so I had to be sure the opening of my headboard was only 23″ from top to bottom so I had enough excess to staple to my frame.
For the top two corners, I mitered the corners at 45 degree angles, and used my Kreg Jig to attach them together. I’m not going to pretend to be an expert at this, since I’ve only done it once before. Instead, let me direct you to a great tutorial on adjoining mitered corners.
How to Attach Cane to a Headboard
I soaked the cane overnight prior to stapling to the frame. It’s important to soak the caning so it is flexible and easy to work with. Additionally, as it dries it contracts a little, which gives the perfect amount of tautness in the caning at the end.
I simply stapled the caning to the back of the frame as tight as I could pull it. As it dried, it contracted and ended up being firm in the frame. I originally used masking tape to cover the frayed ends, but it didn’t end up sticking well so I removed it. I’ve just left the frayed ends on the back of the headboard for the past four years and it’s held up just fine. Plus, no one can see the back anyway!
How to Attach a Headboard to the Wall
I used this Hangman french cleat to securely attach the headboard to our wall. I used one of my favorite tricks for hanging pictures and other items straight – the lipstick trick.
First, I attached half of the french cleat to the back of the headboard, in the center.
Then, I rested the other half of the cleat (the one that would be attached to the wall) in the half attached to the headboard and put lipstick on the outline of each corner.
When I placed the headboard against the wall in the location I wanted it, the lipstick is left on the wall, making the perfect outline for where I needed to attach the cleat. At this point, I just screwed the cleat into the wall, and hung up the headboard.
That’s it! I used wood I had leftover from other projects, but even if you had to buy new wood, this project should cost you less than $75. That’s WAY cheaper than I’ve seen other headboards in a similar style to this one.
You can see the 10″ piece of wood made this headboard the perfect height for raising it up right to the height of the mattress. Depending on if you are going to rest the headboard on the frame, the height of your mattress, and how much wood you want showing around the edge of the headboard might mean you use different dimensions of lumber.
I’m super happy with how it turned out, and love how it looks modern, yet still pairs well with the vintage fabric, black planked wall, and basket and quilt art. If you’re looking for tips on how to style a bed, I can’t help out much, but Kathy at Up to Date Interiors definitely can! She has 10 tips on how to style a bed like a designer.
5 Amazing Cane Headboards You Can Buy
Check out these other furniture flips:
- Chalk Paint Furniture Before and After by Thirty Eighth Street
- How to Make a Headboard with Caning by Refresh Living
- How to Whitewash Wood by Repurpose and Upcycle
- How to Paint a Dresser by Lovely, Etc.
Other Headboard Projects:
Post by Jenny Leads
Jenny is the voice behind Refresh Living. She has a passion for helping people to create a home they love without spending a lot of money.
Wow Jenny, this looks spectacular! I admit- caning intimidates me! But, you’re making me think twice about working with it. It looks terrific! I love your tutorial- and it turned out beautiful! Nice job!
This looks amazing! It matches the decor in your room perfectly.
Where do you buy the caning?? I can’t seem to find it anywhere.
Here’s where I ordered mine from. Hope that helps – they have a ton of different sizes to choose from.
Hi! Do you think this would be sturdy enough not cleated to the wall? Have posts bolted to the bed frame? (My bed is in front of the window? Would just be afraid of putting too much pressure on the caning. Thanks!
Hi Juliann! I think you could attach just it to your bed frame. But, I think I would probably reinforce it with some 1×4 boards along each side (also attached to your bed frame but then running along the back of each side of the headboard). Or perhaps use 2 inch thick boards instead of 1 inch thick boards. But, you’re right, there is also the possibility that something could go right through the cane with enough force if it’s not flush up against the wall.
What stain did you use? It’s beautiful
Thank you! It’s Natural color (most stain brands have this one) on pine.
Hi! I’m going to try this. What size pocket hole screws did you use?
Hi! I’m sorry for the delay in responding. I used 1 1/4″ Kreg screws to attach the boards together. (I used 1″ thick boards as labeled in the store but they actually measure about 3/4″ thick.)