
DIY Potting Bench (Made Entirely of 2 x 4s)
This potting bench is the perfect project for a beginner builder because it’s made entirely of 2x4s and uses simple, straight cuts. You can easily choose to omit the back panel as well, making this an easy to build potting table with a storage shelf underneath.
Although I love a good DIY project that uses power tools, I must admit, I really wouldn’t consider myself much of a builder. I can repair broken furniture or screw together a couple of pieces of wood for a tabletop or a sign, but build something from scratch? The thought of it made me a little nervous.
In This post You’ll find:
This post contains affiliate links. Read my full disclosure policy here.
Now that I’m comfortable using my Kreg Jig K4 Pocket Hole System![]() , I started noticing that a lot of building projects require primary cuts, and something like a Kreg Jig that can easily join together pieces of wood, and that’s it! I can cut down boards and use a drill, so I set out to try my hand at this DIY carpentry thing with a DIY potting bench, made entirely of 2 x 4s.
, I started noticing that a lot of building projects require primary cuts, and something like a Kreg Jig that can easily join together pieces of wood, and that’s it! I can cut down boards and use a drill, so I set out to try my hand at this DIY carpentry thing with a DIY potting bench, made entirely of 2 x 4s.
Since building this DIY potting bench, I’ve tackled a lot more outdoor building projects, including building a chicken coop, a greenhouse and a full garden with raised garden beds and a attached fence.

Wood and Cuts to Make a Potting bench
To keep things easy, the only size of wood I used was 2 x 4s. The great thing about it was it kept the project super easy for a beginning, and super low cost.
I ended up needing 11 – 8 foot boards, but I bet if I figured out a better way to have less excess on my cuts, I probably could have ended up only needing 10. Here are the measurements and cuts needed to make this potting bench.
Cut List
- 5 – 48″ boards (top)
- 2 – 32″ boards (front legs)
- 2 – 64″ boards (back legs)
- 6 – 13.5″ boards (side supports)
- 5 – 43″ boards (bottom shelf)
- 5 – 43″ boards (back and front supports, and last board on the top)
Other Helpful Supplies
- Kreg Jig
- Kreg 2-1/2-Inch #8 Coarse Pocket Screws
- Face clamps
- Wood glue
- Exterior paint or stain
- Jigsaw (if you want to cut a hole for a soil bin)
How to Assemble the Potting Bench
1. Build the side legs
You’ll start by assembling one of the sides. I drilled two holes into each side of the 13.5″ boards, and then screwed those into the front and back legs. After I made the first side, I used it as a guide to be sure the side supports were at the same place on the second side.
2. Attach back support
After the sides were assembled, I attached the back support on the bottom. I lined it up with the two side supports on the bottom, and screwed it into place. From here on out, when I mention that I screwed it together, please know that I first drilled my holes into the board with the Kreg Jig, and then screwed the boards together using those pilot holes. If you don’t have a Kreg Jig, you could also just screw into the face of one of the pieces of wood, straight through it, and then into the adjoining board. It just means you’d be able to see the screws on the faces of the boards.
3. Install bottom shelf boards
After that back support piece was attached, I screwed each of the bottom shelf boards to the sides. It’s helpful to screw all the boards on to one leg first. Then, after all of the boards are screwed in on one side, attach the other side of the boards to the other lef.
I found that when I screwed the whole bottom board in place on both sides, the sides were attached too tightly for the other next boards to fit in.
4. Attach front and back support boards
After the bottom was installed, I attached the front and back supports and at this point, my girls said I had made them the perfect house! Well, I can’t take all the credit. My little two year old loves to help me build.
I walked away for a second to grab something, and she was already hard at work! Bad mom? Maybe, but something tells me she’s going to love power tools just like her mama, and I’m quite alright with fostering girl power!
5. Build the tabletop
Screwing boards together on a flat plane needs extra resistance for the boards to attach together perfectly flat. I would actually recommend using a Face Clamp![]() , but since I don’t have one, I needed the help of my husband. I always have him stand on the joint I’m screwing together, and it works out pretty well.
, but since I don’t have one, I needed the help of my husband. I always have him stand on the joint I’m screwing together, and it works out pretty well.
This is the top of the potting bench. You can see the pocket holes where I screwed together the boards.
Then, I placed it on top of the bench, and screwed it in place. (Quick note – be sure to drill some pocket holes in the back, front, and side supports on the top that will go up into the top when it’s in place. I almost forgot to do this! The arrows in the image show where to have some pocket holes pre-drilled. You’d also add a few on the inside of the front board as well.)
6. Add finishing touches
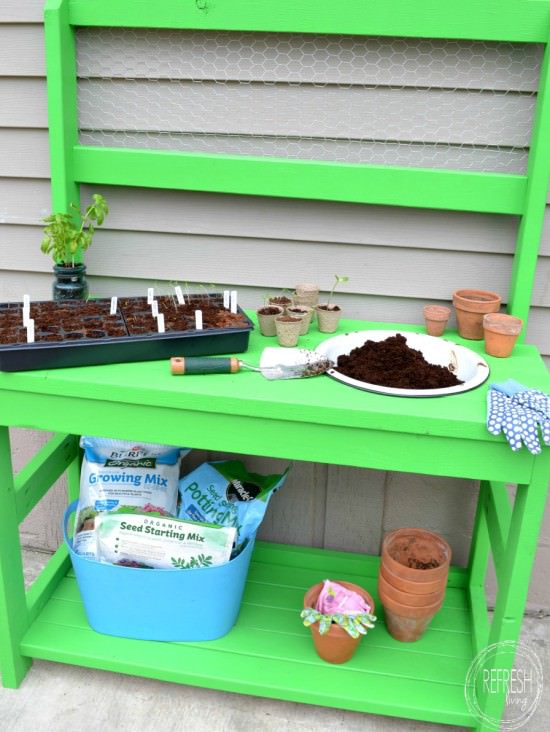
After everything was put together, I got a little too excited and completely forgot to take the rest of the process pictures! Basically, I used a jigsaw to drill a hole in the top of the bench (completely optional) to fit a vintage enamel bowl I found at a flea market last summer.
Then, I used my HomeRight Sprayer![]() to spray on two coats of outdoor paint in a satin finish. This potting bench will be in a semi-enclosed area, so it’s not completely sheltered from the elements, and I wanted to give it the best chance at survival.
to spray on two coats of outdoor paint in a satin finish. This potting bench will be in a semi-enclosed area, so it’s not completely sheltered from the elements, and I wanted to give it the best chance at survival.
The bright green color just makes me crave spring, and to be able to plant all my little seedlings outside!
I can’t tell you how fun it was to complete this project, and how proud I felt when it was completed. To be unsure if I could accomplish something I’ve never tried before, and then to feel pretty successful at it, just feels great.
Plus, it only cost me a total of $40 to make it – including all the boards, screws, and paint.
I attached some chicken wire I had laying around to the back of the boards. I’m thinking I’ll hang some S hooks and use it to store gardening equipment.
Anyone else out there that can’t wait to get gardening?! If so, you might find this post on how to pre-germinate seeds before planting helpful.
Post by Jenny Leads
Jenny is the voice behind Refresh Living. She has a passion for helping people to create a home they love without spending a lot of money.
Oh la la! Loving that gorgeous lime green color! I bet you’re going to stay extra busy this coming season 🙂
Green just makes me happy! I don’t put enough of it in my home because I’m scared, but I figured outside is the perfect place to bring on the bright. Thanks, LZ!
Hey Jenny! I know this was a post from long ago, but do you happen to remember the name of that green color paint?
I still have the can! It’s called Feeling Lucky by Dutch Boy (128-6DB). I’m not sure if it’s still a current color, but I’m pretty sure you can bring the name and number to anywhere for a color match.
Oh my goodness! I love your DIY potting bench and totally need one for all the flowers I need to plant this spring. Pinning!
Thank you so much for linking up with The DIY Collective! Please join us again next week!
What a great project. From your excellent tute…I think even I could build it. Love that color, too. Thanks so much for linking to Friday’s Furniture Fix. We love having you share with us. Susie from The Chelsea Project
Yes, you totally could build it! Thanks for stopping by!
Sorry…I pulled the trigger to publish too quickly.. 🙂
I would totally under mount the bowl of potting soil and make a lid. That way messes are easily cleaned up and when not in use, you can use it for something else. Just my two cents. 😉 It’s still better then what I’m currently using which is a foldable table.
Great idea, Laura! An under mount bowl would be so much better, I just went the lazier route and dropped it in.
Love your potting bench and the color is perfect. You did a great job. Please stop by Thursday Favorite Things tomorrow since you are one of my featured posts.
Hugs,
Bev