
Thread Organizer from Repurposed Knife Block
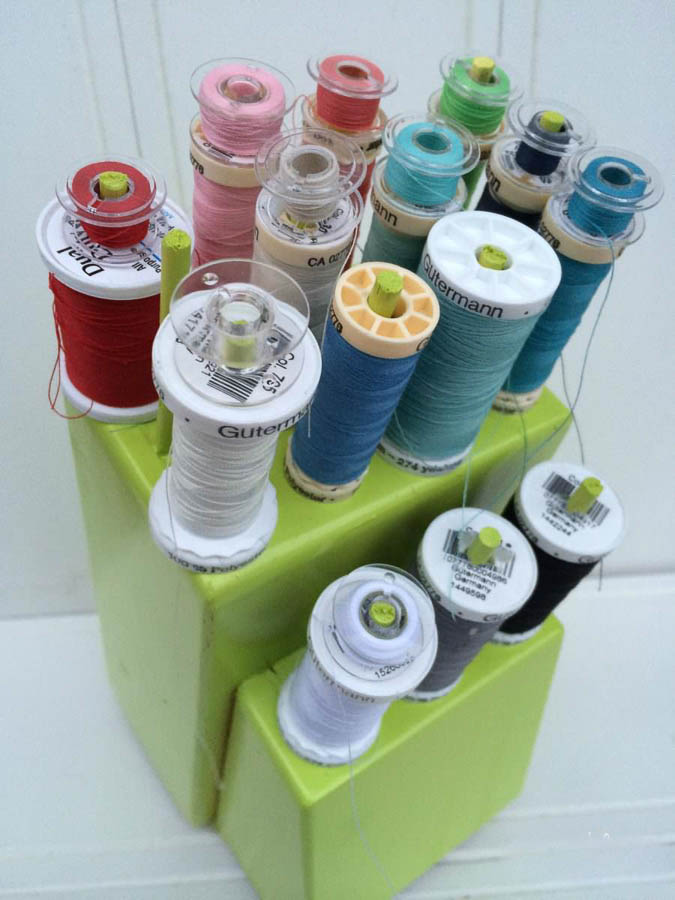
You can give life to an old knife block by reusing it as a thread organizer! This thread storage keeps 15 different colored threads with their matching bobbins on display by your sewing machine and easy to access when needed.
With the goal of staying organized on a budget, I spent $2.00 to create this thread organizer for my craft table. I know, I know, I can easily buy thread organizers for a few bucks more, but I’m all about using something I already have to create something new. That’s exactly why this old knife block is no longer holding knives, but thread!
This post contains affiliate links. Please read my full disclosure policy here.
Supplies to Make a Thread Organizer
- old wood knife block (I see these at the thrift store all the time!)
- wood filler
- wood glue
- wood skewers or small dowel rod
- drill with bit that is slightly larger than your dowels
- spray paint
How to Update the Knife Block

The first step to creating this thread organizer is to fill in all of the slots and holes with wood filler. This will create a smooth surface on the top of the knife block.
After the wood filler has dried completely, use a drill bit slightly larger than your wood dowels or skewers to drill holes into the knife block. You should be able to drill into the original wood of the block or into the places you added wood filler (as long as it is completely dry). Grab your fattest spool of thread during this step to make sure that you space the holes far enough apart to fit the spools.
Then, use wood glue to secure the dowels into the holes. Leave enough of the dowel showing to fit the bobbin and the thread.
Give the knife block a coat of spray paint and it will look like it was always made this way – to store thread!
After taking these pictures, I have since switched the order of my bobbin and thread, putting the bobbin on the bottom and the thread on the top. Now, there’s plenty of room to fit both instead of the bobbin hanging off the top of the taller spools like you see in the photo.
Here’s a shot of my little sewing area in the corner of our basement. I used fabric to cover an old door (yes, it’s an obnoxious pattern, but the rest of this little basement is a playroom, so I picked colors to match). I now have all the items I use when sewing in easy reach and organized!
Interested in other ways to reuse old knife blocks? Check out these 10 ways to repurpose knife blocks at homehacks.co!
Post by Jenny Leads
Jenny is the voice behind Refresh Living. She has a passion for helping people to create a home they love without spending a lot of money.
Cute idea; if you put the bobbin first and then the spool of thread, it wouldn’t matter if the skewers are a little short.
Oh my, you are totally right! Thanks for the suggestion; I’ll definitely be switching them all around!!
if you use thumb tack, a small piece of fabric and some cotton stuffing to the front lower panel you will also have a pin cushion!
i also would like to leave the larger hole in top to store the scissors.
What a great idea to make a mini pin cushion and to keep scissors easily accessible!
How do you figure? Guess I’m just dense but when I try to do what you said, it’s still the same height. My thread spools are not concave. I could your advise because I just moved all my stuff from one house to another and have gobs of thread and bobbins. BTW, I found that the TWO week pill organizers found at Dollar Tree are great for storing bobbins. They’re 3 1/2″ wide by 7 1/8″ long and 1 1/4″ deep and each day of the week will hold three plastic bobbins.
Great tip about the pill organizers for bobbins! Thanks for sharing.
Love what you created. I’ve been wanting to make a thread holder for myself. I don’t have a knife block, but sure I can find one for 50 cents to a $1 at my local Salvation Army. I love the color green you used.
That’s such a smart idea!
Clever!!
Great upcycling idea. I like your tip about making the skewers longer to keep the thread and bobbin together.
I tried to sign up for your weekly email, but it flashed on the screen that my sign-up was not successful. I tried again and don’t know if it was then, or not. Love your ideas and hope I keep getting them.
Thanks so much, Betty! I checked my email list, and I didn’t see your email address, so I added you manually to the list. You will receive posts once a week (every Friday morning) and you can opt out at any time. Thanks for following!!
Love anything creative..however I was informed by a sewing teacher that leaving thread in the light compromises them. Anyone else heard of this?
That’s a great question to bring up. I actually don’t know, but I would probably trust the sewing teacher – they definitely know more than I do about sewing!
Ah, shucks, after shifting that extra block from one garage shelf to another I finally tossed it. Wouldn’t you know!! Grrr! Dang!!
love the ideas…..i’m a quilter and LOVE the idea of the head board for storing quilts….need a place to hold till i get them on the longarm…BIG junk day coming…it will be at the top of my list…THANKS!
Thanks Laura, and I’m glad you like the idea!
If drilling holes anyway, why not angle some more skewers on the front and sides for even more thread/bobbins. Love the idea. Aand I think leaving the scissor space open makes lots of sense.
You always have such unique projects, thats what I love about your blog. I do sew so this would be a great in my new home for the craft section.
Maria
Hi Maria! So great to hear it. 🙂
I would love to know what you made you’re washi tape organizer out of? I love the way that looks and could really use something like that…. thanks for any tips you can give me.
Hi Oveta! I used two wood shelf brackets and drilled 3 holes on each side that would fit small dowel rods. Then I hung them, put the towel rods between, and remove them to add more ribbon and tape! I also just put a piece of wood on top of the shelf brackets to give me a little more storage space. I hope that helps!