
How to Write Perfect Letters on a Chalkboard
This is an easy DIY trick to writing neatly on a chalkboard – every time! It’ll look like you have perfect handwriting, but instead you’ll use an image transfer technique to write perfect fonts on a chalkboard.
This tutorial shows how to write perfect letters on a chalkboard without free handing the design. Instead, you’ll print a phrase or design in the font you’d like and then create that design on your chalkboard. It doesn’t matter how bad your handwriting is – you can write neat letters with this process!
I’ve always felt a tad bit jealous when I see those gorgeously lettered chalkboard menus at restaurants or businesses. Why does my lettering never look that nice? Seriously, it’s not even close to looking that neat and beautiful.
Now, I know there are some chalkboard artists out there who are talented and don’t need any tricks. They can freehand beauty. For all the rest of us out there, here’s an easy way to help you write neat, perfect letters on a chalkboard, every time!
For everything you could ever want to know about using chalkboard paint on a variety of surfaces, check out my full post: all about chalkboard paint.
Supplies Needed to Write Perfect Letters on a Chalkboard
- computer and printer
- fonts that you love (I purchased a set of fonts from The Hungry Jpeg and use them for almost all of my work. They save into all of your programs, so you can access them from Microsoft Word, Silhouette/Cricut, or online. PicMonkey or Canva are also great options for fonts that you can use on your personal projects. Just don’t sell any products made with those fonts!)
- Chalk markers
- Chalk pencils
- piece of regular chalk
- pencil
Design the Text to Transfer to Chalkboard
The first thing you’ll need to do is to create your lettering on your computer with the font you’d like to use. Or, if you have an image of a saying already saved, you can just print a copy of the entire word/phrase and use that as well.
If you are designing your own saying, I often use an online photo editing software, like PicMonkey, to design the words. Many of the fonts are free, or all of the fonts you have are your computer are accessible too, and it allows you to move and stretch the letters a bit more than you could do when using a program like Microsoft Word. Canva is also a great online graphic software as well.
When you print the text, check to make sure it’s the right size for the chalkboard you are writing on. If you need a piece of text that is larger than a piece of printer paper, here’s an easy tutorial for how to print a large design across multiple pages of paper.
How to Transfer the Design to the Chalkboard

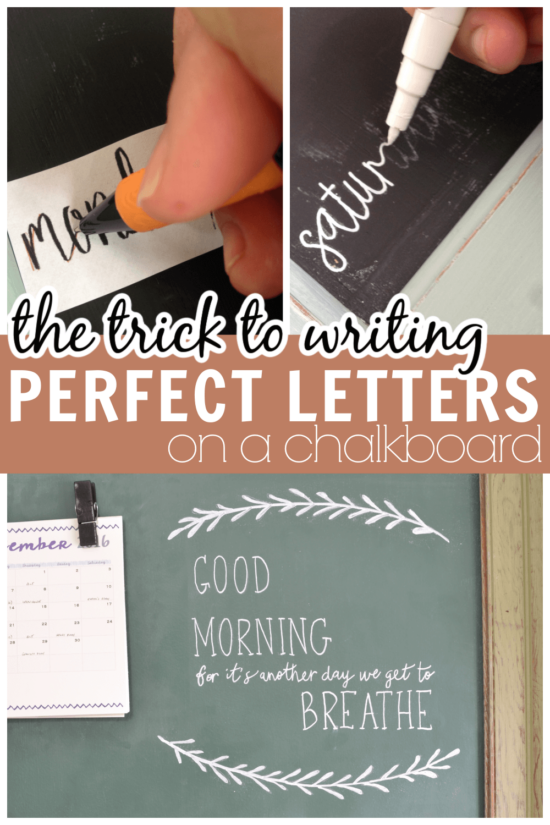
Once you have the letters or design printed, it’s time to transfer it to the chalkboard. First, you’ll want to rub a piece a chalk along the back of the paper, making sure to cover the backs of all of the letters.
Then, you’ll flip the paper over and place it on your chalkboard. Using a pencil, trace over the design and as you do, the chalk will transfer to the chalkboard surface.
With just a little bit of pressure from the pencil, chalk dust will be transferred onto the chalkboard. This gives you the perfect outline of letters!
Then, use chalk markers or regular chalk to trace over the transferred image. If you use regular chalk, I recommend buying a pencil sharpener that has one of the larger holes that a piece of chalk can fit into. Another option I love for getting neat letters is to use a chalk pencil. Although, I think that chalk markers really give the cleanest, neatest letters of all of these options.
Once I found and started using chalk markers, I realized that this was one of the tricks to perfect letters I had been missing out on all of this time! They are so easy to use and make your letters look perfect. Then, when it’s time to erase them, all you need is a damp rag and they wipe right off.
I know the process might seem a bit much for just writing a simple note on a chalkboard, but if I am using my chalkboard as something in my decor for a holiday or a season, I take the extra 15 minutes to walk through this process. I still put up this silver platter upcycled into a fall wreath every year!
It actually looks decent, doesn’t it?! I can’t help but smile when I see this before leaving out the backdoor, not only for the quote, but also because I love that I actually wrote those letters!
I used this same process to make menu chalkboards from old cabinet doors.
If you’re wondering about how to turn a window into a chalkboard, you should definitely read this post. There are some tricks to painting on glass with chalkboard paint that are important to know.
Post by Jenny Leads
Jenny is the voice behind Refresh Living. She has a passion for helping people to create a home they love without spending a lot of money.
I never would have know how to do that! Great tips! Thanks for sharing
I never thought of doing the letters this way. This will help out a lot. Thanks for sharing
These are awesome tips! I’ve always wondered how to do this!
My handwriting is awful (shameful since I am a teacher!) so I am always too embarrassed to make cute signs like this! I will have to try it using this method!
I’ve always wondered the same thing. Thanks for sharing this secret, definitely pinning!
This is great info, I’ve always wondered about this! Pinning for later.
This is genius!! I hate writing on chalkboards because of my handwriting, but I love using chalkboards as decor – thanks for the tip! Pinned!
I so needed this today! I am trying to figure out how to add something to my new chalkboard and make it look awesome since my handwriting isn’t the best either. Pinned!
Brilliant! Certainly a tip I needed! I would love it if you would stop by my link party, Celebrate Your Story! on Monday evening (8PM EST) and share this tip with my other readers!
Thank you for the great ideas! They look so easy to create.
Thank you! I have needed this post!
Nice tutorial, so easy to understand. Pinning. Thanks for sharing with us at Merry Monday.