
Reuse an Old Table to Make Wall-Mounted Desks
It’s easy to make wall mounted desks for kids and adults alike by cutting the ends off on an old table and attaching it to the wall. The desks take up only a little space along the wall and are the perfect size for kids.
This might be one of my favorite projects I’ve completed for our home. Of course, I love refinishing furniture and have quite a few pieces that I love, but this project is a little different in that I changed the function of the piece of furniture, and I LOVE the result!
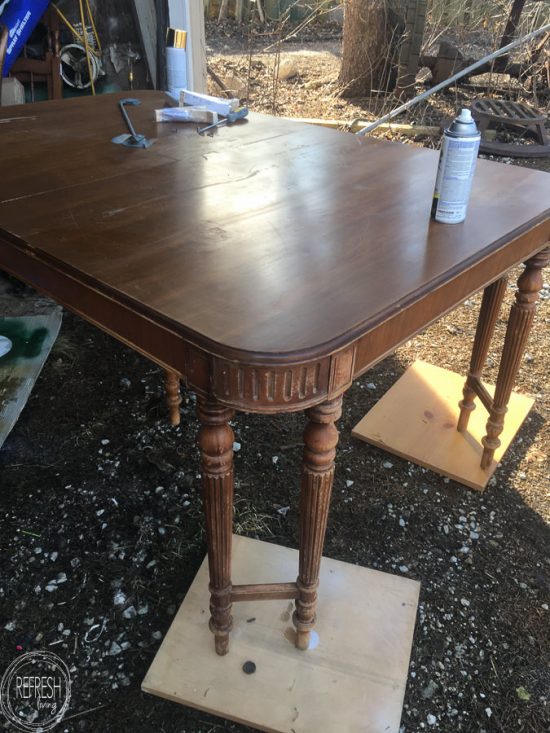
I started with this table I picked up at a second hand furniture store. It cost $60, but also came with 5 vintage chairs. I sold the chairs for $25, so I essentially spent $35 on the table.
I had been wanting to make wall mounted desks for the kids for a while, and when I saw the legs and shape of this piece, I knew it would work perfectly. The rounded corners means no bonked heads from the little ones, and the double legs were just gorgeous.
A second-hand dining table can also be reused as an outdoor table as well. Here’s a full tutorial on how to refinish an interior table into an outdoor table.
I gave it a good cleaning with TSP substitute to remove the years of furniture polish that was coating the legs of the piece. Then, I lightly sanded the legs and table top.

Because painting legs is a pain in the butt, and this table had double the amount of legs than a normal table, I opted to spray the legs and then roll the finish on the top.
I could have also sprayed the top as well, but buying the can of paint in the same black to match was the cheaper option. (If you ever mix spraying with rolling, just be sure its the same brand of paint, as well as the same sheen.)
After the ends were painted, I used my Kreg Rip Cut circular saw guide to cut both of the ends off of the table.
To attach the desks to the wall, I located the studs and marked them with a line.
I then held up my 2 x 4 brace (that I precut to the same length as the opening at the back of the desk) against the wall and marked on the piece of board where the studs would fall. I drilled pilot holes through the 2 x 4s aligned with the markings that corresponded to the stud location.
Then, I simply drilled screws into the pilot holes and then into the wall studs. After both were installed it was time to attach the desks to the wall.
Basically I set the table halves onto the 2 x 4 braces, and then used a finishing nailer to secure it to the top of the brace.
My girls love that they have their own space to color, write, and “do work”. I love that they are small and take up minimal space along the wall in our large hallway office. (If you want to see how I transformed this small “room” into our home office for only $100, you can see the full post here. It includes a baker’s table that I turned into a desk as well!)
Of course, I had to bring in some vintage accessories! I scored these cane chairs at an estate sale for $6 each and that vintage letterboard for $15. I love letterboards, but you better believe I wasn’t going to buy a new, reproduction one when they started to become popular. I held out until I found an authentic vintage one, and I LOVE it!
It was such a fun project to complete, and now brings such function to this space. If you’re looking for more desk inspiration, I’ve rounded up 23 painted desk ideas. This is a great way to add color and interest to a room without spending much money.
If you’re interested in refinishing furniture, you might find this post helpful; I detailed everything I know about the different types of paint to use for furniture.
Ready for some more furniture flipping inspiration?! Check out these other awesome projects from my furniture painting buddies.
- Wet Distress Painted Furniture Technique by Thirty Eighth Street
- How to Make a Dining Table into Desks by Refresh Living
- How to Paint Outdoor Furniture by Lovely Etc.
- Antique Dresser Makeover by A Fresh Squeezed Life
- French Farmhouse Dresser Makeover with an Image Transfer by Repurpose and Upcycle
Post by Jenny Leads
Jenny is the voice behind Refresh Living. She has a passion for helping people to create a home they love without spending a lot of money.
Love love love this project! I created two desks from an old farmhouse table a few years ago but you have me wanting to go back and repaint them black! Love your room and the cute wall mounted baskets for extra storage! Brilliant!
Thanks Carrie! I look around at my furniture almost every day and think about what color I need to repaint it. 😉
I LOVE this! It’s kind of ironic that you just posted this project because I had the EXACT same idea for my kids homework area that I plan to complete soon! Great minds think alike 🙂
Great minds do think alike! So glad I did this project – they love using them!
What a great redo!
I did this same thing but didn’t finish it as nicely as you did! Now kids are gone and I want the table back! Any ideas how to put it back together??
Well, I haven’t thought of that before… I think I would use my Kreg Jig (which creates pocket holes and can easily bring together two flat planes of wood) and attach the top of the table back together from the underside. If you do any bit of woodworking and don’t have a Kreg Jig, I’d highly recommend one. I use mine for everything. This basic one (and the cheapest one as well – bonus!) is my favorite.