
DIY Indoor Greenhouse Cabinet
Looking to use a cabinet as an indoor greenhouse? Whether you’re using an IKEA greenhouse cabinet or upcycling an old wood curio cabinet into a greenhouse, it’s easy to add a few elements that will make it the perfect environment for growing plants and starting seeds indoors.
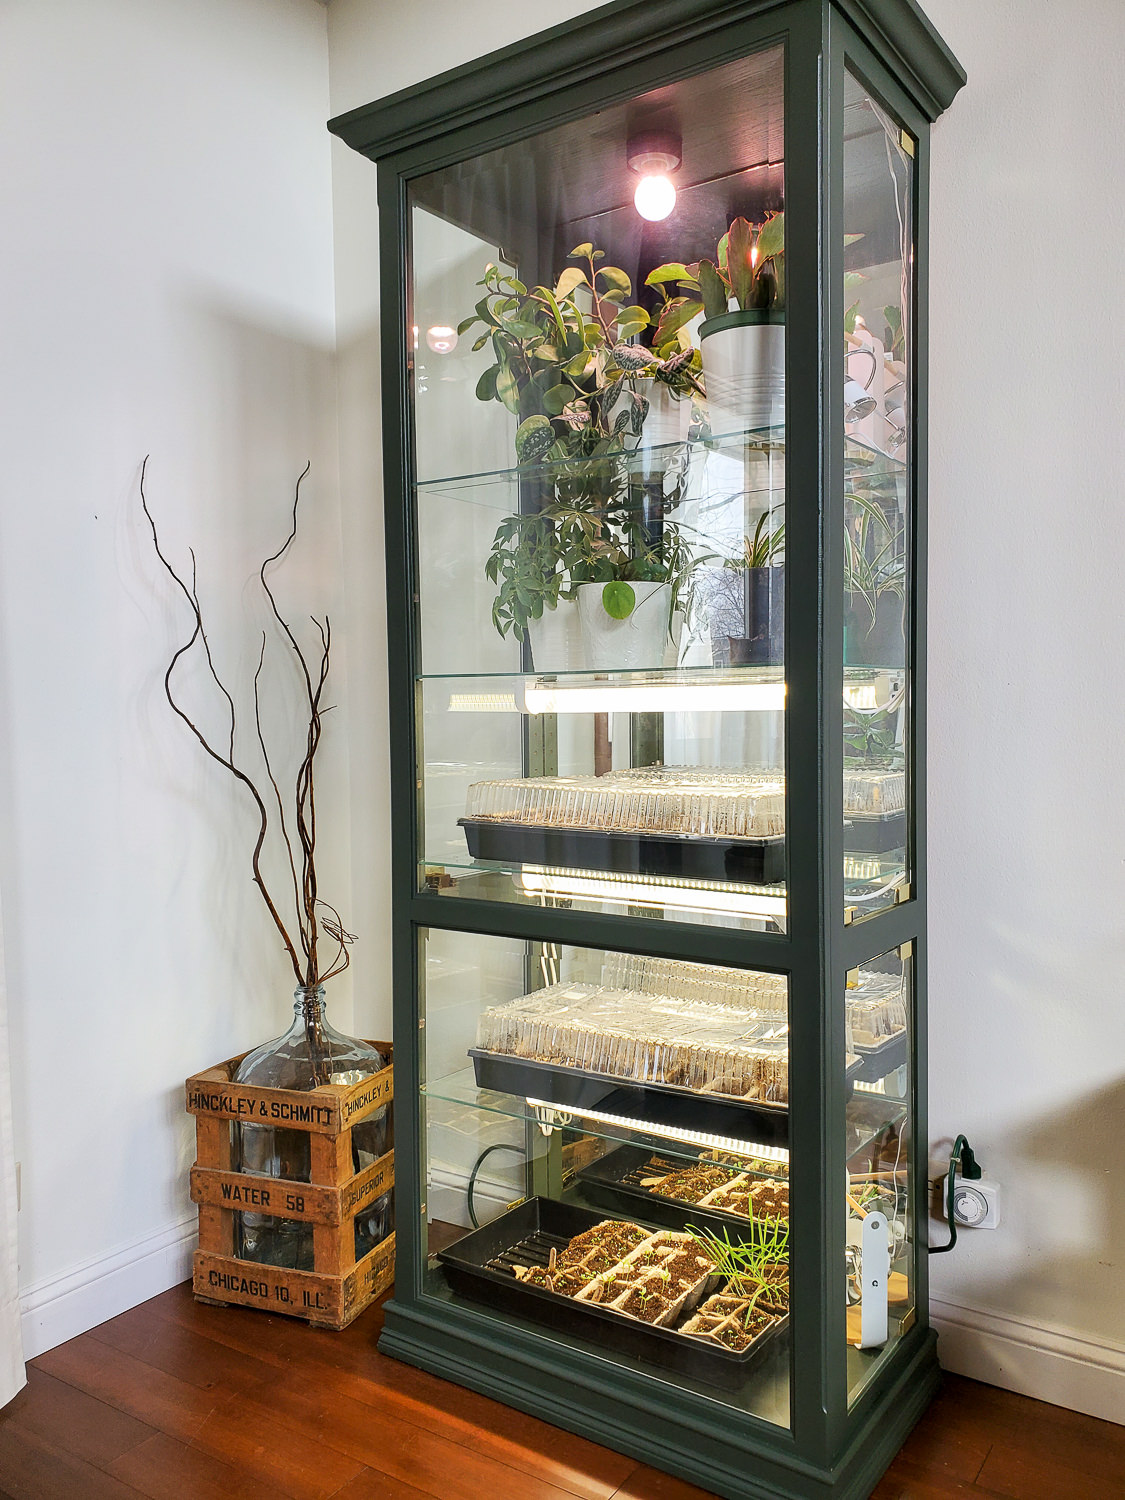
I found an old display cabinet at the thrift store and knew it would be perfect for an indoor greenhouse. Plus, I felt even better knowing that I could reuse an old item instead of buying new. However, if you’re unable to find the perfect curio cabinet, IKEA sells some great glass cabinets that also work perfectly as indoor greenhouses.
In this post, I’m sharing all my tricks for how to turn any cabinet (new or used) into an indoor greenhouse.
In This post You’ll find:
Find a Glass Cabinet to Use as an Indoor Greenhouse
Before finding the perfect greenhouse cabinet, you’ll want to decide how big of a cabinet you need. Of course, you should consider the amount of space you have in your room. Also, you’ll want to position your cabinet in a place that is near a power outlet.
When deciding on the size, you’ll want to think about what types of plants you plan to house in the indoor greenhouse. If you want to use it to start seeds in the spring, each shelf will need to be big enough to fit your seed starting trays. If you’re using it for houseplants, assess how many plant babies will be in the greenhouse at any given time.
I usually rotate my plants in my indoor greenhouse. Some of them will be around my house while others are in the cabinet. I also use it for starting seeds, so the bottom two to three shelves are used for those trays (depending on the time of year).
Decide how many sides you’d like to be glass. This decision is really only based on aesthetics. Of course, you’ll want the front of your greenhouse to be glass so you can see and enjoy the plants inside.
Many cabinets also have the side panels made of glass, which will allow you to see the plants from different angles in your room. But it’s definitely not necessary for every side to be glass, unless that’s the look you want!
IKEA Greenhouse Cabinets
There are a few different styles of cabinets available at IKEA right now that work well for indoor greenhouses. The benefit to all of these cabinets are that they are made of metal which is very easy to clean and if water is spilled inside the cabinet, it’s not a big deal at all.
- IKEA MILSBO Cabinet: The MILSBO cabinet is the tallest option of all the cabinets and measures 69″ H x 29″ W. It comes in black or white and has four shelves (bottom metal shelf and three adjustable glass shelves). All four sides are made of glass. Price: $249
- IKEA RUDSTA Cabinet: This cabinet is shorter than the MILSBO but also wider and measures 47″ H x 32″ W. It comes in black and has three shelves (bottom metal shelf and two adjustable glass shelves). The back panel is metal and the three other sides are glass. Price: $199
- IKEA FABRIKOR Cabinet: This is the smaller version of the Milsbo cabinet and measures 59″ H x 19″ W. It comes in dark gray or light green and has shelves (bottom metal shelf and two adjustable glass shelves). All four sides are made of glass. Price: $199
- IKEA BAGGEBO Cabinet: This is the smallest cabinet of the bunch and measures 45.5″ H x 13.5″ W. It comes in white and has three shelves. This cabinet has a metal back, mesh sides, and a glass front. Due to the mesh sides, it will not create a high humidity environment, so if you are trying to use it with moisture loving plants, this cabinet will not work for you. Price: $50
All of these cabinets are great options to create an IKEA greenhouse cabinet, but if you’re like me and prefer to reuse rather than buy new when possible (and save money too!), you can also create an indoor greenhouse from an old wood curio or display cabinet.
Wood Curio Cabinet as an Indoor Greenhouse

Wood curio cabinets are pretty easy to find right now. A lot of people are trying to get rid of them because they aren’t using them to display whatever people used to put in these to display.
A quick Facebook Marketplace search gave me a couple of options in my neighborhood, but I ended up finding this cabinet at a local thrift store. It was the perfect size for me because I wanted to use my indoor greenhouse to start seeds and this cabinet was wide and deep enough to fit my seed starting trays.
Here’s how I start my seeds every spring before planting them in seed starting trays: How to Germinate Seeds Before Planting
When searching for a curio cabinet to use as a greenhouse, you don’t necessarily need glass on all sides of the cabinet. Having a large glass panel in the front is still enough to view and enjoy your plants. But, if you can find one that has more glass, it will create more of an open cabinet that is similar to the IKEA glass cabinets.
If you’re looking for a miniature greenhouse, here’s a great idea on how to reuse old picture frames to make an easy tabletop greenhouse.
This post contains affiliate links. Feel free to read my full disclosure policy here.
How to Paint a Cabinet to be Used as an Indoor Greenhouse
It’s important to properly paint or seal your wood cabinet considering there will be some moisture in the cabinet.
If you want to keep the wood finish on your cabinet, I would recommend cleaning it well, lightly sanding, and then finishing it with a coat of Varthane Triple Thick Polyurethane. There are definitely other alternatives to creating a water resistant topcoat, but I’ve found this product to be pretty fool proof.
If you want to paint your cabinet, I would recommend using an alkyd enamel based paint. I have all the specific details on this type of paint as well as the different brands that sell it in this post: The Best Paint for Cabinets.
Basically, it’s a water-based paint that is made to mimic the effects of oil-based paint. It dries to a durable topcoat that can withstand some moisture (as long as it doesn’t sit on the surface for prolonged periods of time).
For my particular cabinet, I removed the glass panels from the front (the doors to this cabinet are actually on each side) and taped off the back mirror and the hinges to the doors.
Then, I primed the cabinet with clear BIN Shellac Primer. I personally always prime before using alkyd paint as I find it helps with adhesion. (Here’s everything you need to know about the best primer for furniture.) Then, I painted two coats of Sherwin Williams Emerald Urethane Enamel in the color Shade Grown for my greenhouse cabinet.
Update: I painted this indoor greenhouse cabinet two years ago and the paint is holding up beautifully! It’s helpful that my cabinet has glass shelves (except for the bottom of it), so if water does spill, it’s only going to go on the glass. Either way, as long as the water is wiped off alkyd paint, it won’t cause any damage.
Another important consideration is that I always keep one door propped open on my cabinet, so it is never very humid inside. My plants don’t need this high humidity, so I’ve had no issues with moisture build up when keeping one door cracked open.
Indoor Greenhouse Supplies
- strip grow lights
- USB mini fan
- power cord with USB outlets
- humidity gauge (analog or digital)
- full spectrum grow light bulb (Useful if you already have a lightbulb socket in your curio cabinet. I ended up needing this adapter to convert my E17 socket in my curio cabinet to a standard bulb socket.)
- drill with spade bit or hole saw bit
How to Turn a Cabinet into an Indoor Greenhouse
1. Drill a hole to allow for cords to pass through
Depending on your cabinet, you’ll want to drill a hole in the top, bottom, or back panel of your cabinet. Because my cabinet was so tall, I decided to drill through the top of it and have the power strip just sit on top of the cabinet, hidden behind the decorative molding on the top.
If using an IKEA cabinet, I would drill a hole through the metal bottom panel. Be sure to drill the hole large enough for the largest part of the electric plug to pass through. If using the grow lights linked above, you will only need to drill a hole large enough for a USB plug to fit through.
2. Attach grow lights inside the cabinet
To attach a grow light to the top of the inside of the greenhouse cabinet, you can use little screw in hooks or screws (for a wood cabinet) or magnetic hooks to hang your grow light. This set up with definitely depend on the type of grow light you have.
I also attached grow lights to the underside of my glass shelves because I needed more light for seed starting in the bottom of my tall cabinet. Velcro Command Picture Hanging Strips have been holding strong for two years to attach my strip grow lights to the glass.
3. Add accessories to create the best greenhouse environment
Full Spectrum Grow Lights
Of course, you’ll need grow lights to make an indoor greenhouse! I like using the strip grow lights because they are thin and the shelves in these cabinets are not very deep. I’ve found full spectrum grow lights work the best for my plants and for starting seeds.
Mini Fans
These USB mini fans keep air moving which is healthy for all plants. Especially when starting seeds indoors, it’s important to have a fan on occasionally so the seedlings gain strength as they are growing in moving air rather than still air.
Humidity Gauge
This analog or digital gauge will help maintain the correct humidity levels for your plants. This is especially important if you are growing tropical plants in your greenhouse, or any plants that need high humidity. I personally don’t track the humidity in my cabinet since I purposely keep it with normal humidity levels. I use seed tray covers when starting seeds to create that humid environment in the trays, while the rest of my cabinet remains at normal humidity levels.
Power Strip with USB Outlets
This dual purpose power cord with USB outlets allows you to easily plug in the USB cords and any regular power cords. Then, plug this into a timer that plugs into the wall. I keep my indoor greenhouse lights on for about 15 hours a day.
Keep the Cords Organized
Once you have your grow lights and fans in your greenhouse, there are quite a few small cords running through the cabinet. I used clear Command clips to hold the cords in place on the inside of the cabinet until exiting through the top hole.
All the cords run up along the back edge and exit through the hole at the top. The power strip sits on top of the cabinet and everything plugs into that. Then, that strip plugs into a timer that is plugged into the wall outlet.
4. Move your plants to their new home!
I’ve been using this indoor greenhouse cabinet for seed starting for the last two years and my seedlings and indoor plants have never looked so good! I use the bottom three shelves for seed trays and the top two shelves for indoor plants.
I like to rotate my houseplants in and out of the greenhouse every couple of months. So most of my houseplants are actually in my house, and then a few stay in the greenhouse.
Frequently Asked Questions
How do you make the wood waterproof inside the indoor greenhouse?
I have been asked this question a lot. First, the cabinet doesn’t really need to be waterproof. It will not be submerged in water, nor will it be in contact with water for prolonged periods of time. Most brands of alkyd paint are also rated for exterior use, so that tells me some water exposure is fine (and I’ve seen the same from using it one many sets of cabinets).
Also, I purposely do not keep my cabinet very humid. If I needed that environment, I might opt for a metal cabinet just to be on the same side. I never have condensation on the glass or sides and there is never water sitting on the surface of the paint at any time.
What are the exact lights you used in your greenhouse?
The strip grow lights I used are from Menards are 21″ Patriot Under Cabinet Grow Light. Currently (January, 2023) they are on clearance which makes me think they are discontinuing this specific model. But, there is an 18″ undercabinet grow light at Menards that looks to be very comparable. Or, they also sell this LED grow light tape that I think would also work well in an indoor greenhouse cabinet. You would just have to place some of the tape along the back wall to travel between shelves.
Does the humidity build up inside the greenhouse cabinet?
I purposely do not keep my cabinet very humid. I use lids for the seed trays to keep those humid, but the rest of my plants are happy if I leave one or two of the doors slightly open.
If I needed a humid environment, I might opt for a metal cabinet just to be on the safe side. I never have condensation on the glass or sides and there is never water sitting on the surface of the paint at any time, so the paint is holding up extremely well given the conditions I keep my indoor greenhouse at.
Other Posts You Might Enjoy
Post by Jenny Leads
Jenny is the voice behind Refresh Living. She has a passion for helping people to create a home they love without spending a lot of money.
Got to ask, since it has been a few months since you did this, how has the wood frame handled moisture? How have you monitored and regulated the humidity in the case? I have a curio that i “helped” my grandfather build, that is sitting empty, that I’m thinking about converting. But i am concerned about it warping.
I haven’t had any issue with moisture. However, I do have two small fans circulating air during the day and I make an effort to open one of the doors every couple of days. I haven’t had any moisture build up at all on the wood or glass. Also, this paint holds up REALLY well to moisture. (Although I probably wouldn’t use this case for moisture loving plants where it needed to be super humid inside for the very reason that I don’t want to destroy the wood.)
wow this turned out great and good looking also..wow ..really like it …great job as always …you sure have a great talent for changing things …wow…
The greenhouse is ingenious and beautiful! Good luck with your garden!
Just love the idea and the execution !!
Hi! I’m a freelance writer working on a digital article for Family Handyman about mini greenhouse ideas. I would love to include this photo!
We’d feature a brief description of what we love about it and how readers can achieve it, and a link back to your post. Can you confirm you are the rights holder, and give us your irrevocable permission for us to use it across all partners and platforms with credit and link to you?
Family Handyman has 10+MM unique visitors and 122K Instagram followers @familyhandyman.
Let me know, thanks!
Hi Erica. Thanks for reaching out. I’m sending you an email now!
Hi there !
I love your DIY Indoor Greenhouse Cabinet project.
That will be one of my autums DIY project; should be easy to find one as I live in Sweden, home of IKEA 🙂
And I as you – hate spending money.
Thanks for sharing your ideas.
//Stefan