
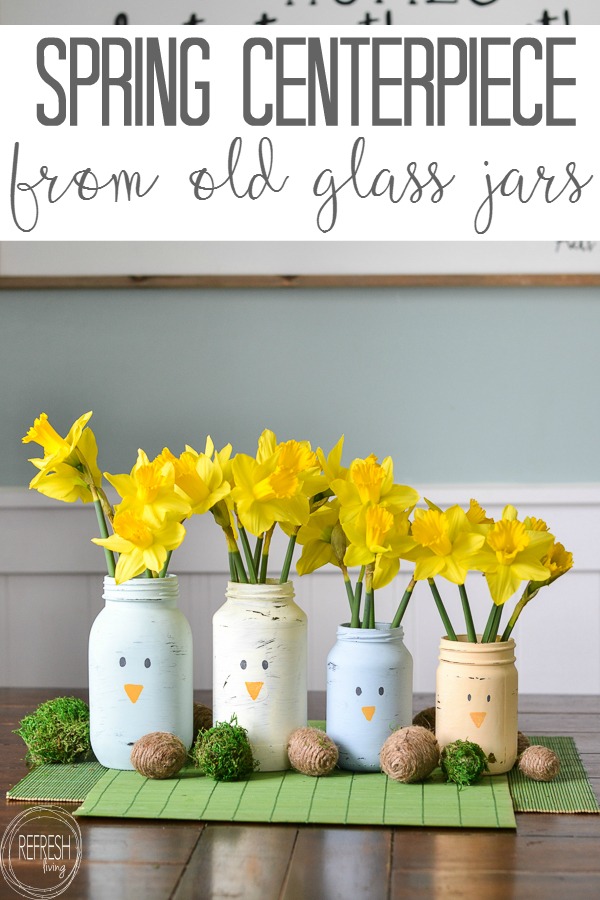
DIY Spring Centerpiece from Old Glass Jars
Chalk paint will always stick to glass, but it’s not washable. However, this chalk paint is permanent so that the jars can be washed! I reused some old glass jars and this washable glass paint to make adorable DIY spring decorations.
If you’ve been around here for any length of time, you know that I love to reuse items and create unique and inexpensive items to decorate our home. I love finding ways to reuse old food jars instead of throwing them in the recycling bin. I’ve used them to make easy bathroom storage jars and dry goods storage jars in my pantry.
This spring, I used some of my old glass jars from my stash in the basement to make these cute little chalk painted jars. I also found the BEST paint to use on glass jars that will not wash off AND gives a chalky finish.

I started with some glass jars in different sizes. You can see the labels were not cooperating, but thankfully I’ve figured out the best way to remove labels from glass jars.
After the labels were removed, I ran them through the dishwasher, and then cleaned them off with rubbing alcohol. Anytime you paint glass, a good wipe-down with rubbing alcohol right before you paint is the way to go.
After completely cleaning the jars, it was time to get painting!
DecoArt provided me with the paint to try out for this project. All opinions are my own. Just know I simply wouldn’t recommend a product I don’t love!
Can I Use Chalk Paint on Glass?
Regular chalk paint can be used on glass, but the jars cannot get wet and definitely can’t be washed. But, this Chalky Finish for Glass paint by DecoArt is different. It is permanent on glass and the jars can easily be washed and even put in the dishwasher on the top shelf. Finally, a chalk paint that can be used on glass that won’t wash off!
I mixed a little of the white paint with each of the colors to get more muted shades to paint on the jars. Then, I used a regular paint brush to paint a coat onto each of the jars. If you’ve ever painted on glass before with most types of glass paint, you know that you often need to do multiple coats for it to cover correctly. This paint is different: one coat of paint is all you need!
After the based coat was dry, I used orange and black to paint on the beaks and eyes.
How to Cure the Jars (so they can be later washed)
Once painted, the jars need to dry for four days (according to the directions on the back) if you want them to be dishwasher safe in the end. After this four-day drying period, I used 220 grit sandpaper to distress the jars slightly.
After drying, I placed them in a cool oven, set the temperature to 325 degrees, and let them bake at that temperature for 30 minutes. At the end of the baking time, I turned off the oven, opened the door a crack, and let the jars cool in the oven. (I was obviously working on another project at the same time as this one, hence all the painted mason jars!)
After the jars cool completely in the oven, they are ready to be used and can be hand-washed or washed in the dishwasher on the top rack. I’ve used this same paint on jars in my bathroom that we use to store toothbrushes and toothpaste. Obviously, these jars get pretty gross! I’ve washed them multiple times and the paint is still holding up perfectly. This paint and this during method really do work!
As for these DIY spring vases, these little birdies are just the beginning! You could paint bunny faces, or go a whole other route for different seasons. Hate cute little animals? Ditch the faces all together!
And just now, as I added this last picture, did I remember I wanted to wrap twine around the top of each vase! Oops. Do you know how much cuter that would look?
If you have a old glass jar stash in your basement like me, you’ll want to check out these other posts using reused glass food jars!
A few other spring projects:
Post by Jenny Leads
Jenny is the voice behind Refresh Living. She has a passion for helping people to create a home they love without spending a lot of money.
Ooo that looks very nice! Thanks Jenny =)
Thanks so much, Emmy!
Do you seal after baking them? I want to apply vinyl on them after they are baked.
Hi Charlene. I did not seal them after baking, but you definitely could. ModPodge makes a clear dishwasher safe sealer that I really like!
found your post on Smell Good Sunday. I enjoyed my visit today and will be back again. This idea of creating decor using old glass jars is something that interest me. My dad always had glass jars around and while some of them are old and unusual others are just old jars. I am always looking for something to use the jars for thanks for sharing this great idea
come over and visit us at http://shopannies.blogspot.com
This is the cutest! I’m not that crafty, but my daughter is, and she’s always looking for projects for the two of us to do together. I can’t wait to try this with her, and I love the idea about bunny faces too. Thanks so much for sharing 🙂
These are so adorable! The colors are perfect for spring time. I love them and your tutorial is great! Thanks for sharing at Snickerdoodle. This was our most clicked from the last party and it will be featured in my party reminder email and all of the party co-hosts will be featuring it at today’s party. Hope to see you there!
Love the colors & adorable faces. Thanks for sharing this at the Inspiration Spotlight party. Pinned & sharing. See you again soon.
I have found using WD 40 to remove labels after soaking in hot soapy water!
trbenton0362@yahoo.com
I diffently going to try this paint on my jars????
Thanks for the tip, Tina! I’ll have to give that a try.
I want to add cute wording made on cricut. do I add after cooling in the oven or before
Hi Diana! I would suggest adding the lettering after they have been removed and completely cooled from the oven. Cricut vinyl should stick well to the painted surface!
So the jars are ok to be put in the oven? I don’t want them to break in the oven.
Hi Shelley! Yes, it’s safe to put them into the oven. Just put them into a cool oven and bring them up to temp inside. Same goes at the end. Turn off the oven and let the jars cool inside. This slower change in temperature prevents breakage!