
DIY Snowflake Decorations (from Toilet Paper Rolls!)
Reuse old toilet paper rolls this holiday season to make inexpensive, but also beautiful, DIY snowflake decorations.
These toilet paper roll snowflakes are easy to make and can be customized in different ways. They can be hung on your tree as snowflake ornaments, from a mantle or shelf, or on picture frames, walls or windows throughout your home
Toilet paper roll snowflakes are also a great handmade gift idea for students or older kids to give to their parents or loved ones. I’ve created these DIY snowflakes with my 5th, 6th, 7th and 8th graders over the last several years. If you’re looking for an inexpensive holiday craft to do with your students in the classroom, this project might be the perfect fit!
In this post you’ll find a video tutorial, variations on how to make snowflake ornaments, and a few different design ideas!
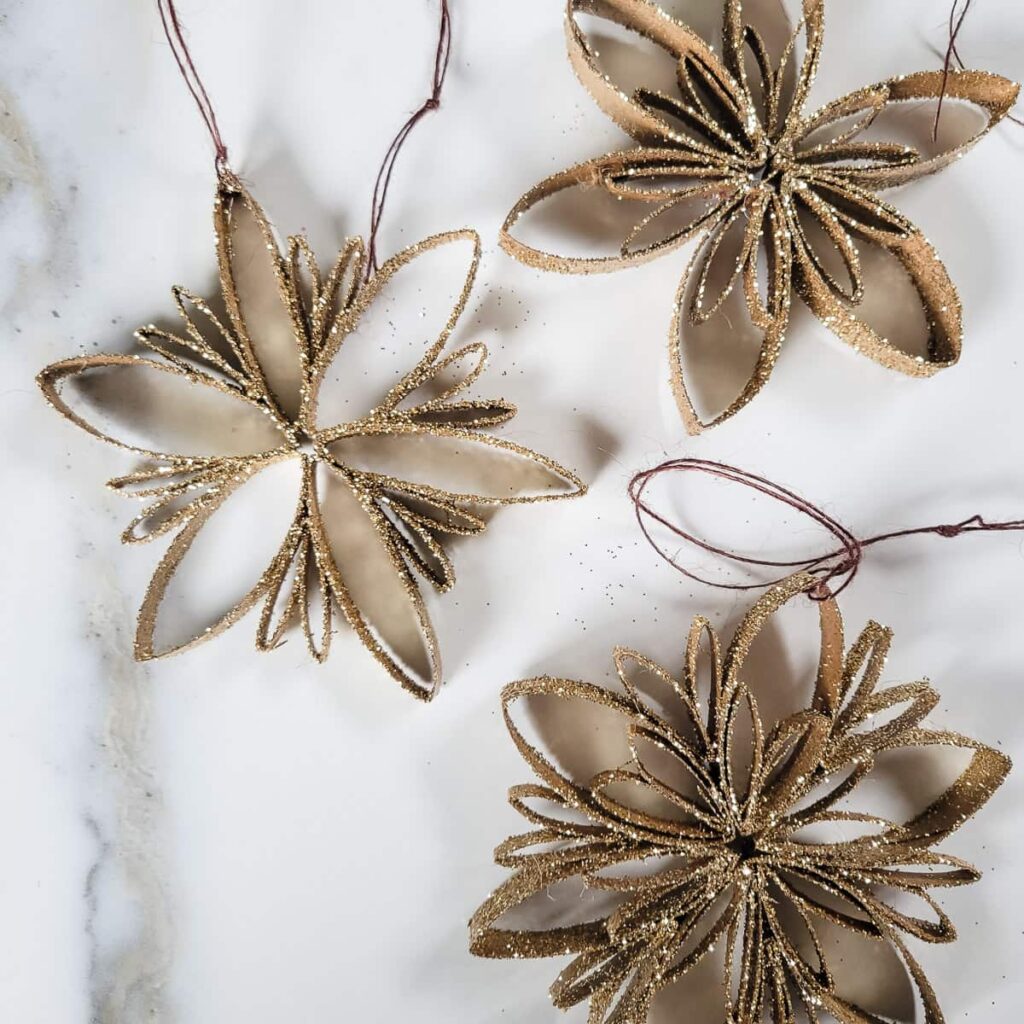
Although these snowflakes are extremely inexpensive to make, they end up looking like beautiful, sparkling pieces of art! Plus, they can stay up as decorations well past Christmas as winter decorations.

I’m a huge fan of decorating for holidays, including Christmas, without buying new. There are so many ways to upcycle old items to be used for recycled Christmas decor!
I’ve also made a modern, DIY Christmas village from thrift store finds, reused old old sweaters to make sweater Christmas trees and upcycled an old nativity set with an antique mirror finish. You’ll find these projects and more at the end of this post.
Supplies to Make Snowflake Ornaments
This post contains affiliate links. You can read my full disclosure policy here.
- toilet paper roll (or paper towel roll)
- hot glue or double sided glue dots
- white glue or spray adhesive
- glitter (glass glitter looks especially pretty on these!)
- twine for hanging
How to Create the Snowflake Shape
1. Cut Toilet Paper Rolls
The first step is to collect up some empty toilet paper rolls or paper towel tubes. One toilet paper tube will make one snowflake.
Next, crease the tube down flat, and cut it into 6 strips about 3/8 inch thick. Then, use the leftover amount of tube to cut 6 thin strips, about 1/4 inch thick.
2. Arrange pieces into a snowflake shape
Take the 6 thicker pieces of the tube and arrange them together in a snowflake shape. Use hot glue or double sided glue dots to glue the points of the tube to one another near the center.
White glue does not work as well for this step, as you need to hold together each piece and allow it to dry before moving on to glue the next piece. (I made the mistake of giving 6th graders tacky glue for this step. I had a lot of kids give up halfway through because they were sick of holding it together to dry!)
Snowflake Design Ideas
Snowflake Design 1
Take the thin tubes and fold them in half. Then, glue those folded pieces to the inside of each tube ring. (You can apply the glitter to the small pieces before gluing them in for great glitter coverage. Or, apply glitter to the whole snowflake at once a the end.)
Snowflake Design 2
Glue the small folded pieces to the outside of each tube ring, forming points on the outside of the snowflake.
Snowflake Design 3
You’ll need an extra toilet paper roll for this, but you can also glue the small folded pieces to both parts of the snowflake as well!
As you can probably see, you can continue to add large pieces or pieces folded in half to extend the design to make large snowflakes.
3. Add Paint and/or Glitter to the Snowflake
You can customize the look of your snowflake ornament by painting the toilet paper rolls or applying the glitter in different ways.
Paint the Tube First
If you want to give the toilet paper roll some color, you’ll want to paint it before adding the glitter. I spray painted one in white and one in black to try out different looks, but you could use any color of any type of paint here to completely customize the look.
Add Glitter with White Glue
If you’re looking for a ton of sparkle on your snowflake, I’d recommend using white glue.
The only downfall with this method is that it’s difficult to get the glue into all of the grooves and on both the inside and outside of the flake. It’s possible, just a bit messy. I found it helpful to add the glitter to the small folded pieces first, before gluing them to the large snowflake.
If you wanted to add glitter to the inside of the snowflake, you’ll want to do that before gluing in the small folded pieces.
Add Glitter with Spray Adhesive
This method for applying the glitter is much faster than using white glue. After gluing together all the pieces of your snowflake, simply spray it with spray adhesive.
This allows you to easily apply glue in any area of the snowflake. Then, add glitter and let dry.
The downside to using spray adhesive is that I’ve found the glitter doesn’t stick quite as well as compared to white glue.
If you’re going to be moving these around a lot or in a place where they will be touched often, I’d recommend using white glue. If you’re just hanging them for display, spray adhesive will work just fine.
4. Tie with String or Twine
Use ribbon, jute twine, or any other strong to form a loop for hanging.
Tips for Making this Holiday Craft in the Classroom
This DIY holiday craft would be perfect for classrooms with older students. Upper elementary students, middle school students and high school students should be able to easily create these snowflakes (without making a massive mess of glitter, in most cases).
Here are a few tips I’ve found help to make this classroom Christmas craft a success:
- Use double sided glue dots (unless you have access to a decent amount of hot glue guns!)
- If you’re having students paint their snowflakes, have them assemble and paint on the first day. Then, on a second day have them add the glitter.
- I’ve only had students use white glue to attach the glitter. They’ve come up with some cool variations of colorful glitter!
- Make a glitter station (a couple of desks pushed together with a plastic tablecloth on top). Have all the students apply the glue at their seats, and then go to the glitter station to add the glitter.
- Put a large drop cloth or table cloth on the ground to catch all the glitter that will inevitably get on the ground. Your custodian will thank you!
- You could have students glue a small picture of themselves in the middle to give as a gift (although middle schoolers will not like this idea)!
You could use these as DIY ornaments, make a garland out of them, hang them in your windows, or use them as little stocking ornaments. I may try to make a full wreath with them this year!
Let me know if you make these in the comments below. Feel free to share your tips or other variations to create unique designs.
Even More DIY Christmas Decorations
Post by Jenny Leads
Jenny is the voice behind Refresh Living. She has a passion for helping people to create a home they love without spending a lot of money.
So cute! What a easy project to do with kids too! Great idea!!
Lindi @ http://www.lovecreatecelebrate.com
Thanks! A lot of kids are already excited about making them next week!
OK, these are great! I love them! We would love to have you share them at our link up party Found & Foraged this Friday at 8PM Central Time (normally it starts on Saturday at 8PM, but this week only it starts on Friday). I hope you can make it over to http://houseofhipsters.com/
Thanks – I’ll make sure to check it out. 🙂
Jenny I love your toilet paper snowflakes – so pretty. I plan on making a few to add to my holiday decor next year. I’ve pinned it to our DIY Sunday Showcase Talent Board.
http://www.pinterest.com/pinkwhen/diy-sunday-showcase-talent/
Marie@The Interior Frugalista
Thank you! They are so easy to make – such a quick way to update holiday decor!
I LOVE these, Jenny!! I chose them as one of our features from our Get Your DIY On party! That will go live Sunday…who knew tp rolls could look so fabulous?? Pinning and sharing! XO
Thanks, Christy!! It was pretty awesome to see how great the kids’ snowflakes turned out at well – all with a silly TP tube and glitter!
Love the sparkly sparkly!! What a great way to upcycle tp rolls! Love this and appreciate the tute 🙂 Thanks for linking to the creative craft challenge!
These are fantastic! I love simple crafts and have a tendency to stock toilet rolls for this exact type of thing. Pinning for future reference. Stopping by from the Craft Challenge Creative Link Up Party
I just love when pretty meets frugal! These turned out amazing and totally don’t look like they came from a TP tube. Great job!
Very cute! Thanks for linking up to Merry Monday! Pinned! Have a great week!
Kim
I made this and they are very adorable. One suggestion though. Try putting a little bell in the center. Fills in that hole and really sets the whole thing off.
Great idea! Thanks for the suggestion Susan.
Just found this upcycle craft and love it. Started to make it and just wonder about the bigger snowflake. It reads “next, crease the tube down flat, and cut 6 strips about half and inch thick.” Okay, I have to ask, this does mean 1 1/2″ thick, correct? It seemed rather big to me for the base of the snowflake and just want to confirm. Looking forward to making these, thank you!
Hi! Thanks for the question, and it made me notice that I typed that instruction incorrectly. It should say to cut the strips about a half (1/2) inch thick. Yes, I think 1 1/2 would be a little too thick too! Thanks for the question – I’m off to change that in the post now.