
How to Install a Plank Wall – DIY Tutorial
Adding a DIY wood plank wall, also known as a shiplap wall, is an easy way to add a focal point to a room. Plank walls can be stained, whitewashed or painted and will completely change the look of a room.
This tutorial will give you step by step instructions on how to install a DIY wood accent wall.
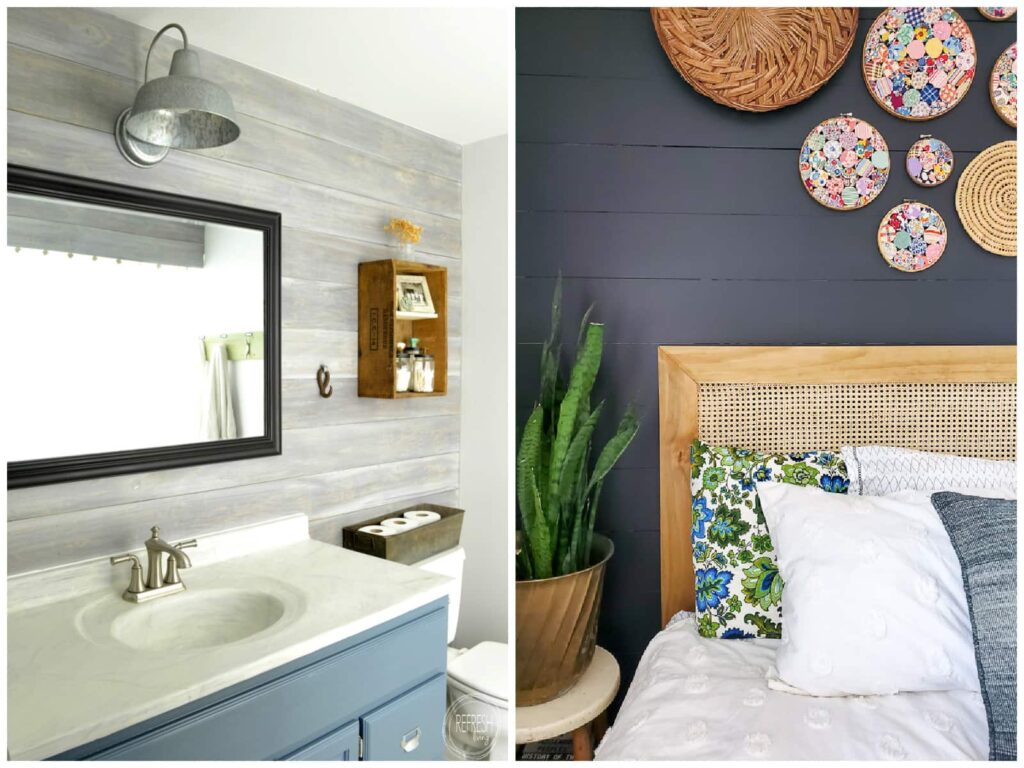
I created a whitewash plank wall in my bathroom makeover and a black painted shiplap wall in my master bedroom makeover.
There are many different options when purchasing wood for a DIY plank wall, but to save money, I usually use 1/4″ plywood to create the look of a shiplap wall without the cost of thicker wood panels.
The steps in this post can be used to install a plywood plank wall, but the same process is used for prefinished planks or reclaimed wood.
This post contains affiliate links. Feel free to read my full disclosure policy here.
Supplies Needed to Install a Plank Wall
- Wood planks (different options described below)
- stud finder with metal detection
- Brad nail gun (I love my Ryobi Airstrike – one of my all-time favorite tools!)
- 2 inch, 18 gauge brad nails
- miter saw, table saw (or rip cut with a circular saw) and a jigsaw
- construction adhesive (optional)
- wood filler (optional)
- Outlet extender box (if your planks are thick)
Step by Step Tutorial
Follow this installation process to easily cover any wall in your home with wood planks.
1. Choose the wall plank material
There are SO many options when it comes to deciding on a material to use to create a plank wall. All home improvement stores now sell prefinished planks or interlocking shiplap, as well as unfinished boards that can easily be used to create your own plank wall.
Specialty companies have peel and stick wood plank walls (like Stikwood) or custom created stained wood or even vinyl boards to create a full shiplap wall.
You can also find reclaimed wood or barn wood to make a unique plank wall that reuses beautiful old wood instead of buying new.
I reused old beadboard from a torn down dairy barn to create the beadboard ceiling in our lake house bathroom. Although it’s not a wall, planking the ceiling is still a cool way to add wood to a room!

For my DIY plank walls, I decided to use the most budget-friendly option – 1/4″ plywood panels. Plywood is sold in grades and with different veneer species. For a plank wall, it’s best to choose a sanded plywood. If you’re planning to stain or whitewash the wood, a birch plywood might be the best option because it has more natural woodgrain.
Or, if you don’t want to install individual planks, you can also purchase shiplap wall panels which create the look of planks in far less time! Read a full tutorial on how to add shiplap paneling to update the look of a room.
2. Measure the wall and purchase wood
Measure the width and height of the wall to determine square footage. If you’re purchasing pre-cut planks, most manufacturers will list how much area each box of planks will cover. Add 10% to your calculations to account for cuts and scraps.
Plywood boards are sold in 4′ x 8′ sheets. Smaller sizes are also available, but not ideal for a planked wall because you’ll have so many seams across the wall.
Each 4′ x 8′ sheet will need to be ripped down into 6″ strips. (or less if you want thinner planks). In the past, my Home Depot will rip down a sheet of plywood into 12″ planks, but they won’t cut it any thinner. At home, I ripped down the last cut of each board to make it 6″. It might be worth asking your local store if they’ll do the cutting for you!
3. Stain or seal wood prior to installing
If you are planning to stain, whitewash or use a clearcoat finish over your paneling planks, I recommend doing so before installation. These materials are very thin, and it’s much easier to apply them when the plank is horizontal as opposed to vertical.
I used the paint technique to whitewash my plywood panels in the bathroom shiplap wall prior to installation. Here’s a full post on four different ways to whitewash wood. Any of these techniques could be used to create a plank wall with whitewash look.
For the plank wall in my master bedroom, I hung the boards first and then primed and painted them once they were on the wall.
(Note: If you paint the planks after installation, it will be difficult to paint in the gaps. So, if you want the thin edges of the boards to match the paint color, you’ll need to paint the planks separately before installation.)
4. Mark wall with level lines and stud lines
Use a level placed to the top of the wall to mark a level line across the top of the wall. You can also mark this level line with a chalk line, if you have access to that tool. Often (or at least in my house), ceilings aren’t 100% level, so this line will keep things horizonal.
Then, use a stud finder to mark the studs in the wall. If you’ll be nailing into a wall that has water access in it, I recommend using a stud finder with metal detection. This will alert you of any pipes in the wall. (I learned the hard way on this tip when installing a plank wall in a bathroom!)
I like to use a pencil to mark where the wall studs are, all the way down the wall. I’ve also used a piece of painter’s tape marked at the ceiling, but sometimes it can be hard to follow this all the down vertically by just eyeballing it.
5. Attach first row of planks to the wall
For the first row, start at the top, left hand corner of the wall. Install a full board even with the level line you marked. (Using a long first board helps to start with the straightest line.)
You may notice slight gaps between the wood plank and the ceiling, or none at all. In the end, these gaps will not be noticeable or can also be hidden with a piece of quarter round or a top trim board.
Use a brad nail gun with 2 inch nails to attach the plank to the wall, placing two nails into each stud. If you’re using 1/4 plywood, make sure your nail depth is set to a lower depth, as you don’t want the small finishing nail to go right through the thin wood!
You can choose to use construction adhesive like Liquid Nails on the back of each plank to help them adhere to the wall. Personally, I’ve found this isn’t really necessary (and creates a mess if you want to remove the planks later). Nailing two brad nails into every stud has worked fine on the plank walls I’ve installed. Those boards are holding strong and it’s been over 7 years!
6. Install remaining rows across entire wall
To install the next row, leave a small gap between the first row of boards. A nickel is the perfect thickness to use to space the planks. Actually, the nickname for this type of shiplap is nickel gap shiplap!
Continue installing the boards from left to right. If your wall is wider than 8 feet, you will need to cut the second piece in each row. Be sure to use a staggered pattern rather than having all the joints in the same place on the wall.
You may need to cut holes and notches for windows, electrical outlets or other fixtures. A jigsaw works great for these smaller cuts.
On the bottom row, you may need to rip that board down to fit. Also, this is where some gaps or differences may be present between the bottom of the wall and the floor. It’s easy to cover these gaps in the paneling with new baseboards!
7. (Optional) Fill in holes, prime and paint
If you’re planning to paint your plank wall, you can fill in nail holes and the places where the boards meet to create a cleaner look. Or, feel free to keep these visible for a more rustic look.
When I choose to stain or whitewash a plank wall, I leave the nail holes and joints visible. If I’m painting, I usually fill the holes and seams, but it’s definitely not necessary.
Lightly sand the wood filler after it dries for the smoothest finish.
At this point, it’s time to prime and then paint the wall. Primer is a necessary step to seal in the wood tannins that might otherwise bleed through lighter colored paint.
Use a shellac-based primer to ensure none of the wood or knots bleed through the paint. (This post on the best primer for furniture describes shellac primer in more detail.)
This wood plank accent wall project is such a DIY-friendly project that looks just like the shiplap or planked wall kits, but for far less!
Of course, you can also create a vertical plank feature wall in the same way!
Thanks for reading! I hope you found it helpful for your next project. Feel free to leave any comments or questions below.
Post by Jenny Leads
Jenny is the voice behind Refresh Living. She has a passion for helping people to create a home they love without spending a lot of money.
What color did you take?
Beautiful! I would love to do that to a wall in our house. The gray and white look of the whitewashed planks would be perfect!
Oh thanks so much! I was a little worried the gray would make the room look darker than I wanted, but I think it works with the other light elements.
I love the wall!! I’ve been looking for a way to cover the former owner’s terrible paint job and rough walls In my bathroom. This is it! Thank you for sharing and the easy whitewashing instructions!
I’m so glad it was helpful. Good luck on your wall!
Oh my goodness! I want to do this to our boys’ bathroom! Such an awesome look!
Thanks so much for sharing your creativity at The DIY Collective this week! Please come back next week to show off your latest project!
Have an awesome week!
~ Ashley
Thanks Ashley! It’s an easy update – you should add one to your boys’ bathroom!
Hello cute lady! Just stopping by to let you know that your plank wall will be featured at our party that starts tonight at 7pm. Pinned and tweeted. Thank you for sharing this with us and we hope to see you tonight! Lou Lou Girls
Thanks so much! 🙂
Love your new wall! Great tutorial, as well. Thanks so much for sharing! Cynthia
Aw, thanks Cynthia!
This is an amazing idea! Thanks for sharing. Hi, I’m Anita visiting from Creative Ways Link Party.
Thanks Anita!
I love this look! It’s taking us forever to remodel our bathroom, but something like this would look great in there. Pinning this.
Great! Plus, it really didn’t take too much time. Thanks for pinning!!
Just Wow! It looks really great! I love the blue vanity and that light as well.
Thank you so much for sharing at the Create – Share – Inspire link party. I hope that you will be by again this evening. Thanks!
Wow! pretty impressive that it is actually plywood! I never would have guessed! With it cut into strips and the grain, it is very believable looking planks. Well done!
Thanks, Liz. It’s fun to find things that look better than they actually are – like plywood! 😉
I absolutely LOVE this! I’ve chosen it as my favorite link from Link Party Palooza, and we are going to feature it on all of our sites this Friday! Thanks for linking up!
xoxoxo,
Stephanie
I’m so glad you like it, Stephanie! I’m so excited to be featured this Friday! 🙂 Thank you!!
Can you tell me the color of the stain you used
Hi Anne – Everything you should need to know about how I got to the color I did for the wall is in this post: https://refreshliving.us/2016/01/the-best-way-to-whitewash-wood.html Let me know if you have any questions!
It looks great! How did you get the horizontal spacing between the planks?
Hi! Thanks for your question. I used a quarter and put it in between the boards before I nailed the next board in. I will admit, sometimes I just eyeball too, though and it seems to work!
Hi Jenny,
I am using white pine car siding for my new office building (small). I want the walls to have more gray/wood/white distressed look. I love the shiplap wall you did for your bathroom. What paint, stain, method should I do for that look on the white pine?
I want to make my ceilings lighter because the ceiling is only 8ft tall. Any suggestions? I plan to use the side of the board that has a beadboard look for the ceiling and the flat side for the walls.
Your work is amazing and I would love to have your advice!! Thank you for your time.
Hi Brittnie. I’m sorry for my delay in responding to this message. I used a gray stain on pine (no sealer) and then applied a diluted white paint over that to create a whitewash. Then, I sealed it with a clear water-based polyurethane. Best of luck on your project!