
How to Hang Oars on a Wall (DIY Leather Hooks)
An easy way to hang oars or paddles on the wall is to use leather strips that attach to the wall with brass screws. Hanging oars on the wall with leather hooks gives a finished, decorative look for hanging and allows you to display vintage oars or paddles which is perfect for lake house or beach decor!
In this step by step tutorial post, you’ll learn how to make your own leather hooks to hang oars horizontally on the wall. If you’re looking to hang your oars vertically, check out these hangers. Or, if you want to hang your oars in an X shape, this post will be helpful. I’ll also share my favorite leather oar hangers that are most similar to the version I made if you prefer to buy instead of DIY.
In This post You’ll find:
- Supplies Needed to Make Hanging Brackets For Oars
- How to Hang Oars on Walls
I’ve been working for years renovating our small lake house cottage, tackling DIY projects over the weekends we are up there and slowly collecting vintage decor to use in the rooms. Our cottage is on a small lake in Wisconsin, so I’m always on the lookout for vintage lake and camp decor.
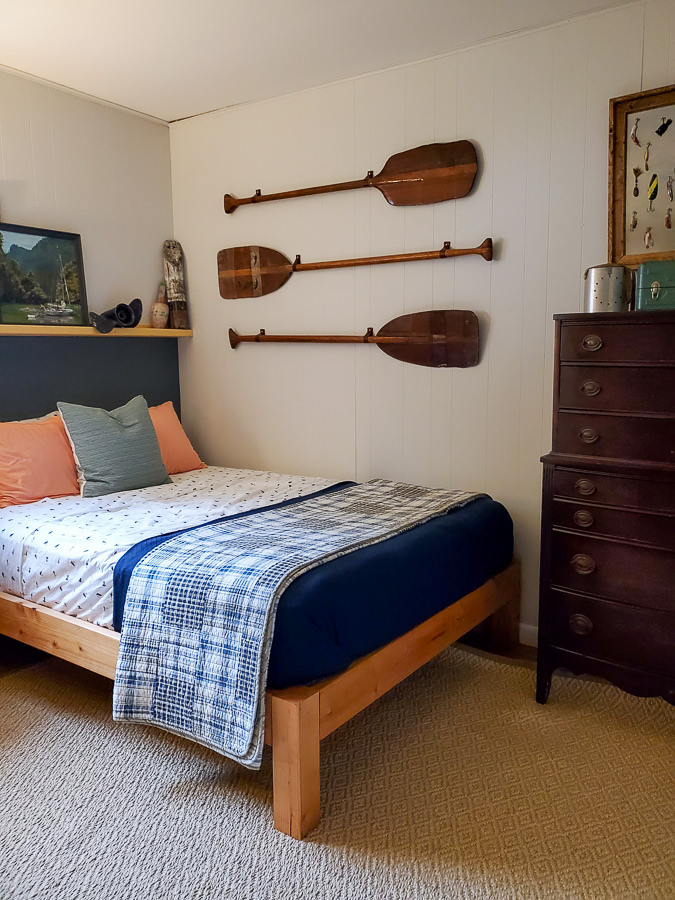
I searched for vintage oars at the right price for years, but kept coming up with expensive or ugly options. When these beauties were still there on the last day of an estate sale in my town, I snagged them up for half off and paid $30 for all three!
Update: Five years later, I don’t think I would stand a chance ever finding these types of oars for $10 each. I’m a extreme thrifter and can usually find really great deals, but I’m calling that one impossible in the year 2023!
If you’re lucky enough to have vintage oars in your garage or stumble upon them at a flea market or other second hand sale, snag them up and then hang them up! Here’s an easy way to hang oars on the wall that still looks pretty.
When I first wrote this post, these types of hooks weren’t available for purchase online, but since writing this post a few years ago, there are a couple of similar versions now available on Etsy and Amazon. If you prefer to buy instead of DIY, here are a few options. You can even customize the color of the screw cap or buy colored leather straps instead of brown!
- Leather Paddle Hanger (for hanging oars horizontally on the wall – very similar to my DIY version in this post)
- Vertical Leather Paddle Hanger (for hanging oars vertically up and down on the wall)
- Pack of 12 Leather Hangers (budget friendly option that is sold as a set rather than individually)
Supplies Needed to Make Hanging Brackets For Oars
- 12 x 12 sheet of leather
- #8 brass screw with slotted, rounded head
- Drywall anchors (if you are unable to drill into studs)
- Drill bit and drill
How to Hang Oars on Wall
1. Make the bracket by cutting leather strips

The first step is to cut the sheet of leather into strips about 1″-2″ thick, depending on how thick you’d like the brackets to be. This is a decision based on the look you are going for and how big your oars are. Cut a strip and wrap it around the oar to visual the thickness.
After cutting the strips, use scissors to cut a point at one end of each piece. This will give the bracket a more finished look. You could also place the folded part of the bracket at the back of the hanger (touching the wall) if you don’t like the look of the folded part in the front.
2. Drill holes in the leather for screws to pass through
Next, drill a hole in the center of the triangle end of the bracket that is big enough for the screw to fit through but not big enough for the screw head to pass through. I used a 3/16″ drill bit, but any size close to this size should work. It will definitely depend on the exact size of screw you use as well. Note – if you pick too small of a drill bit, the hole won’t be big enough for the screw to pass through and it will eat up the leather as it tries to go through the hole.
Then, wrap the piece of leather around the oar. Use the pre-drilled hole to mark the places where you will need to drill holes through the other two layers of the loop. (One hole will be right behind the decorative fold and the second hole will be at the back of the bracket against the wall.
After drilling the holes in one leather bracket, use that piece as a template to mark where the holes need to be drilled on the other pieces of leather.
3. Screw brackets into the wall
To attach the hooks to the wall, you’ll want an extra pair of hands to hold up the other side of the oar while you screw the bracket into the wall. First, fold the strip around the oar and hold the oar in the place where you want to hand it. Have someone else hold up the other end and then mark on the wall through the holes in the leather where it will be hung.
If drilling into drywall
Drill a hole into the wall at the mark, large enough for your wall anchor to fit into. Push the wall anchor into the hole, and then screw the decorative screw through your leather bracket and into the wall hanger.
If drilling into studs (or paneling, like in my case)
Predrill a pilot hole (smaller than your screw) into the wall at the mark. This will help the screw to easily work its way into the hole without ruining the bracket. Use a screwdrive to screw the decorative screw through the leather bracket and into the pilot hole in the wall.
At this point, you probably only have one bracket installed, so your helper will still be an essential part of this installation as they are continuing to hold up the oar until the second bracket is installed. Use this time to adjust the placement, ensuring its level. Then, repeat this same process for the second bracket – marking the spot in which you will attach the screw.
4. Admire the vintage oars on the wall!
I love vintage items, so whenever I can reuse a beautifully made piece and find a place for it in my home, even if it’s in a unique way, it feels more special than buying some factory made decoration.
These paddles are one of my favorite decorations at our lake house. They give interest to the entire wall and are seriously gorgeous works on craftsmanship from many years ago. In fact, I think this entire bedroom might be my favorite room in the house because all of the vintage lake items I was able to find and use in the room.
All in all, the brackets cost me only a couple of bucks for a handful of screws, because I used leather left over from a couch cushion repair I had to make.
And here’s how they look across the wall. My three year old was quite upset that the middle one was facing a different way than the others, but you can’t please everyone, right?
Here’s a full look at our budget friendly lake house renovation full of DIY projects!
A few more of my lake house projects…
Post by Jenny Leads
Jenny is the voice behind Refresh Living. She has a passion for helping people to create a home they love without spending a lot of money.
Nice idea. The leather adds to the vintage oars much better that a hook bought at the hardware store. Thanks.
Thank you! I’m glad you like it.